๐Ÿงถ Beautiful โœจ Detailed ๐Ÿ’ Adorable

Adorable Little Mussel Amigurumi Pattern

Adorable Little Mussel Amigurumi Pattern
4.4โ˜…Rating
2-3 HoursTime Needed
2.2KMade This
โœ‚๏ธ

Intermediate Level

Ideal for those with basic crocheting experience, featuring slightly more advanced stitches and techniques to expand your skills.

โฑ๏ธ

Quick Craft

Fits nicely into a free afternoon โ€” 2 to 5 hours of focused, enjoyable crocheting.

๐ŸŽ

Tiny Treasure

Small, sweet, and gift-worthy creations that fit perfectly in the palm of your hand with detailed charm.

About This Adorable Little Mussel Amigurumi Pattern

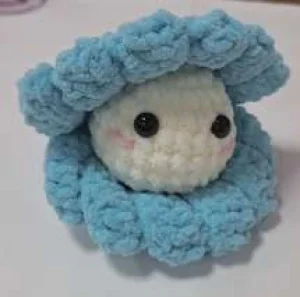
Adorable Little Mussel Amigurumi Pattern crochet pattern - detailed view

This sweet companion makes a lovely handmade gift for ocean enthusiasts or a unique addition to a baby's nursery. It is small enough to be a desk buddy but detailed enough to stand out in any amigurumi collection.

Why You'll Love This Adorable Little Mussel Amigurumi Pattern

I absolutely adore the way the shell hinges open! As a crafter, there is a special kind of satisfaction in seeing simple flat rows transform into a curved, 3D shape just by changing where you insert your hook. It is a quick win that looks much more complex than it actually is, and the moment you tuck that little pearl inside, the whole project just feels complete.

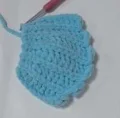
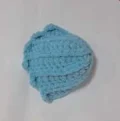
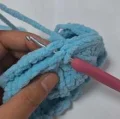
Adorable Little Mussel Amigurumi Pattern step 1 Adorable Little Mussel Amigurumi Pattern step 2 Adorable Little Mussel Amigurumi Pattern step 3 Adorable Little Mussel Amigurumi Pattern step 4

Switch Things Up

I remember the first time I tried a pattern like thisโ€”I was so worried about the shell shaping! But honestly, thereโ€™s something so meditative about working in the back loops to create those ridges. It really makes the piece come alive and feel like a real treasure from the tide pools. For my version, I ended up using a soft velvet yarn in a dusty lilac, and it gave the mussel such a premium, boutique feel that looked amazing on my bookshelf.

If you're feeling adventurous, try adding a tiny bit of blush to the pearlโ€™s cheeks with a real makeup brush and some powderโ€”it adds that extra layer of 'handmade with love' that you just can't get from a store. I also found that pinning the two shell halves together before doing the final slip stitch join helps keep the 'hinge' perfectly centered. Itโ€™s a quick project, but the result is so charming that youโ€™ll probably find yourself making a whole family of them in different shades of sea foam and sand. I canโ€™t wait to see the colors you choose for your little ocean treasures! Itโ€™s the perfect way to use up those leftover scraps of bulky yarn sitting in your stash.

Common Mistakes & How to Fix Them

โœ— Forgetting to work in the blo during the shell rows will result in a flat surface instead of the characteristic ridges that make it look like a real mussel.โœ— When working the shell, it is easy to miss the specific starting stitch instructions for even and odd rows, which will throw off the tapering shape of the edges.โœ— If you don't pull the gathering thread tightly enough in Row 12 of the shell, the base won't curve properly and the two halves won't sit flush when joined.โœ— Placing the safety eyes too high on the pearl can make the face look a bit unbalanced; aim for the space between rounds 4 and 5 to get that cute, chubby-cheeked look.

Adorable Little Mussel Amigurumi Pattern

There is something truly magical about the treasures we find at the shoreline, and this little mussel captures that seaside wonder perfectly. You are going to love how this project comes together, hiding a sweet little surprise inside a textured shell. It is a wonderful way to play with different yarn weights and textures while creating a gift that feels both thoughtful and whimsical. Get your favorite blue and white yarns ready, because you are about to make a tiny ocean friend that will bring a smile to anyone's face.

Intermediate 2-3 Hours

Materials Needed for Adorable Little Mussel Amigurumi Pattern

โ€” Main Fabric

  • 01
    Super Bulky (Category 6) yarn in a deep sea blue for the shell
  • 02
    Super Bulky (Category 6) yarn in a soft cream or white for the pearl
  • 03
    Small scrap of pink yarn or embroidery thread for the mouth and blush details

โ€” Tools Required

  • 01
    3.5mm (E) crochet hook
  • 02
    One pair of 8mm plastic safety eyes
  • 03
    High-quality polyester fiberfill stuffing
  • 04
    Stitch markers to keep track of your rounds
  • 05
    Large-eye sewing needle for assembly
  • 06
    Sharp scissors
  • 07
    Hot glue gun for securing small details if preferred

Progress Tracker

0% Complete

โ€” 1. The Pearl :

Round 1 :

Using your white yarn, create a mr and work 6 sc into it (6)

Round 2 :

Work 1 inc into every st around (12)

Round 3 :

Repeat the sequence of 1 sc followed by 1 inc 6 times (18)

Round 4 :

Repeat the sequence of 2 sc followed by 1 inc 6 times (24)

Round 5 :

Work 1 sc into every st around (24)

Round 6 :

Work 1 sc into every st around (24)

Round 7 :

Work 1 sc into every st around (24)

Round 8 :

Repeat the sequence of 2 sc followed by 1 dec 6 times (18)

Info :

At this point, insert your safety eyes between rounds 4 and 5, leaving about 5 sts of space between them. Stuff the piece firmly with fiberfill.

Round 9 :

Repeat the sequence of 1 sc followed by 1 dec 6 times (12)

Round 10 :

Work 6 dec to close the opening (6)

Info :

Fasten off and hide the yarn tail inside. Use pink thread to embroider a small 'v' or straight line for the mouth.

โ€” 2. The Seashell (Make 2) :

Info :

Use blue yarn. From Row 2 through Row 11, work every stitch in the blo to create the ribbed texture.

Row 1 :

ch 13, then starting in the second ch from the hook, work 7 dc, 1 hdc, 1 sc, and 2 sl st, then turn (11)

Row 2 :

ch 1, then starting in the 2nd st from the hook, work 11 sl st in the blo and turn (11)

Row 3 :

ch 3, then starting in the 3rd st from the hook, work 8 dc, 1 hdc, 1 sc, and 2 sl st in the blo, then turn (12)

Row 4 :

ch 1, then starting in the 2nd st from the hook, work 12 sl st in the blo and turn (12)

Row 5 :

ch 3, then starting in the 3rd st from the hook, work 9 dc, 1 hdc, 1 sc, and 2 sl st in the blo, then turn (13)

Row 6 :

ch 1, then starting in the 2nd st from the hook, work 13 sl st in the blo and turn (13)

Row 7 :

ch 2, then starting in the 3rd st from the hook, work 9 dc, 1 hdc, 1 sc, and 2 sl st in the blo, then turn (13)

Row 8 :

ch 1, then starting in the 2nd st from the hook, work 12 sl st in the blo and turn (12)

Row 9 :

ch 2, then starting in the 3rd st from the hook, work 8 dc, 1 hdc, 1 sc, and 2 sl st in the blo, then turn (12)

Row 10 :

ch 1, then starting in the 2nd st from the hook, work 11 sl st in the blo and turn (11)

Row 11 :

ch 2, then starting in the 3rd st from the hook, work 7 dc, 1 hdc, 1 sc, and 2 sl st in the blo (11)

Row 12 :

Using a sewing needle, weave through the loops at the base of the shell in three pairs (totaling 4 loops on your needle), then pull the thread through all of them to gather the piece into a single point.

โ€” 3. Joining the Shells :

Info :

Place your two shell pieces together with the wrong sides touching and the ridged sides facing out.

Step 1 :

Identify the center point at Row 12. Count back 7 sts along Row 11 to find your starting point for the join.

Step 2 :

Work 15 sl st through both layers to create the hinge: 7 sl st along Row 11, 1 sl st at the Row 12 center, and 7 sl st along Row 1.

Step 3 :

Fasten off and weave in all remaining ends securely.

Assembly Instructions

  • Place the safety eyes on the pearl between rounds 4 and 5, ensuring they are spaced 5 stitches apart before securing the backs.
  • Embroider a small pink mouth centered between the eyes to give your pearl its sweet personality.
  • After finishing the second shell, use the gathering technique in Row 12 to create the rounded base of each shell half.
  • Align the two shell pieces with the textured ridges facing outward and the gathered points touching.
  • Using your blue yarn, slip stitch the two halves together along the back edge for a total of 15 stitches to create a flexible hinge.
  • Check that the shell opens and closes smoothly before weaving in your final yarn tails.
  • Place the finished pearl inside the shell; you can leave it loose or use a small dab of hot glue to secure it in place.

Important Notes

  • ๐Ÿ’กUsing a smaller hook than usual for bulky yarn helps ensure the pearl's stuffing doesn't peek through the stitches.
  • ๐Ÿ’กThe seashell is worked flat in rows, but the use of BLO is vital for achieving the realistic 'ridged' look.
  • ๐Ÿ’กPay close attention to the turning chains at the start of each shell row, as they vary between 1, 2, and 3 chains to create the curve.
  • ๐Ÿ’กWhen stuffing the pearl, try to keep it as spherical as possible so it sits comfortably inside the shell halves.
  • ๐Ÿ’กIf your shell feels too floppy, you can try using a slightly smaller hook or tighter tension to give it more structure.

I really hope you enjoyed making this little mussel as much as I did! There is something so rewarding about finishing a project that has a hidden surprise inside. Whether you keep it on your desk for a bit of ocean inspiration or gift it to a friend who loves the sea, it is sure to be a conversation starter. Don't forget to share your finished photos with the communityโ€”I love seeing the different colors you all choose! Happy crocheting, and may your stitches always be even and your yarn never tangle! ๐Ÿงถโœจ๐Ÿš

You ask,

we answer.

FAQs

Can I use a lighter weight yarn like DK or Worsted for this?

Absolutely! Just keep in mind that using a thinner yarn will result in a much smaller mussel. You'll also need to downsize your hook (try a 2.5mm or 3.0mm) and use smaller safety eyes to keep the proportions correct.

My shell isn't curving correctly, what am I doing wrong?

The curve comes from the specific combination of dc, hdc, and sc in each row. Double-check that you are starting in the 2nd or 3rd stitch as specified for even and odd rows, as this 'steps' the height of the shell.

Should I sew the pearl into the shell?

That is totally up to you! If it's for a small child, I recommend sewing it in or using a bit of hot glue for safety. If it's for a display piece, leaving it loose makes it a fun interactive toy.

Why does the shell use slip stitches at the end of the rows?

Those slip stitches create the narrow 'hinge' part of the shell. By tapering down from double crochets to slip stitches, you create a natural wedge shape that allows the shell to fan out.