🧢 Beautiful ✨ Detailed πŸ’ Adorable

Baby Cthulhu Amigurumi Pattern

Baby Cthulhu Amigurumi Pattern
4.9β˜…Rating
3-5 HoursTime Needed
2.6KMade This
βœ‚οΈ

Intermediate Level

Ideal for those with basic crocheting experience, featuring slightly more advanced stitches and techniques to expand your skills.

⏱️

Quick Craft

Fits nicely into a free afternoon β€” 2 to 5 hours of focused, enjoyable crocheting.

πŸ₯

Charming Critter

Delightful animal designs with sweet details that capture the essence of your favorite woodland and farmyard friends.

About This Baby Cthulhu Amigurumi Pattern

Baby Cthulhu Amigurumi Pattern crochet pattern - detailed view

This pattern makes a fantastic gift for fantasy readers, gamers, or anyone who loves a bit of quirky home decor. It is quick enough to whip up in a single sitting and looks amazing in classic olive, deep teal, or even a soft lilac.

Why You'll Love This Baby Cthulhu Amigurumi Pattern

I am absolutely obsessed with how the face tentacles are worked directly onto the headβ€”it saves so much tedious sewing at the end! Plus, joining the legs to build the body in one piece is such a satisfying technique that gives him great stability.

Baby Cthulhu Amigurumi Pattern step 1 Baby Cthulhu Amigurumi Pattern step 2 Baby Cthulhu Amigurumi Pattern step 3 Baby Cthulhu Amigurumi Pattern step 4

Switch Things Up

Every time I sit down to design something a little bit spooky, I can't help but smile. Cthulhu is usually this terrifying, ancient creature from the depths, but in crochet form? He is just a little guy who needs a hug! When I was making my first prototype, I experimented with a few different shades of green, but I fell completely in love with this earthy camel tone. It gives him such a vintage, handcrafted look.

If you want to customize your little deep-sea buddy, try playing around with the wings! You could make them in a contrasting deep purple or even a sparkly black yarn to add some extra magic. For the tentacles, if you want them to curl a bit more, you can try adding two single crochets into each chain stitch on your way back down instead of just slip stitching. It gives them a lovely, bouncy spiral effect that looks incredibly lively. Whatever you choose, make him your own!

Common Mistakes & How to Fix Them

βœ— When working the face tentacles into the BLO of Rounds 20 and 21, make sure you do not accidentally pull your stitches too tight or the face will pucker and distort the head shape.βœ— If you lose track of your stitch counts during the leg-joining on Round 6 of the body, the legs might end up crookedβ€”double-check that you have exactly 42 stitches before moving on.βœ— Forgetting to leave the arms unstuffed will make them stick out awkwardly from the sides instead of resting flat against the body.βœ— Placing the safety eyes too close together can crowd the face tentacles, so be sure to count exactly 11 stitches between them on Rounds 18 and 19 before securing the backings.

Baby Cthulhu Amigurumi Pattern

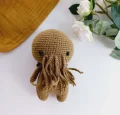
Bring a touch of myth and mystery to your crochet hook with this adorable little deep-sea deity. This pocket-sized Cthulhu is surprisingly cuddly, featuring a detailed set of face tentacles and tiny wings. You will love watching this legendary creature come to life stitch by stitch as you work up the seamless body and textured face details. It is the perfect weekend project to add some whimsical fantasy to your shelf!

Intermediate 3-5 Hours

Materials Needed for Baby Cthulhu Amigurumi Pattern

β€” Main Fabric

  • 01
    Alize Cotton Gold (approx. 50g) in Camel or Olive Green (Color 782) for the main body, head, and tentacles
  • 02
    Alize Cotton Gold (approx. 15g) in Dark Charcoal or Black (Color 60) for the wings

β€” Tools Required

  • 01
    2.00 mm crochet hook (or size needed to obtain a tight fabric)
  • 02
    One pair of 6 mm safety eyes
  • 03
    High-quality polyester fiberfill stuffing
  • 04
    Yarn needle for weaving in ends and assembly
  • 05
    Stitch markers to keep track of your rounds
  • 06
    Sharp embroidery scissors

Progress Tracker

0% Complete

β€” 1. Head :

Round 1 :

6 sc in mr (6)

Round 2 :

(inc) x6 (12)

Round 3 :

(sc, inc) x6 (18)

Round 4 :

(inc, 2 sc) x6 (24)

Round 5 :

(3 sc, inc) x6 (30)

Round 6 :

2 sc, inc, (4 sc, inc) x5, 2 sc (36)

Round 7 :

(5 sc, inc) x6 (42)

Round 8 :

3 sc, inc, (6 sc, inc) x5, 3 sc (48)

Round 9 :

(7 sc, inc) x6 (54)

Round 10 :

4 sc, inc, (8 sc, inc) x5, 4 sc (60)

Round 11 :

sc around (60)

Round 12 :

sc around (60)

Round 13 :

sc around (60)

Round 14 :

sc around (60)

Round 15 :

sc around (60)

Round 16 :

sc around (60)

Round 17 :

sc around (60)

Round 18 :

sc around (60)

Round 19 :

sc around (60)

Round 20 :

29 sc, BLO 9 sc, 22 sc (60)

Round 21 :

29 sc, BLO 9 sc, 22 sc (60)

Round 22 :

sc around (60)

Round 23 :

sc around (60)

Round 24 :

(3 sc, dec) x12 (48)

Round 25 :

(2 sc, dec) x12 (36)

Round 26 :

2 sc, dec, (4 sc, dec) x5, 2 sc (30)

Round 27 :

(3 sc, dec) x6 (24)

Round 28 :

sc around (24)

Info :

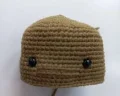
Insert the 6 mm safety eyes between Rounds 18 and 19, leaving a space of 11 stitches between them. Make sure they are centered relative to the BLO stitches on the front of the face.

Info :

To create the face texture, we will work into the front loops left open from Rounds 20 and 21. Join your yarn to the first front loop of Round 20. Sl st, ch 20, then sl st into the next front loop and ch 20. Repeat this sequence across both rows of BLO stitches for a total of 18 times to form the dense tentacle fringe.

Info :

For the longer tentacles, attach your yarn to the remaining BLO section, ch 25, and sl st back down the chain. Repeat this along the row to add the longer hanging tentacles.

β€” 2. Legs :

Round 1 :

7 sc in mr (7)

Round 2 :

(inc) x7 (14)

Round 3 :

sc around (14)

Round 4 :

sc around (14)

Round 5 :

sc around (14)

Info :

Fasten off and cut the yarn after completing the first leg. When finishing the second leg, do not cut the yarn; we will continue directly into the body from here.

β€” 3. Body :

Round 6 :

ch 4, connect to the first leg with a sc. Work 2 sc around the first leg, then repeat (inc, 5 sc) twice. Work along the joining chain: inc, 2 sc, inc. Continue onto the second leg: repeat (5 sc, inc) twice, followed by 2 sc. Finish by working 4 sc along the opposite side of the joining chain (42)

Round 7 :

(13 sc, inc) x3 (45)

Round 8 :

sc around (45)

Round 9 :

sc around (45)

Round 10 :

sc around (45)

Round 11 :

sc around (45)

Round 12 :

sc around (45)

Round 13 :

(13 sc, dec) x3 (42)

Round 14 :

sc around (42)

Round 15 :

sc around (42)

Round 16 :

sc around (42)

Round 17 :

(5 sc, dec) x6 (36)

Round 18 :

sc around (36)

Round 19 :

sc around (36)

Round 20 :

sc around (36)

Round 21 :

(4 sc, dec) x6 (30)

Round 22 :

sc around (30)

Round 23 :

sc around (30)

Round 24 :

sc around (30)

Round 25 :

(3 sc, dec) x6, sl st to join (24)

Info :

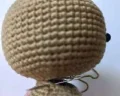
Fasten off, leaving a long tail for sewing. Stuff the body firmly with fiberfill.

β€” 4. Arms :

Round 1 :

6 sc in mr (6)

Round 2 :

(sc, inc) x3 (9)

Round 3 :

sc around (9)

Round 4 :

sc around (9)

Round 5 :

sc around (9)

Round 6 :

sc around (9)

Round 7 :

sc around (9)

Round 8 :

sc around (9)

Round 9 :

sc around (9)

Round 10 :

sc around (9)

Round 11 :

sc around (9)

Info :

Fasten off, leaving a tail for sewing. Do not stuff the arms.

β€” 5. Wings :

Row 1 :

ch 21, starting in second ch from hook work 20 sc, ch 1, turn (20)

Row 2 :

4 sl st, ch 6, 12 sc, ch 6, turn

Row 3 :

12 sc, ch 6, turn

Row 4 :

12 sc

Info :

Fasten off, leaving a long tail to attach the wings to the back of the body.

Assembly Instructions

  • Firmly stuff the body and the head with polyester fiberfill, ensuring they hold their round shapes well.
  • Align the head onto the open neck of the body, matching up the 24 stitches from the final rounds of both pieces.
  • Using the long yarn tail left from the body, sew the head and body together securely, adding extra stuffing to the neck before closing if needed.
  • Position the unstuffed arms on either side of the body, approximately 2 rounds below the neck join, and sew them flat against the sides.
  • Center the wings on the back of the body, aligning them horizontally, and sew them firmly in place using the yarn tail.

Important Notes

  • πŸ’‘Keep your stitch tension consistent and relatively tight to prevent the stuffing from showing through the stitches.
  • πŸ’‘Use a stitch marker to mark the beginning of each round, especially on the continuous rounds of the head and body.
  • πŸ’‘When working the face tentacles, take your time to locate the correct front loops so the face remains symmetrical.
  • πŸ’‘Ensure the safety eyes are fully secured with their backings before you begin the decreasing rounds on the head.

And there you have it! Your very own cute little cosmic companion is ready to take over the world (or just guard your bookshelf). I hope you had as much fun stitching up this little legend as I did designing him. Don't forget to share your finished photos with our crafting familyβ€”seeing your color choices absolutely makes my day! Keep those hooks busy and stay cozy! 🧢✨

You ask,

we answer.

FAQs

Can I use a different yarn weight like blanket yarn?

Absolutely! If you use a super bulky blanket yarn with a larger hook (like 5.0mm or 6.0mm), your Cthulhu will turn out much larger and incredibly squishy. Just make sure to scale up your safety eyes to around 12mm or 14mm so they don't get lost in the plush fabric.

How do I make sure the head doesn't wobble?

The key to a sturdy head is stuffing the neck area firmly. Right before you finish sewing the head to the body, push a bit of extra fiberfill into the gap to create a solid support column.

Is it hard to work the face tentacles?

Not at all! They are worked directly into the front loops we left unworked on the head. Just attach your yarn and follow the chain instructions. It takes a little patience but requires no sewing!

What if I don't want to use safety eyes?

No problem! You can easily embroider the eyes using a small scrap of black yarn or embroidery floss. This is actually a safer option if you are gifting this toy to a baby or toddler.