About This Canadian Maple Leaf Coaster Pattern
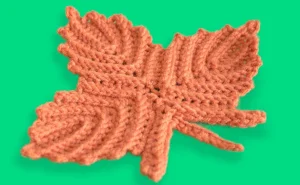
This makes a lovely housewarming gift for friends who appreciate handmade decor. It's also a great way to use up those scraps of orange, red, or gold yarn in your stash.
Ideal for those with basic crocheting experience, featuring slightly more advanced stitches and techniques to expand your skills.
Fits nicely into a free afternoon — 2 to 5 hours of focused, enjoyable crocheting.
A warm touch for your space that transforms ordinary corners into inviting nooks filled with handmade charm.
This makes a lovely housewarming gift for friends who appreciate handmade decor. It's also a great way to use up those scraps of orange, red, or gold yarn in your stash.
I love how the post stitches create those realistic ridges on the leaf surface. It's one of those projects where you feel like a true artist once the pieces finally come together and that classic silhouette emerges.


I remember the first time I tried to make a leaf that actually looked like a leaf. Most patterns were just flat circles with points, but this one? It's got soul. The way the post stitches mimic the natural veins of a maple leaf is just genius. I usually make a handful of these in different shades of rust, mustard, and deep burgundy every September. It's my favorite way to transition my home decor into the cooler months.
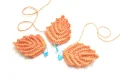
One thing I've found is that these make the most incredible bunting. Instead of using them as coasters, I string them along some twine with a few wooden beads in between. It instantly transforms my mantle for the season. If you're feeling extra creative, try using a variegated yarn that transitions between red and orange—it looks just like a leaf changing colors in the wild!
Just a little tip: when you're doing the stalk, take your time with the sc4tog. It can be a bit fiddly to get through all those loops, but it's what gives the center that nice, pinched shape. I've also found that using a slightly smaller hook than the yarn label suggests helps keep the stitches tight so the coaster doesn't let condensation seep through to your table. If you want to use these as appliqués on a hat or a scarf, try using a softer wool blend for a bit of extra warmth and texture. It really makes the ridges pop!
Bring a bit of autumn's magic into your home with this beautiful maple leaf project. It's thick enough to protect your tables as a coaster but delicate enough to stitch onto a cozy blanket or sweater as a decorative appliqué. You'll love seeing the realistic texture come to life as you work those post stitches—it's like watching the seasons change right in your hands.
You will need to create three of these small leaf pieces before moving on to the assembly stage.
ch 10
(RS) Start by placing 1 sc into the second chain from your hook. Continue with 1 sc in each of the next 7 chains. Work 5 sc into the very last chain to turn the corner, then crochet 1 sc in each of the 6 chains along the opposite side of your starting chain. Turn your work. (19)
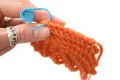
(WS) ch 1, which doesn't count as a stitch. Work 1 fpsc around the posts of the next 17 stitches. Turn. (17)
(RS) ch 1. Crochet 1 sc in each of the next 8 stitches. Work 5 sc into the next stitch to create the point, then finish with 1 sc in each of the next 6 stitches. Turn. (19)
(WS) Repeat the instructions for Row 2. (17)
(RS) Repeat the instructions for Row 3. (19)
(WS) Repeat the instructions for Row 2. (17)
(RS) Repeat the instructions for Row 3. (19)
(WS) Repeat the instructions for Row 2. (17)
Fasten off your yarn, making sure to leave a long tail for sewing later. Weave in the starting tail. Flip the piece over and place a marker in the 9th stitch counting back from the end of the row.
Lay your three finished leaf pieces side-by-side with the wrong sides facing you.
Position the leaves so that the markers you placed on the 9th stitches are touching in the center.
Using your tapestry needle and the long yarn tails, whip stitch the leaves together along the sides across 9 stitches.
Remove the markers from the left and right leaves as you sew, but keep the center marker in place for the stalk.
Secure your yarn and weave in the ends on the wrong side of the fabric.
Hold the joined leaf with the right side facing you and the center marker at the top. Join your yarn and ch 4.
(RS) Working across the top 9 stitches of the right leaf, sc in the first stitch, sc in the next 6, then sc2tog. Skip the stitch with the marker and remove it. Moving to the left leaf, sc2tog, sc in the next 7 stitches, then ch 5 and turn. (16 stitches plus 2 chains on each end)
(WS) Place 1 sc in the second chain from the hook, then 1 sc in each of the next 3 chains. Crochet 1 sc in the next 6 stitches. Work a sc4tog across the center. Continue with 1 sc in the next 6 stitches and finish with 1 sc in each of the 4 chains at the end. Turn. (21)
(RS) ch 1. Work 1 bpsc around the posts of the first 10 stitches. Chain 10 to start the stem. Starting in the second chain from the hook, work 1 sc back down the 9 chains. Continue by working 1 bpsc around the posts of the remaining 10 stitches on the leaf. Finish with a sl st in the last stitch. (30)
Fasten off and weave in all remaining ends on the back of the leaf.
I hope you have a blast making these! There's something so satisfying about watching a pile of yarn turn into a crisp, textured leaf. Whether you're making a set for your coffee table or adding a fall touch to a bag, these leaves are sure to bring a smile. Don't forget to block them for that professional finish. It's the little details that make a project special, and these leaves are full of them. Happy hooking, friends! 🧶 ✨
Yes, post stitches naturally create a bit of tension that can cause curling. A good wet blocking session will fix this right up!
Absolutely! Cotton is actually excellent for coasters as it's very absorbent and handles heat well.
Make sure you're inserting your hook around the vertical post of the stitch from the previous row rather than the top V-shaped loops.
You can use a bulkier yarn and a larger hook size, like a 6.0mm hook with chunky yarn, to create a large decorative centerpiece.
