About This Christmas Tree Cat Amigurumi Pattern
This makes a genuinely special handmade gift — thoughtful enough to wrap and give, but small enough to finish in a single cozy evening with a hot drink beside you.
Ideal for those with basic crocheting experience, featuring slightly more advanced stitches and techniques to expand your skills.
Fits nicely into a free afternoon — 2 to 5 hours of focused, enjoyable crocheting.
Festive fun for the season, bringing handmade magic to celebrations and creating new family traditions.
This makes a genuinely special handmade gift — thoughtful enough to wrap and give, but small enough to finish in a single cozy evening with a hot drink beside you.
I picked this one up mid-November and couldn't put it down. There's something so satisfying about working those FLO ruffle rounds on the body — the moment those little white scallops fan out, the whole Christmas tree shape just clicks into place and you kind of squeal a little. I love how the pieces are all small and manageable, so you get that constant feeling of finishing something. And the face embroidery? My favourite part. Getting those whiskers just right feels like the whole project coming to life in your hands.
I made my first Christmas Tree Cat in the middle of October — way too early, I know, but once I saw the design I couldn't wait. There's something about that green-and-white layered body that just gets me every year.
The part most people worry about is the ruffle system, and honestly it sounds more complicated than it is. The key is understanding that those BLO rows you work throughout the body aren't just a texture detail — they're leaving a row of untouched front loops behind, and you're going to come back and build an entire decorative layer off each one. Once that clicks, the whole construction makes sense and you stop second-guessing yourself.
I'd suggest crocheting the ruffles from bottom to top — starting at the Row 18 FLO on the body and working your way up toward Row 6. The widest ruffle is at the bottom, and if you do the narrow top ones first they tend to get in your way when you're trying to hold the piece while crocheting the lower tiers.
For color swaps: this cat is absolutely gorgeous in cream and dusty rose instead of white and green if you want a softer, non-Christmas version. Or go full festive with red and gold. The ruffle pattern reads beautifully in any two-color combination, so don't be afraid to make it your own.
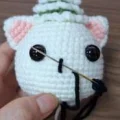
One last thing — the face is where this little cat really comes alive. Take your time with the embroidery. Those whiskers and the tiny eyelid lines are what give him his personality, and a few extra minutes here is absolutely worth it.
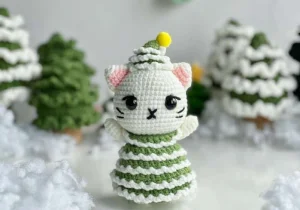
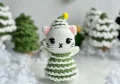
Picture this little guy sitting on your shelf in December, his green-striped tree body and tiny white ears just peeking out from under that pompom hat — honestly, he's too cute to put away after the holidays. This pattern walks you through every piece with clear, approachable instructions so you can focus on the fun parts. Your finished cat stands small enough to tuck into a stocking or perch on a mantle, and he's the kind of handmade gift that makes people gasp a little when they realize you made it yourself. Whether you're crocheting your first amigurumi or your fiftieth, this project has a satisfying rhythm to it.
Start with white yarn.
Work 8 sc into an MR. (8)
INC in each st around. (16)
(sc, INC) 8 times. (24)
(2 sc, INC) 8 times. (32)
32 sc. (32)
(7 sc, INC) 4 times. (36)
(5 sc, INC) 6 times. (42)
(6 sc, INC) 6 times. (48)
48 sc. (48)
48 sc. (48)
48 sc. (48)
48 sc. (48)
48 sc. (48)
48 sc. (48)
48 sc. (48)
48 sc. (48)
48 sc. (48)
(4 sc, DEC) 8 times. (40)
(3 sc, DEC) 8 times. (32)
(2 sc, DEC) 8 times. (24)
Cut yarn with a long tail for sewing. Stuff the head firmly before closing.
Start with white yarn. Switch to pink yarn where indicated in the steps below (the pink stitches are the highlighted ones in the original — they form the inner ear colour).
Work 6 sc into an MR. (6)
(sc, INC) 3 times. (9)
2 sc, INC, then in pink: 2 sc, INC, then back to white: 2 sc, INC. (12)
3 sc, INC, then in pink: 3 sc, INC, then back to white: 3 sc, INC. (15)
4 sc, INC, then in pink: 4 sc, INC, then back to white: 4 sc, INC. (18)
Cut yarn with a long tail for sewing. Do not stuff the ears.
Start with green yarn.
Work 6 sc into an MR. (6)
(sc, INC) 3 times. (9)
(2 sc, INC) 3 times. (12)
(3 sc, INC) 3 times. (15)
Working in BLO only: (4 sc, INC) 3 times. (18)
(5 sc, INC) 3 times. (21)
Working in BLO only: (6 sc, INC) 3 times. (24)
(7 sc, INC) 3 times. (27)
Cut yarn with a long tail for sewing. Now return to the FLO loops left at Rows 4, 6, and 8 to add the white ruffle layers.
Join white yarn into the front loops of Row 4. Work: (3 ch, sk, slst) 7 times, then 3 ch, slst. This completes the first ruffle tier.
Join white yarn into the front loops of Row 6. Work: (3 ch, sk, slst) 10 times, then 3 ch, slst. This completes the second ruffle tier.
Join white yarn into the front loops of Row 8. Work: (3 ch, sk, slst) 13 times, then 3 ch, slst. This completes the third and widest ruffle tier.
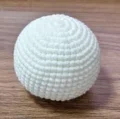
Start with green yarn.
Work 8 sc into an MR. (8)
INC in each st around. (16)
(sc, INC) 8 times. (24)
(2 sc, INC) 8 times. (32)
(3 sc, INC) 8 times. (40)
(4 sc, INC) 8 times. (48)
Working in BLO only: 48 sc. (48)
(10 sc, DEC) 4 times. (44)
44 sc. (44)
Working in BLO only: (9 sc, DEC) 4 times. (40)
40 sc. (40)
(8 sc, DEC) 4 times. (36)
Working in BLO only: 36 sc. (36)
(7 sc, DEC) 4 times. (32)
32 sc. (32)
Working in BLO only: (6 sc, DEC) 4 times. (28)
28 sc. (28)
(5 sc, DEC) 4 times. (24)
Working in BLO only: 24 sc. (24)
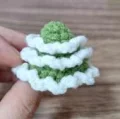
Cut yarn with a long tail for sewing. Stuff the body before closing. Now return to add the outer ruffle layers using the FLO loops left at Rows 6, 9, 12, 15, and 18.
Join green yarn into the front loops of Row 18. Work: 2 ch, 24 dc, slst to join. (green)
With white yarn: (3 ch, sk, slst) 12 times.
Join green yarn into the front loops of Row 15. Work: 2 ch, 32 dc, slst to join. (green)
With white yarn: (3 ch, sk, slst) 16 times.
Join green yarn into the front loops of Row 12. Work: 2 ch, 36 dc, slst to join. (green)
With white yarn: (3 ch, sk, slst) 18 times.
Join green yarn into the front loops of Row 9. Work: 2 ch, 44 dc, slst to join. (green)
With white yarn: (3 ch, sk, slst) 22 times.
Join green yarn into the front loops of Row 6. Work: 2 ch, 48 dc, slst to join. (green)
With white yarn: (3 ch, sk, slst) 24 times.
Start with white yarn.
Work 6 sc into an MR. (6)
(sc, INC) 3 times. (9)
9 sc. (9)
9 sc. (9)
9 sc. (9)
9 sc. (9)
9 sc. (9)
9 sc. (9)
Cut yarn with a long tail for sewing. The pattern notes a stitch count of (15) at the end of Row 3 in the source — this appears to be a misprint referencing the total across both arms or a typo. Each hand should read 9 sts from Row 2 onward. Verify your count before continuing.
Start with white yarn.
Work 6 sc into an MR. (6)
INC in each st around. (12)
(3 sc, INC) 3 times. (15)
15 sc. (15)
15 sc. (15)
Cut yarn with a long tail for sewing. Do not stuff the legs.
Start with white yarn.
Work 6 sc into an MR. (6)
6 sc. (6)
6 sc. (6)
6 sc. (6)
6 sc. (6)
6 sc. (6)
6 sc. (6)
6 sc. (6)
6 sc. (6)
6 sc. (6)
6 sc. (6)
6 sc. (6)
6 sc. (6)
6 sc. (6)
6 sc. (6)
Cut yarn with a long tail for sewing. Thread a length of wire through the full length of the tail — cut it to match the tail exactly and fold any sharp tips back before inserting so they don't break through the yarn.
Every time I finish one of these little guys and set him on the shelf, I can't help smiling. There's something genuinely magical about a tiny crocheted cat dressed up as a Christmas tree — the layered ruffles, the embroidered whiskers, that little yellow pompom on top. He's so small you can hold him in one hand, but the detail work makes him feel like a proper heirloom piece. 🧶 Make him as a gift, make a few for the mantle, or just make him for yourself — no justification needed. I hope you love every stitch of this one. ✨
You can, but this pattern is built around Sport (2) weight yarn at 2.5mm. Moving up to DK weight will increase the finished size by roughly 25–30%, and the ruffle layers may look chunkier and less delicate. The stitch structure still works — just know your cat will come out noticeably bigger.
No — only the head and body get stuffed. The ears, hands, and legs are left unstuffed so they stay flat and flexible. The tail doesn't get stuffed either; it gets a wire threaded through it instead to hold whatever shape you bend it into.
Using Sport (2) yarn and a 2.5mm hook as written, the finished cat comes out roughly 10–12cm tall. The head is quite large relative to the body, which gives him that classic kawaii chibi proportion.
The best approach is to place a stitch marker in the FLO loops of each BLO row as soon as you finish it. Rows 6, 9, 12, 15, and 18 on the body and Rows 4, 6, and 8 on the hat are the ones you'll need later. Mark them while the stitch count is fresh in your mind.
Technically yes, but without wire the tail will flop completely flat against the body and lose its poseable charm. A short length of craft wire or floral wire works well — just make sure to fold the sharp ends back before threading it through so nothing pokes out later.
The safety eyes are fine for display or older children, but for babies or toddlers you'd want to embroider the eyes in yarn instead of using the hardware eyes, and skip the internal wire in the tail entirely. The fiberfill and all yarn components are otherwise toy-safe.
