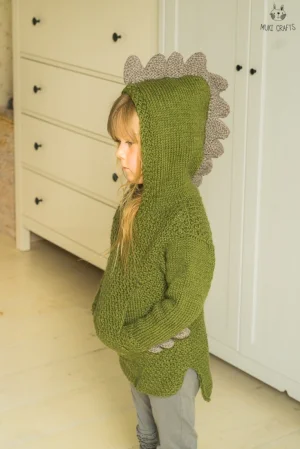
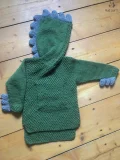
There is something absolutely magical about seeing a little one transform into a prehistoric creature just by pulling on a sweater. This Dragon Rex hoodie isn't just a piece of clothing; it's an invitation for imaginative play. You will love how the sturdy Aran weight wool creates a warm, structured fabric that stands up to all sorts of playground adventures. The textured seed stitch borders and those iconic spikes along the back and sleeves give it a high-end boutique look that you can proudly say you made yourself.
Progress Tracker
0% Complete
— 1. The Seed Stitch Texture :
Row 1 :
On the RS, k1, then repeat p1 and k1 until you reach the end of the row.
Row 2 :
On the WS, p1, then repeat k1 and p1 until the end of the row.
Row 3 :
Repeat the same instructions as Row 2.
Row 4 :
Repeat the same instructions as Row 1.
— 2. Front - Size 1-2 Year Old :
Info :
Using your MC and 5mm needles, cast on 47 sts.
Row 1-12 :
Work the Seed Stitch Texture pattern for a total of 12 rows.
Row 13 :
Continue in the seed stitch pattern and cast on 2 extra sts at the very end of the row.
Row 14 :
Continue in the seed stitch pattern and cast on 2 more sts at the end of this row (51 sts total).
Info :
Keep working in the seed stitch pattern until the front of your sweater measures 7 cm from the very first cast on row.
Pocket Row 1 :
On the RS, work 13 sts in the seed stitch pattern, move the next 25 sts onto a holder and keep it at the front, cast on 25 new sts, and work the remaining 13 sts in pattern.
Pocket Row 2 :
On the WS, work 13 sts in pattern, p 25 sts, and work the last 13 sts in pattern.
Pocket Row 3 :
On the RS, work 13 sts in pattern, k 25 sts, and work the last 13 sts in pattern.
Info :
Repeat the last two rows until the front measures 18 cm from the cast on edge, finishing with a WS row.
Armhole Row 1 :
On the RS, bind off 3 sts, work 10 sts in pattern, bind off 26 sts, and work the rest in pattern.
Armhole Row 2 :
On the WS, bind off 3 sts, work 10 sts in pattern, then begin working the top layer of the pocket.
Pocket Top :
Transfer the 25 sts from the holder to your needle. With a new strand of yarn, work these sts in seed stitch for the same number of rows as the inner pocket layer. End on a WS row and leave a long tail for sewing.
Armhole Row 3 :
On the RS, bind off 1 st and work the rest in pattern.
Armhole Row 4 :
On the WS, bind off 1 st and work the rest in pattern (43 sts left).
Info :
Continue in pattern until the piece reaches 32 cm from the start.
Shoulder Row 1 :
On the RS, work 15 sts in pattern and turn your work.
Shoulder Row 2 :
On the WS, bind off 2 sts and work to the end (13 sts left for this shoulder).
Shoulder Row 3 :
On the RS, work all 13 sts in pattern and turn.
Shoulder Row 4 :
On the WS, bind off 1 st and work the remaining 12 sts in pattern.
Info :
Work 4 more rows in pattern and bind off all 12 sts.
Neckline :
With the RS facing, join yarn to the center sts. Bind off 13 sts for the neck and work the remaining 15 sts in pattern for the right shoulder.
Right Shoulder :
Repeat the shaping as done for the left shoulder, but mirrored, until you have 12 sts left. Bind off all sts.
— 3. Back - Size 1-2 Year Old :
Info :
Using MC and 5mm needles, cast on 47 sts.
Row 1-24 :
Work the Seed Stitch Texture pattern for 24 rows total. Place a marker at the start of Row 13 to help with measuring later.
Info :
Measure from the marker and follow the same instructions as the front, but skip the pocket steps. Continue until the armholes are complete.
Neckline Shaping :
When the back measures 34 cm from the cast on row, begin the shoulder shaping.
Shoulder Rows :
Follow the same bind off sequence as the front for the left and right shoulders (bind off 2 sts, then 1 st). Bind off all remaining sts when the length matches the front.
— 4. Sleeves (Make 2) :
Info :
Using MC and 5mm needles, cast on 25 sts.
Row 1-8 :
Work the Seed Stitch Texture pattern for 8 rows total.
Row 9-10 :
Knit in stockinette stitch (knit RS, purl WS) for 2 rows.
Increases :
Continue in stockinette, but M1 after the first st and before the last st of the row every 2nd row. Do this 10 times until you have 45 sts.
Info :
Continue until the sleeve measures 17 cm from the start.
Bind Off :
For the next 6 rows, bind off 5 sts at the start of each row. Bind off any remaining sts on the following row.
— 5. Hood Construction :
Info :
Using 5mm needles, cast on 46 sts.
Row 1 :
k1, (p1, k1) twice, knit until 5 sts remain, (p1, k1) twice, k1.
Row 2 :
sl1, (p1, k1) twice, purl until 5 sts remain, (p1, k1) twice, k1.
Info :
Repeat these rows, placing a marker after the 23rd st. On every 9th RS row, kfb before and after the marker until you have 64 sts.
Info :
Continue until the hood measures 24 cm. On the next 3 RS rows, ssk before the marker and k2tog after the marker.
Finish :
Bind off all sts and sew the top seam together using the inner loops for a clean finish.
— 6. Hood Spikes (Make 2 Sets) :
Row 1 :
Using CC and 4.5mm needles, cast on 3 sts and k3.
Row 2 :
k1, kfb, k1 (4 sts).
Row 3 :
k1, kfb, k2 (5 sts).
Row 4 :
k3, kfb, k1 (6 sts).
Row 5 :
k1, kfb, k4 (7 sts).
Row 6 :
k5, kfb, k1 (8 sts).
Row 7 :
k1, kfb, k6 (9 sts).
Row 8 :
k7, kfb, k1 (10 sts).
Row 9-12 :
Knit all 10 sts.
Row 13 :
Bind off 7 sts, k3 (3 sts left).
Repeat :
Repeat Rows 2-13 nine more times until you have 10 spikes in total. Bind off all sts.
— 7. Sleeve Spikes (Make 4 Sets) :
Info :
Cast on 3 sts using CC and 4.5mm needles.
Row 1-8 :
Follow the same increase pattern as the hood spikes until you have 10 sts.
Row 9 :
Bind off 7 sts, k3.
Repeat :
Repeat the spike pattern 2 more times for a total of 3 spikes. Bind off all sts.
I hope your little dragon loves wearing this as much as you enjoyed knitting it! There's nothing quite like the look on a child's face when they see those spikes for the first time. This sweater is built to last through countless adventures and cozy afternoons alike. If you run into any tricky spots with the pocket or the hood shaping, just take it one row at a time—you've got this! Don't forget to share your finished project with the community; we all love seeing those prehistoric knits in the wild. Happy crafting! 🧶 🦖 ✨