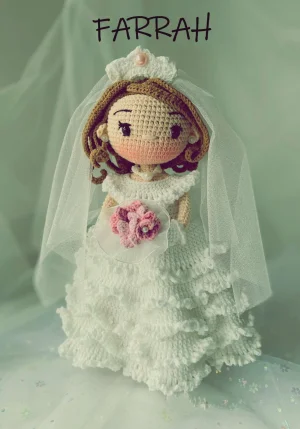
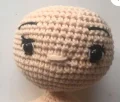
Meet Farrah, a stunning bride doll that captures all the magic and elegance of a wedding day. You'll love working through the intricate layers of her ruffled gown and adding the delicate finishing touches like her tiny bouquet and tulle veil. While she takes a bit of time to complete, seeing her come together with her wired crown and curly hair is incredibly rewarding. She's the perfect project for when you want to create something truly special and heirloom-quality.
Progress Tracker
0% Complete
— 1. Arms (Make 2) :
Round 1 :
Using white yarn, make 6sc into a magic ring (6)
Round 2 :
Work 6inc around (12)
Round 3 :
*3sc, 1inc* repeat 3 times (15)
Round 4-5 :
sc in each st around (15)
Round 6 :
1sc, 2dec, 10sc (13)
Round 7 :
1sc, 1N, 11sc (13)
Round 8 :
1sc, 1dec, 3sc, 2dec, 3sc (10)
Colour Change :
Cut the white yarn and switch to skin-toned yarn
Round 10 :
BLO: sc in each st around (9)
Round 11-24 :
sc in each st around (9)
Round 25 :
9sc, 1slst, then fasten off (9)
Border Round 1 :
Attach white yarn to the FLO of Round 9 and work 9sc (9)
Border Round 2 :
*1slst, 3ch* repeat 9 times, then fasten off (9)
— 2. Legs (Make 2) :
Round 1 :
Using white yarn, ch5. Starting in the 2nd ch from hook: 1inc, 2sc, 4sc in the last ch. Work on the bottom of the chain: 2sc, 1inc (12)
Round 2 :
1sc, 1inc, 2sc, 4inc, 2sc, 1inc, 1sc (18)
Round 3 :
1inc, 4sc, *1sc, 1inc* repeat 4 times, 4sc, 1inc (24)
Round 4-6 :
sc in each st around (24)
Round 7 :
6sc, 6dec, 6sc (18)
Round 8 :
5sc, 4dec, 5sc (14)
Round 9 :
6sc, 1dec, 6sc (13)
Round 10-11 :
sc in each st around (13)
Info :
Insert your prepared insole to flatten the foot. Use glue to secure it if needed.
Colour Change :
Switch to skin-toned yarn at the final stitch of Round 11
Round 12 :
BLO: 6sc, 1dec, 5sc (12)
Round 13-19 :
sc in each st around (12)
Round 20 :
1inc, 11sc (13)
Round 21-22 :
sc in each st around (13)
Round 23 :
1inc, 12sc (14)
Round 24-29 :
sc in each st around (14)
Round 30 :
1inc, 13sc (15)
Round 31-34 :
sc in each st around (15)
Round 35 :
15sc, 1slst, then fasten off (15)
Border Round 1 :
Attach white yarn to the FLO of Round 11 and work 13sc (13)
Border Round 2 :
*1slst, 3ch* repeat 13 times, then fasten off (13)
— 3. Body :
Info :
Align your legs. From the back of the second leg, use white yarn to ch4 and connect it to the first leg.
Round 36 :
15sc around the 1st leg, 4sc along the chain, 15sc around the 2nd leg, 4sc along the other side of the chain (38)
Round 37 :
*2sc, 1inc* repeat twice, 1inc, 22sc, *1inc, 2sc* repeat 3 times (44)
Round 38 :
*4sc, 1inc* repeat twice, 24sc, *1inc, 4sc* repeat twice (48)
Round 39-44 :
sc in each st around (48)
Round 45 :
*6sc, 1dec* repeat 6 times (42)
Round 46 :
*1dec, 5sc* repeat 6 times (36)
Colour Change :
Cut white yarn and switch to skin-toned yarn
Round 47 :
sc in each st around (36)
Round 48-55 :
sc in each st around (36)
Round 56 :
9sc on body, join arm and body with 3sc, 15sc on body, join second arm and body with 3sc, 6sc on body (36)
Round 57 :
9sc on body, 6sc around the outside of the first arm, 15sc on body, 6sc around the outside of the second arm, 6sc on body (42)
Info :
Insert your wire armature through the arms and body, then stuff firmly with fiberfill.
Round 58 :
*5sc, 1dec* repeat 6 times (36)
Round 59 :
*2sc, 1dec, 2sc* repeat 6 times (30)
Round 60 :
*3sc, 1dec* repeat 6 times (24)
Round 61 :
*1sc, 1dec, 1sc* repeat 6 times (18)
Round 62 :
*1sc, 1dec* repeat 6 times (12)
— 4. Neck and Head :
Info :
Ensure the neck support (wire or stick) is positioned correctly in the center.
Round 63-66 :
sc in each st around (12)
Round 67 :
Work 12inc around (24)
Round 68 :
*1sc, 1inc* repeat 12 times (36)
Round 69 :
*5sc, 1inc* repeat 6 times (42)
Round 70 :
3sc, 1inc, *6sc, 1inc* repeat 5 times, 3sc (48)
Round 71 :
*7sc, 1inc* repeat 6 times (54)
Round 72-83 :
sc in each st around (54)
Round 84 :
*7sc, 1dec* repeat 6 times (48)
Round 85 :
3sc, 1dec, *6sc, 1dec* repeat 5 times, 3sc (42)
Round 86 :
*5sc, 1dec* repeat 6 times (36)
Round 87 :
2sc, 1dec, *4sc, 1dec* repeat 5 times, 2sc (30)
Round 88 :
*3sc, 1dec* repeat 6 times (24)
Round 89 :
1sc, 1dec, *2sc, 1dec* repeat 5 times, 1sc (18)
Round 90 :
*1sc, 1dec* repeat 6 times (12)
Round 91 :
6dec, 1slst, then fasten off (6)
— 5. Ears (Make 2) :
Round 1 :
Using skin-toned yarn, ch2. In the 2nd ch from hook, work [6dc], 1slst. Leave a tail for sewing and fasten off.
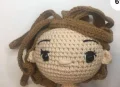
— 6. Wig :
Round 1 :
Using yellow or brown yarn, make 8sc into a magic ring (8)
Round 3 :
BLO: *1sc, 1inc* repeat 8 times (24)
Round 4 :
BLO: *1sc, 1inc, 1sc* repeat 8 times (32)
Info :
Do not cut the yarn. You will now begin the hair strands.
Row 1-13 :
Work in the stitches of Round 4. ch23, starting in 2nd ch: 22hdc, then on Round 4: 1sk, 1sc. Total 16 strands.
Row 14-16 :
ch28, starting in 2nd ch: 27hdc, then on Round 4: 1sk, 1sc.
Row 17-28 :
Work in the FLO of Round 3. ch39, starting in 2nd ch: 38hdc, then on FLO of Rd 3: 1sk, 1sc. Total 12 strands.
Row 29-36 :
Work in the FLO of Round 2. ch39, starting in 2nd ch: 38hdc, then on FLO of Rd 2: 1sk, 1sc. Total 8 strands.
Row 37-40 :
Work in the FLO of Round 1. ch36, starting in 2nd ch: 35hdc, then on FLO of Rd 1: 1sk, 1sc. Total 4 strands. Fasten off.
— 7. Wedding Dress - Upper Body :
Round 1 :
Using white yarn, ch41. Starting in 2nd ch: 40sc, turn (40)
Round 3 :
BLO: *9sc, 1inc* repeat 4 times, turn (44)
Round 4 :
1ch, 7sc, ch7, 8sk, 14sc, ch7, 8sk, 7sc, turn (42)
Round 5 :
1ch, 1inc, 5sc, 1inc, 7sc into the ch space, 1inc, 12sc, 1inc, 7sc into the ch space, 1inc, 5sc, 1inc, turn (48)
Round 6-9 :
1ch, 48sc, turn (48)
Round 10 :
1ch, 48sc, do not turn. 1slst into the first st to join in a circle (48)
— 7. Wedding Dress - Layer 1 :
Round 11 :
BLO: 2ch, *1dc, 1dc-inc* repeat 24 times, 1slst (72)
Round 12-14 :
2ch, 72dc, 1slst (72)
Round 15 :
BLO: 2ch, *2dc, 1dc-inc* repeat 24 times, 1slst (96)
Round 16-18 :
2ch, 96dc, 1slst (96)
Round 19 :
BLO: 2ch, *3dc, 1dc-inc* repeat 24 times, 1slst (120)
Round 20-22 :
2ch, 120dc, 1slst (120)
Round 23 :
BLO: 2ch, *4dc, 1dc-inc* repeat 24 times, 1slst (144)
Round 24-27 :
2ch, 144dc, 1slst (144)
Round 28 :
2ch, *1dc, ch1* repeat 144 times, 1slst (144)
Round 29 :
*1sc, ch5, 1slst* into each ch space from Round 28, then fasten off (144)
— 7. Wedding Dress - Layer 2 :
Round 1 :
Attach white yarn to the FLO of Round 22 from Layer 1. 2ch, *4dc, 1dc-inc* repeat 24 times, 1slst (144)
Round 2 :
2ch, 144dc, 1slst (144)
Round 3 :
2ch, *1dc, ch1* repeat 144 times, 1slst (144)
Round 4 :
*1sc, ch5, 1slst* into each ch space from Round 3, then fasten off (144)
— 7. Wedding Dress - Layer 3 :
Round 1 :
Attach white yarn to the FLO of Round 18 from Layer 1. *3dc, 1dc-inc* repeat 24 times, 1slst (120)
Round 2-3 :
2ch, 120dc, 1slst (120)
Round 4 :
2ch, *1dc, ch1* repeat 120 times, 1slst (120)
Round 5 :
*1sc, ch5, 1slst* into each ch space from Round 4, then fasten off (120)
— 7. Wedding Dress - Layer 4 :
Round 1 :
Attach white yarn to the FLO of Round 14 from Layer 1. *2dc, 1dc-inc* repeat 24 times, 1slst (96)
Round 2-4 :
2ch, 96dc, 1slst (96)
Round 5 :
2ch, *1dc, ch1* repeat 96 times, 1slst (96)
Round 6 :
*1sc, ch5, 1slst* into each ch space from Round 5, then fasten off (96)
— 7. Wedding Dress - Layer 5 :
Round 1 :
Attach white yarn to the FLO of Round 10 from Layer 1. 2ch, *1dc, 1dc-inc* repeat 24 times, 1slst (72)
Round 2-5 :
2ch, 72dc, 1slst (72)
Round 6 :
2ch, *1dc, ch1* repeat 72 times, 1slst (72)
Round 7 :
*1sc, ch5, 1slst* into each ch space from Round 6, then fasten off (72)
— 7. Wedding Dress - Collar & Border :
Round 1 :
Attach white yarn to the FLO of Round 2 of the upper dress. 2ch, *1dc, ch1* repeat 40 times, 1slst (40)
Round 2 :
*1sc, ch5, 1slst* into each ch space from Round 1, then fasten off (40)
Border :
Attach white yarn to the right side edge: 1slst, *3ch, 3sk, 3slst* twice. Crochet 1slst into each st around the collar and fasten off.
— 8. Choker :
Info :
Using white yarn, ch6. Starting in the 4th ch from hook: 1dc in each of the next 4 stitches, ch2, then fasten off.
— 9. Shoes (Make 2) :
Round 1 :
Using white yarn, ch6. Starting in 2nd ch: 1inc, 3sc, 4sc in last ch. Bottom side of chain: 3sc, 1inc (14)
Round 2 :
1sc, 1inc, 3sc, 4inc, 3sc, 1inc, 1sc (20)
Round 3 :
1inc, 5sc, *1sc, 1inc* repeat 4 times, 5sc, 1inc (26)
Round 5-6 :
2ch, 26hdc, 1slst (26)
Round 7 :
2ch, 8hdc, 5hdc2tog, 8hdc, 1slst (21)
Round 8 :
ch10, sk10, 1sc, ch10, sk10, 1slst, then fasten off and weave in ends.
— 10. Flowers (Make 5) :
Row 1 :
Using pink or light pink yarn, ch14. In 3rd ch from hook: [1dc, ch1, 1hdc, ch1, 1sc, 1slst] in one st. 1slst in next st. *[1sc, ch1, 1hdc, ch1, 1dc, ch1, 1hdc, ch1, 1sc, 1slst] in one st, 1slst in next st* repeat to end. Fasten off.
— 11. Crown :
Info :
Fold a 16cm piece of wire in half and work your stitches over the wire to secure it.
Round 1 :
Using white yarn, 17sc over the wire, turn (17)
Round 2-3 :
1ch, 17sc, turn (17)
Round 4 :
2ch, *2sk, [3tr, 1picot, 3tr] in one st, 2sk, 1sc* repeat 3 times. Fasten off.
I can't wait to see your finished Farrah dolls! Whether she's sitting on a shelf as a memory of a special day or being gifted to a new bride, she's sure to bring a smile to anyone's face. Remember to take your time with the assembly—it's the finishing touches that really make her shine. Don't forget to add that little bit of blush at the very end to give her those sweet, rosy cheeks. Happy crocheting, and I hope this project brings a little extra magic to your hook today! 🧶✨