About This Fuyuko the Nine-Tailed Kitsune Amigurumi Pattern
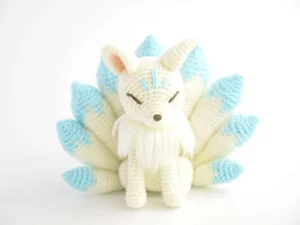
Whether you're a fan of mythology or just love unique plushies, this kitsune makes a stunning display piece or a deeply thoughtful gift for a fellow folklore lover.
Ideal for those with basic crocheting experience, featuring slightly more advanced stitches and techniques to expand your skills.
A 10-12 hour project—great for savoring the process over several sessions.
Playful characters full of personality, designed to spark imagination and become cherished playtime favorites.
Whether you're a fan of mythology or just love unique plushies, this kitsune makes a stunning display piece or a deeply thoughtful gift for a fellow folklore lover.
I honestly couldn't stop smiling while making those tails! There's something so satisfying about seeing the color gradient develop. Plus, using a slicker brush to fluff up the yarn is total magic—it transforms standard yarn into something that looks professionally made and super soft.

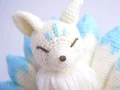
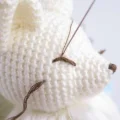
I’ve always been captivated by the stories of Kitsunes, and designing Fuyuko felt like bringing a little piece of that magic into my studio. There’s something truly meditative about working through the nine tails—even though it’s a bit of a marathon, seeing them all lined up at the end is such a 'wow' moment.
One tip I really want to share from my own experience making her: don't rush the assembly. It’s tempting to just sew the tails on and be done, but taking the time to pin them into that perfect fan shape makes all the difference in her silhouette. And that neck fur? It’s a total game-changer! I used a slicker brush I usually keep for my cat, and it worked wonders to get that ethereal, misty look.
I really hope you find as much peace in these stitches as I did. She’s the kind of project that reminds me why I fell in love with amigurumi in the first place—the ability to turn a simple ball of yarn into a character with so much personality and history. Happy hooking!
You're going to love bringing this mystical little fox to life! Fuyuko is inspired by Japanese folklore, featuring nine majestic tails and a soft, ethereal look. I've designed this pattern to be a relaxing project where you can really play with texture, especially when you get to that fluffy neck fur. It's such a rewarding piece to see come together on your shelf, and the colorwork on the tails adds that perfect touch of magic.
Start with 6 sc into a magic ring (6)
Work 3 sc, then 3 inc (9)
Work 3 inc, then 6 sc (12)
Work 6 sc, then repeat (1 sc, inc) 3 times (15)
Repeat (1 sc, inc) 3 times, then 9 sc (18)
Work 1 sc in each st around (18)
Repeat (1 sc, inc) 6 times, then 6 sc (24)
Repeat (1 sc, inc) 9 times, then 6 sc (33)
Work 4 sc, inc, then repeat (10 sc, inc) 2 times, then 6 sc (36)
Repeat (11 sc, inc) 3 times (39)
Work 5 sc, inc, then repeat (12 sc, inc) 2 times, then 7 sc (42)
Repeat (13 sc, inc) 2 times, then 14 sc (44)
Work 4 sc, dec, 30 sc, dec, then 6 sc (42)
Work 1 sc in each st around (42)
Repeat (5 sc, dec) 6 times (36)
Repeat (4 sc, dec) 6 times (30)
Repeat (3 sc, dec) 6 times (24)
Repeat (2 sc, dec) 6 times (18)
Firmly stuff the head now, ensuring the muzzle shape is well-defined.
Repeat (1 sc, dec) 6 times (12)
Work dec around (6)
Fasten off and leave a long tail for sewing.
Start with 6 sc into a magic ring (6)
Repeat (1 sc, inc) 3 times (9)
Repeat (2 sc, inc) 3 times (12)
Repeat (3 sc, inc) 3 times (15)
Repeat (4 sc, inc) 3 times (18)
Repeat (5 sc, inc) 3 times (21)
Work 1 sc in each st around (21)
Press the ear flat without stuffing it. Fasten off and leave a tail for sewing.
Start with 6 sc into a magic ring (6)
Repeat (3 sc in one st, inc, 1 sc) 2 times (12)
Work in BLO: 1 sc in each st around (12)
Work 1 sc in each st around (12)
Work 3 dec, then 6 sc (9)
Work 1 sc in each st around (9)
Fasten off and leave a tail for sewing.
Start with 6 sc into a magic ring (6)
Work 2 sc in every st around (12)
Repeat (1 sc, inc) 6 times (18)
Repeat (2 sc, inc) 6 times (24)
Repeat (3 sc, inc) 6 times (30)
Work 1 sc in each st around (30)
Work 15 sc, then repeat (4 sc, inc) 3 times (33)
Work 1 sc in each st around (33)
Work 15 sc, then repeat (5 sc, inc) 3 times (36)
Work 1 sc in each st around (36)
Stuff the front legs with fiberfill before continuing to the join.
Repeat (4 sc, dec) 3 times, then 4 sc. Join the first leg by working 7 sc around it, skip 2 body sts, then 4 sc on the body. Join the second leg by working 7 sc around it, skip 2 body sts, and finish with 7 sc on the body (43)
You'll have a 2-stitch gap on each leg and the body. Sew these closed with the leg yarn tails.
Work 26 sc, dec, then 15 sc (42)
Work 5 sc, dec, 12 sc, dec, 4 sc, dec, 5 sc, dec, then 8 sc (38)
Work 1 sc in each st around (38)
Work 17 sc, dec, 10 sc, dec, then 7 sc (36)
Work 1 sc in each st around (36)
Work 4 sc, dec, then repeat (10 sc, dec) 2 times, then 6 sc (33)
Work 1 sc in each st around (33)
Repeat (9 sc, dec) 3 times (30)
Repeat (3 sc, dec) 6 times (24)
Work 1 sc, 1 hdc, 3 dc, 2 tc, 3 dc, 1 hdc, then 1 sc (12)
Stuff the body firmly and leave a tail for sewing. Note that Round 25 is an incomplete round.
Start with 6 sc into a magic ring (6)
Repeat (1 sc, inc) 3 times (9)
Work 1 sc in each st around (9)
Stuff the feet and leave a tail for sewing.
Start with 6 sc into a magic ring (6)
Work 2 sc in every st around (12)
Repeat (1 sc, inc) 6 times (18)
Work 1 sc in each st around (18)
Repeat (1 sc, dec) 6 times (12)
Work dec around (6)
Stuff the thigh as you work and leave a tail for sewing.
Using blue: 4 sc in magic ring (4)
1 sc, 3 inc (7)
1 sc, (1 sc, inc) 3 times (10)
1 sc, (1 sc, inc) 4 times, 1 sc (14)
(2 sc, inc) 4 times, 2 sc (18)
3 sc, (3 sc, inc) 3 times, 3 sc (21)
Using blue: 7 sc, inc, 2 sc. Switch to white: 1 sc. Switch to blue: 1 sc, inc, 1 sc. Switch to white: 1 sc. Switch to blue: 2 sc, inc. Switch to white: 1 sc. Switch to blue: 2 sc (24)
Using blue: 1 sc. White: 1 sc. Blue: 3 sc. White: 1 sc. Blue: 2 sc, 1 sc in next st. White: 1 sc in same st as previous blue. Blue: 2 sc. White: 2 sc. Blue: 1 sc, inc. White: 3 sc. Blue: 2 sc, 1 sc in next st. White: 1 sc in same st. Blue: 2 sc, 1 sc (27)
White: 3 sc. Blue: 2 sc. White: 2 sc. Blue: 1 sc. White: 3 sc. Blue: 1 sc. White: 3 sc. Blue: 1 sc. White: 5 sc. Blue: 1 sc. White: 5 sc (27)
Repeat (1 sc, dec) 3 times, then repeat (5 sc, inc) 3 times (27)
Work 1 sc in each st around (27)
Repeat (1 sc, dec) 2 times, then repeat (5 sc, inc) 3 times, then 1 sc, dec (27)
Work 1 sc in each st around (27)
Repeat (7 sc, dec) 3 times (24)
4 sc, dec, repeat (5 sc, inc) 2 times, 4 sc, dec (24)
Work 1 sc in each st around (24)
2 sc, dec, repeat (6 sc, dec) 2 times, 4 sc (21)
Work 1 sc in each st around (21)
Stuff the tail and continue stuffing as you go.
Repeat (5 sc, dec) 3 times (18)
Work 1 sc in each st around (18)
Repeat (7 sc, dec) 2 times (16)
Work 1 sc in each st around (16)
2 sc, dec, 6 sc, dec, 4 sc (14)
Work 1 sc in each st around (14)
Repeat (5 sc, dec) 2 times (12)
Work 1 sc in each st around (12)
1 sc, dec, 4 sc, dec, 3 sc (10)
Work 1 sc in each st around (10)
Repeat (3 sc, dec) 2 times (8)
Work 1 sc in each st around (8)
Repeat (2 sc, dec) 2 times (6)
Work 1 sc in each st around (6)
Repeat (1 sc, dec) 2 times (4)
Follow steps for Tail 1 (21)
Using blue: 7 sc, inc, 2 sc. Switch to white: 1 sc. Switch to blue: 1 sc, inc, 1 sc. White: 1 sc. Blue: 2 sc, inc. White: 1 sc. Blue: 2 sc (24)
Using blue: 1 sc. White: 1 sc. Blue: 4 sc. White: 1 sc. Blue: 3 sc. White: 3 sc. Blue: 2 sc. White: 3 sc. Blue: 2 sc. White: 3 sc. Blue: 1 sc (24)
White: 3 sc. Blue: 1 sc, dec. White: 2 sc. Blue: 1 sc. White: 2 sc, inc. Blue: 2 sc. White: 1 sc. Blue: 1 sc. White: 2 sc, inc. Blue: 1 sc. White: 2 sc, dec (24)
Work 1 sc in each st around (24)
Repeat (1 sc, dec) 2 times, repeat (4 sc, inc) 3 times, then 1 sc, dec (24)
Work 1 sc in each st around (24)
2 sc, dec, repeat (6 sc, dec) 2 times, 4 sc (21)
Work 1 sc in each st around (21)
2 sc, dec, repeat (5 sc, inc) 2 times, 3 sc, dec (21)
Work 1 sc in each st around (21)
Repeat (5 sc, dec) 3 times (18)
Work 1 sc in each st around (18)
Repeat (7 sc, dec) 2 times (16)
Work 1 sc in each st around (16)
2 sc, dec, 6 sc, dec, 4 sc (14)
Work 1 sc in each st around (14)
Repeat (5 sc, dec) 2 times (12)
Work 1 sc in each st around (12)
1 sc, dec, 4 sc, dec, 3 sc (10)
Work 1 sc in each st around (10)
Repeat (3 sc, dec) 2 times (8)
Work 1 sc in each st around (8)
Repeat (2 sc, dec) 2 times (6)
Work 1 sc in each st around (6)
Repeat (1 sc, dec) 2 times (4)
Follow steps for Tail 1 (21)
Using blue: 7 sc, inc, 2 sc. Switch to white: 1 sc. Switch to blue: 1 sc, inc, 1 sc. White: 1 sc. Blue: 2 sc, inc. White: 1 sc. Blue: 2 sc (24)
Using blue: 1 sc. White: 1 sc. Blue: 4 sc. White: 1 sc. Blue: 3 sc. White: 3 sc. Blue: 2 sc. White: 3 sc. Blue: 3 sc. White: 3 sc. Blue: 1 sc (24)
White: 1 sc, dec. Blue: 1 sc, dec. White: 1 sc, dec. Blue: 1 sc. White: 3 sc, 1 sc in next st. Blue: 1 sc in same st. White: 4 sc, 1 sc in next st. Blue: 1 sc in same st. White: 4 sc, inc (24)
Work 1 sc in each st around (24)
2 sc, dec, repeat (6 sc, dec) 2 times, 4 sc (21)
2 sc, dec, repeat (5 sc, inc) 2 times, 3 sc, dec (21)
Work 1 sc in each st around (21)
Repeat (5 sc, dec) 3 times (18)
Work 1 sc in each st around (18)
Repeat (7 sc, dec) 2 times (16)
Work 1 sc in each st around (16)
2 sc, dec, 6 sc, dec, 4 sc (14)
Work 1 sc in each st around (14)
Repeat (5 sc, dec) 2 times (12)
Work 1 sc in each st around (12)
1 sc, dec, 4 sc, dec, 3 sc (10)
Work 1 sc in each st around (10)
Work 1 sc in each st around (8)
Work 1 sc in each st around (6)
Repeat (1 sc, dec) 2 times (4)
Follow steps for Tail 1 (18)
Blue: 6 sc, inc, 2 sc. White: 1 sc. Blue: inc, 2 sc. White: 1 sc. Blue: inc, 1 sc. White: 1 sc. Blue: 1 sc (21)
Blue: 2 sc. White: 1 sc. Blue: 3 sc. White: 1 sc. Blue: 2 sc. White: 3 sc. Blue: 2 sc. White: 3 sc. Blue: 2 sc. White: 2 sc (21)
Blue: 1 sc. White: dec, 1 sc. Blue: dec, 1 sc. White: dec, 3 sc, inc. Blue: 1 sc. White: 2 sc, inc, 3 sc, inc (21)
Work 1 sc in each st around (21)
Repeat (5 sc, dec) 3 times (18)
Work 1 sc in each st around (18)
Repeat (7 sc, dec) 2 times (16)
Work 1 sc in each st around (16)
2 sc, dec, 6 sc, dec, 4 sc (14)
Work 1 sc in each st around (14)
Repeat (5 sc, dec) 2 times (12)
Work 1 sc in each st around (12)
1 sc, dec, 4 sc, dec, 3 sc (10)
Work 1 sc in each st around (10)
Repeat (3 sc, dec) 2 times (8)
Work 1 sc in each st around (8)
Repeat (2 sc, dec) 2 times (6)
Work 1 sc in each st around (6)
Repeat (1 sc, dec) 2 times (4)
Follow steps for Tail 1 (14)
1 sc, dec, repeat (3 sc, inc) 2 times, 1 sc, dec (14)
Blue: 2 sc. White: 1 sc. Blue: 3 sc. White: 1 sc. Blue: 3 sc. White: 1 sc. Blue: 2 sc. White: 1 sc (14)
Blue: 1 sc. White: 3 sc. Blue: 1 sc. White: 3 sc. Blue: 1 sc. White: 3 sc. Blue: 1 sc. White: 1 sc (14)
Work 1 sc in each st around (14)
Repeat (5 sc, dec) 2 times (12)
1 sc, dec, 4 sc, dec, 3 sc (10)
Work 1 sc in each st around (10)
Repeat (3 sc, dec) 2 times (8)
Work 1 sc in each st around (8)
Repeat (2 sc, dec) 2 times (6)
Work 1 sc in each st around (6)
Repeat (1 sc, dec) 2 times (4)
I can't wait to see your version of Fuyuko! There's something so peaceful about the process of making a kitsune, from the repetitive rounds of the tails to the final artistic touches on the face. She really comes to life once you brush out that neck fur and add the blush. If you run into any tricky spots with the colorwork, just take it one stitch at a time—it’s totally worth the effort for such a unique result. Happy crafting, and enjoy your new magical companion! 🧶✨🦊
Absolutely! If you prefer safety eyes, I’d recommend 6mm or 8mm sizes, but make sure to place them around Round 9 before you finish stuffing the head.
The secret is in the assembly step where you sew the tails to each other first. Make sure you're stitching them together at both the base and the middle to create that rigid fan structure.
It’s actually a pet grooming brush! You can find them at any pet store. It’s the best tool for 'teasing' yarn fibers to create that fluffy, fur-like texture.
It’s a bit fiddly because the rounds are small, but since it’s just two colors, it’s a great way to practice carrying yarn. Just keep your tension relaxed so the tails don't shrink.
