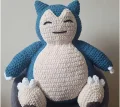
You are going to absolutely love having this massive, sleepy guy in your home! He is truly a giant among plushies and makes the most incredible lounge companion while you are working on your next project. This pattern uses super bulky blanket yarn to create a finished piece that feels more like a cozy piece of furniture than a simple toy. Get ready to clear some space on your couch for your new best friend!
Progress Tracker
0% Complete
— 1. Head :
Info :
Work in continuous rounds using the teal or blue yarn. Do not join with a sl st.
Round 1 :
Start by placing 6 sc into a mr (6)
Round 2 :
Work 2 sc into every st around (12)
Round 3 :
Repeat (1 sc, 1 inc) 6 times (18)
Round 4 :
1 sc, 1 inc, then repeat (2 sc, 1 inc) 5 times, finishing with 1 sc (24)
Round 5 :
Repeat (3 sc, 1 inc) 6 times (30)
Round 6 :
2 sc, 1 inc, then repeat (4 sc, 1 inc) 5 times, finishing with 2 sc (36)
Round 7 :
Repeat (5 sc, 1 inc) 6 times (42)
Round 8 :
3 sc, 1 inc, then repeat (6 sc, 1 inc) 5 times, finishing with 3 sc (48)
Round 9 :
Repeat (7 sc, 1 inc) 6 times (54)
Round 10 :
sc in each st around (54)
Round 11 :
4 sc, 1 inc, then repeat (8 sc, 1 inc) 5 times, finishing with 4 sc (60)
Round 12 :
sc in each st around (60)
Round 13 :
Repeat (14 sc, 1 inc) 4 times (64)
Round 14-18 :
sc in each st around for five full rounds (64)
Round 19 :
Repeat (14 sc, 1 dec) 4 times (60)
Round 20 :
sc in each st around (60)
Round 21 :
4 sc, 1 dec, then repeat (8 sc, 1 dec) 5 times, finishing with 4 sc (54)
Round 22 :
sc in each st around (54)
Round 23 :
Repeat (7 sc, 1 dec) 6 times (48)
Info :
Cut yarn and fasten off. Stuff the head firmly; the increases in Round 13 will create a slight oval shape.
— 2. Body :
Info :
Work in continuous rounds using the teal or blue yarn.
Round 1 :
ch 18. Starting in 2nd ch from hook, work 1 inc, 15 sc, then 3 sc in the last ch. Turn to work along the other side of the chain and make 16 sc (36)
Round 2 :
2 inc, 15 sc, 3 inc, 15 sc, 1 inc (42)
Round 3 :
sc, inc, sc, inc, 16 sc, inc, sc, inc, sc, inc, 16 sc, inc (48)
Round 4 :
2 sc, inc, 2 sc, inc, 17 sc, inc, 2 sc, inc, 2 sc, inc, 17 sc, inc (54)
Round 5 :
3 sc, inc, 3 sc, inc, 18 sc, inc, 3 sc, inc, 3 sc, inc, 18 sc, inc (60)
Round 6 :
4 sc, inc, 4 sc, inc, 19 sc, inc, 4 sc, inc, 4 sc, inc, 19 sc, inc (66)
Round 7 :
5 sc, inc, 5 sc, inc, 20 sc, inc, 5 sc, inc, 5 sc, inc, 20 sc, inc (72)
Round 8 :
4 sc, inc, repeat (8 sc, inc) 7 times, finishing with 4 sc (80)
Round 9 :
Repeat (9 sc, inc) 8 times (88)
Round 10 :
5 sc, inc, repeat (10 sc, inc) 7 times, finishing with 5 sc (96)
Round 11 :
sc in each st around (96)
Round 12 :
Repeat (11 sc, inc) 8 times (104)
Round 13 :
sc in each st around (104)
Round 14 :
6 sc, inc, repeat (12 sc, inc) 7 times, finishing with 6 sc (112)
Round 15-24 :
sc in each st around for ten full rounds (112)
Round 25 :
6 sc, dec, repeat (12 sc, dec) 7 times, finishing with 6 sc (104)
Round 26-29 :
sc in each st around for four rounds (104)
Round 30 :
Repeat (11 sc, dec) 8 times (96)
Round 31 :
sc in each st around (96)
Round 32 :
5 sc, dec, repeat (10 sc, dec) 7 times, finishing with 5 sc (88)
Round 33 :
sc in each st around (88)
Round 34 :
Repeat (9 sc, dec) 8 times (80)
Round 35 :
4 sc, dec, repeat (8 sc, dec) 7 times, finishing with 4 sc (72)
Round 36 :
sc in each st around (72)
Round 37 :
Repeat (7 sc, dec) 8 times (64)
Round 38 :
sc in each st around (64)
Round 39 :
3 sc, dec, repeat (6 sc, dec) 7 times, finishing with 3 sc (56)
Round 40 :
sc in each st around (56)
Round 41 :
Repeat (5 sc, dec) 8 times (48)
Info :
Fasten off leaving a long tail for sewing. Stuff the body very firmly.
— 3. Ears :
Info :
Make two using teal or blue yarn.
Round 1 :
Make a mr and work 6 sc into it (6)
Round 2 :
Repeat (1 sc, 1 inc) 3 times (9)
Round 3 :
sc, inc, 2 sc, inc, 2 sc, inc, sc (12)
Round 4 :
sc, inc, 2 sc, inc, 2 sc, inc, 2 sc, inc, sc (16)
Round 5 :
Repeat (3 sc, 1 inc) 4 times (20)
Round 6 :
2 sc, inc, 4 sc, inc, 4 sc, inc, 4 sc, inc, 2 sc (24)
Info :
Fasten off and leave a tail for sewing.
— 4. Arms :
Info :
Make two using teal or blue yarn.
Round 1 :
Start with 6 sc in a mr (6)
Round 2 :
Work 2 sc in every st (12)
Round 3 :
2 inc, 3 sc, 3 inc, 3 sc, 1 inc (18)
Round 4 :
sc in each st around (18)
Round 5 :
4 sc, inc, 8 sc, inc, 4 sc (20)
Round 6 :
9 sc, inc, 9 sc, inc (22)
Round 7-11 :
sc in each st around for five rounds (22)
Round 12 :
sc in each st around, then ch 1 and turn to start working in rows (22)
Row 13 :
16 sc, ch 1, turn (16)
Row 14 :
dec, 12 sc, dec, ch 1, turn (14)
Row 15 :
14 sc, ch 1, turn (14)
Row 16 :
dec, 10 sc, dec, ch 1, turn (12)
Row 17 :
12 sc, ch 1, turn (12)
Row 18 :
dec, 8 sc, dec, ch 1, turn (10)
Row 19 :
10 sc, ch 1, turn (10)
Row 20 :
dec, 6 sc, dec, ch 1, turn (8)
Row 21 :
8 sc, ch 1, turn (8)
Row 22 :
dec, 4 sc, dec, ch 1, turn (6)
Info :
Fasten off and leave a long tail. Only stuff the bottom round part of the arm; the row section will be stuffed during assembly.
— 5. Feet :
Info :
Make two using the Birch yarn.
Round 1 :
ch 6. In 2nd ch from hook: inc, 3 sc, then 3 sc in the last ch. Turn and work 4 sc along the bottom (12)
Round 2 :
2 inc, 3 sc, 3 inc, 3 sc, 1 inc (18)
Round 3 :
sc, inc, sc, inc, 4 sc, inc, sc, inc, sc, inc, 4 sc, inc (24)
Round 4 :
2 sc, inc, 2 sc, inc, 5 sc, inc, 2 sc, inc, 2 sc, inc, 5 sc, inc (30)
Round 5 :
3 sc, inc, 3 sc, inc, 6 sc, inc, 3 sc, inc, 3 sc, inc, 6 sc, inc (36)
Round 6 :
3 sc, inc, 4 sc, inc, 7 sc, inc, 4 sc, inc, 4 sc, inc, 7 sc, inc, 1 sc (42)
Round 7-8 :
sc in each st around for two rounds (42)
Round 9 :
4 sc, dec, 4 sc, dec, 7 sc, dec, 4 sc, dec, 4 sc, dec, 7 sc, dec (36)
Round 10 :
3 sc, dec, 3 sc, dec, 6 sc, dec, 3 sc, dec, 3 sc, dec, 6 sc, dec (30)
Round 11 :
2 sc, dec, 2 sc, dec, 5 sc, dec, 2 sc, dec, 2 sc, dec, 5 sc, dec (24)
Round 12 :
2 sc, dec, 4 sc, dec, 4 sc, dec, 4 sc, dec, 2 sc (20)
Info :
Fasten off and leave a long tail. Stuff the feet firmly.
— 6. Foot Pads :
Info :
Make two using the Taupe yarn. These are worked in joined rounds.
Round 1 :
Make 8 hdc into a mr, join with sl st and ch 1 (8)
Round 2 :
Work 2 hdc in each st around, join with sl st (16)
Info :
Fasten off and leave a tail for sewing.
— 7. Belly Patch :
Info :
Worked in rows using Birch yarn.
Row 1 :
ch 13. Starting in 2nd ch from hook: inc, 10 sc, inc, ch 1, turn (14)
Row 2 :
inc, 12 sc, inc, ch 1, turn (16)
Row 3 :
inc, 14 sc, inc, ch 1, turn (18)
Row 4 :
inc, 16 sc, inc, ch 1, turn (20)
Row 5 :
inc, 18 sc, inc, ch 1, turn (22)
Row 6 :
inc, 20 sc, inc, ch 1, turn (24)
Row 7-18 :
sc in each st across for twelve rows, ch 1, turn (24)
Row 19 :
dec, 20 sc, dec, ch 1, turn (22)
Row 20 :
sc in each st across, ch 1, turn (22)
Row 21 :
dec, 18 sc, dec, ch 1, turn (20)
Row 22 :
sc in each st across, ch 1, turn (20)
Row 23 :
dec, 16 sc, dec, ch 1, turn (18)
Row 24 :
dec, 14 sc, dec, ch 1, turn (16)
Row 25 :
sc in each st across, ch 1, turn (16)
Row 26 :
dec, 12 sc, dec, ch 1, turn (14)
Row 27 :
dec, 10 sc, dec, ch 1, turn (12)
Row 28 :
sc in each st across, ch 1, turn (12)
Row 29 :
inc, 10 sc, inc, ch 1, turn (14)
Row 30 :
inc, 12 sc, inc, ch 1, turn (16)
Row 31-37 :
sc in each st across for seven rows, ch 1, turn (16)
Row 38 :
dec, 4 sc, dec. Place a marker in the next st for later. ch 1, turn (6)
Row 39 :
sc in each st across, ch 1, turn (6)
Row 40 :
dec, 2 sc, dec, ch 1, turn (4)
Row 41 :
dec, dec, ch 1, turn (2)
Info :
Fasten off. Now attach yarn to the st you marked in Row 37 to finish the other side.
Row 43 :
dec, 4 sc, dec, ch 1, turn (6)
Row 44 :
sc in each st across, ch 1, turn (6)
Row 45 :
dec, 2 sc, dec, ch 1, turn (4)
Row 46 :
dec, dec, ch 1, turn (2)
Border :
Fasten off. Flip the piece so the right side faces you. Attach yarn to the bottom left corner and sc around the entire edge. Work 3 sc at the peak of row 42, 4 sc down the side, dec across the valley between the peaks, 4 sc up the other side, and 3 sc at row 47. Ensure you have an even number of stitches on both long sides.
— 8. Claws :
Hand Claws :
Make 10 using white yarn. Work 3 sc into a mr and join with a sl st to the first st (3). Fasten off leaving a tail.
Foot Claws Round 1 :
Make 6 using white yarn. Work 3 sc into a mr (3)
Foot Claws Round 2 :
Work 2 sc in each st around (6)
Foot Claws Round 3 :
sc in each st around (6)
Info :
Fasten off and leave a tail for sewing.
I am so excited for you to finish this project! He is a bit of a marathon to crochet, especially with all those little claws, but the end result is absolutely worth every single stitch. There is nothing quite like the feeling of finishing a piece this big and having a giant new friend to show for it. Make sure to take breaks and stretch your hands while you work on those big rounds! Happy crafting, and I hope you enjoy many cozy naps with your new cuddle buddy! 🧶 ✨