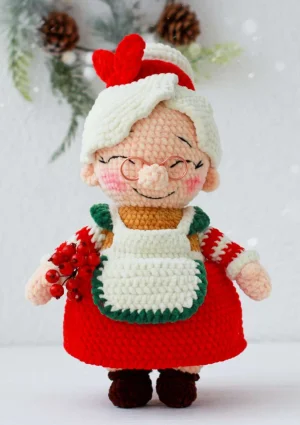
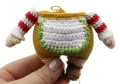
There is something so incredibly cozy about a handmade Mrs. Claus, and this pattern captures all that holiday warmth. You'll love the way her personality shines through, from her perfectly styled white hair to those tiny, custom-made wire glasses. She's the kind of project that keeps you excited at every turn, especially when you see how the clever construction of her layered hair comes together. Whether she's sitting on your mantel or tucked into a gift basket, she's sure to become a cherished part of your Christmas traditions.
Progress Tracker
0% Complete
— 1. Arms (Make 2) :
Info :
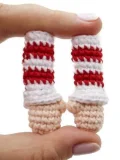
Start with cream yarn. Stuff the hand well but leave the rest of the arm empty for now.
Round 1 :
Starting in the second loop from the hook, work 3 SC, then 3 SC into the last loop. On the other side of the chain, work 2 SC and an INC (10)
Round 2 :
(4 SC, INC) repeated twice (12)
Round 5 :
5 SC, PS, 6 SC (12)
Round 7 :
Switch to white yarn and work 12 SC
Round 9 :
Switch to red yarn and work 12 SC
Round 11 :
Switch to white yarn and work 12 SC
Round 13 :
Switch to red yarn and work 12 SC
Round 15 :
Switch to white yarn and work 12 SC
Info :
Work a few extra SC so the fold aligns with the side of the arm, then fasten off.
— 2. Sleeve Edging :
Info :
Go back to the unworked front loops from Round 7 of the arm and attach white yarn.
Round 1 :
FLO: (3 SC, INC) repeated 3 times (15)
Info :
Fasten off and hide the yarn tail inside the arm.
— 3. Apron Base :
Info :
Use white yarn. Turn and work a turning CH at the end of every row.
Row 1 :
Beginning in the second loop from the hook, work 14 SC
Row 6 :
Skip the first St, 11 SC, DEC (12)
Row 7 :
Skip the first St, 9 SC, DEC (10)
Info :
Fasten off leaving a long tail. Attach green yarn to the top corner and work a Reverse SC border around the sides and bottom, placing a CH between each St.
— 4. Legs (Make 2) :
Info :
Start with brown yarn and stuff as you go.
Round 1 :
Starting in the second loop, work 5 SC, then 3 SC in the last loop. On the other side, do 4 SC and an INC (14)
Round 2 :
INC, 4 SC, 3 INC, 4 SC, 2 INC (20)
Info :
Ensure your stitch marker is centered at the heel.
Round 4 :
5 SC, 5 DEC, 5 SC (15)
Round 5 :
5 SC, 3 DEC, 4 SC (12)
Round 6 :
(3 SC, INC) repeated 3 times (15)
Round 7 :
Switch to cream yarn and work BLO: 15 SC. Keep the brown yarn on the outside for later.
Round 8 :
(4 SC, INC) repeated 3 times (18)
Round 10 :
(5 SC, INC) repeated 3 times (21)
Info :
Fasten off. Now return to the brown yarn at Round 6 and work a cuff: BLO 15 SC. Join with a SS and fasten off.
— 5. Body and Head :
Info :
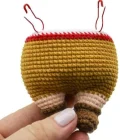
Using mustard yarn, start with the leg connector.
Info :
Mark 3 stitches on each side of the connector and 3 stitches on the inner side of each leg.
Round 11 :
Work 18 SC around the left leg, 2 SC across the connector, 18 SC around the right leg, and 2 SC back across the connector (40)
Round 12 :
(SC, INC) twice, 8 SC, (SC, INC) 6 times, 8 SC, (SC, INC) 4 times (52)
Round 13 :
(2 SC, INC) twice, 8 SC, (2 SC, INC) 6 times, 8 SC, (2 SC, INC) 4 times (64)
Round 25 :
(3 SC, DEC) 3 times, 34 SC, (DEC, 3 SC) 3 times (58)
Round 26 :
Switch to red yarn and work 58 SC
Round 27 :
Switch to white yarn and work BLO: (2 SC, DEC) 3 times, 34 SC, (DEC, 2 SC) 3 times (52)
Round 28 :
18 SC, 16 SC worked together with the apron stitches, 18 SC (52)
Round 29 :
Switch to mustard yarn and work BLO: (SC, DEC) 3 times, 34 SC, (DEC, SC) 3 times (46)
Round 30 :
8 SC, 6 SC joined with the first arm, 18 SC, 6 SC joined with the second arm, 8 SC (46)
Round 31 :
8 SC, 6 SC along the outer arm edge, 18 SC, 6 SC along the other outer arm edge, 8 SC (46)
Round 32 :
(14 SC, DEC) twice, 14 SC (44)
Round 33 :
(9 SC, DEC) 4 times (40)
Round 34 :
(8 SC, DEC) 4 times (36)
Round 35 :
(4 SC, DEC) 6 times (30)
Round 36 :
(3 SC, DEC) 6 times (24)
Round 37 :
Switch to cream yarn and work BLO: 24 SC
Round 38 :
(SC, INC) 12 times (36)
Round 39 :
(2 SC, INC) 12 times (48)
Round 40 :
(7 SC, INC) 6 times (54)
Round 53 :
(7 SC, DEC) 6 times (48)
Round 54 :
(6 SC, DEC) 6 times (42)
Round 55 :
(5 SC, DEC) 6 times (36)
Round 56 :
(4 SC, DEC) 6 times (30)
Round 57 :
(3 SC, DEC) 6 times (24)
Round 58 :
(2 SC, DEC) 6 times (18)
Round 59 :
(SC, DEC) 6 times (12)
— 6. Skirt :
Info :
Turn the body upside down and attach red yarn to the front loops of Round 26.
Round 1 :
FLO: 7 SC, INC, (6 SC, INC) 6 times, 7 SC, INC (66)
Round 3 :
(10 SC, INC) 6 times (72)
Round 16 :
Reverse SC around the entire edge: 72 St
— 7. Apron Top and Straps :
Info :
Attach white yarn to the middle of the belly at Round 28. Work in rows with a turning CH.
Row 2 :
Skip the first St, 11 SC, DEC (12)
Row 3 :
Skip the first St, 9 SC, DEC (10)
Row 4 :
CH 20, work 19 SC back down the chain for the first strap. Work 8 SC across the apron top. CH 19, work 18 SC back down for the second strap, then finish with a SC in the last apron stitch.
Info :
Attach green yarn to the straps and work a ruffle: SS, SC, HDC, 3 INC HDC, HDC, SC, SS (12).
— 8. Nose :
Round 2 :
(SC, INC) repeated 3 times (9)
— 9. Ears (Make 2) :
Round 1 :
7 SC in MR. Do not join the circle; leave it slightly open.
— 10. Hair Circles :
Info :
Make 2 large circles and 1 small circle using white yarn.
Large R3 :
(SC, INC) 8 times (24)
Large R4 :
(3 SC, INC) 6 times (30)
Large R5 :
(4 SC, INC) 6 times (36)
Large R6 :
(5 SC, INC) 6 times (42)
Large R7 :
(6 SC, INC) 6 times (48)
Large R8 :
(7 SC, INC) 6 times (54)
Large R9 :
(8 SC, INC) 6 times (60)
Small R1-8 :
Follow the large circle pattern through Round 8 only (54)
— 11. Topknot :
Round 3 :
(SC, INC) 6 times (18)
Round 4 :
(2 SC, INC) 6 times (24)
Round 5 :
(3 SC, INC) 6 times (30)
Round 6 :
(4 SC, INC) 6 times (36)
Round 7 :
(5 SC, INC) 6 times (42)
Round 9 :
(5 SC, DEC) 6 times (36)
Round 10 :
(4 SC, DEC) 6 times (30)
Round 11 :
(3 SC, DEC) 6 times (24)
Round 12 :
(2 SC, DEC) 6 times (18)
— 12. Headband :
Round 1 :
Starting in 2nd loop: 2 SC, 2 HDC, INC DC, 2 HDC, 36 SC, 2 HDC, INC DC, 2 HDC, SC. In the last loop, work 2 SC, then turn and work on the bottom: SC, 2 HDC, INC DC, 2 HDC, 36 SC, 2 HDC, INC DC, 2 HDC, 2 SC (100)
I hope you enjoyed creating this darling Granny Claus as much as I did! She has such a sweet, comforting presence that really brightens up any holiday display. Don't be afraid to take your time with the facial embroidery—it's the little details in her smile and the tilt of her glasses that truly bring her to life. Once she's all finished, she'll be a beautiful handmade heirloom that your family will look forward to seeing every single year. Happy crafting, and may your holidays be filled with cozy stitches! 🧶✨❤️