About This Legendary Link Amigurumi Pattern
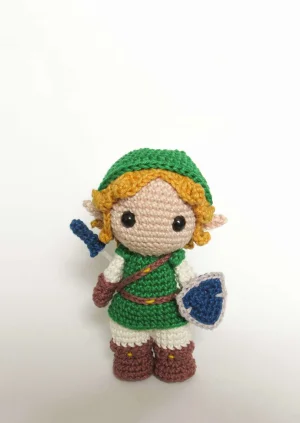
This little hero makes the ultimate gift for the gamer in your life—style him on a shelf next to your console or use him as a lucky charm during your next boss battle!
Ideal for those with basic crocheting experience, featuring slightly more advanced stitches and techniques to expand your skills.
Takes 5-7 hours, making it an enjoyable project to finish over a couple of days.
Playful characters full of personality, designed to spark imagination and become cherished playtime favorites.
This little hero makes the ultimate gift for the gamer in your life—style him on a shelf next to your console or use him as a lucky charm during your next boss battle!
I absolutely adore how this pattern uses everyday items like buttons and craft wire to give the finished doll so much personality and structure. The way the hair strands are layered makes him look so expressive, and there is a real sense of accomplishment when you finally equip him with his tiny shield. It is one of those projects where you can really see the character emerging with every round you finish.
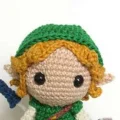
I still remember the first time I picked up a controller to play Zelda; that sense of wonder never really leaves you, does it? Bringing Link into the real world through crochet felt like a full-circle moment for me. One of my favorite things about this design is the clever use of buttons inside the boots. It gives him just enough weight to stand tall, which is such a game-changer for display pieces!
When you're working on the hair, take your time with the strands. They can feel a bit fiddly because they're so small, but they're what give him that perfect 'hero' look. I actually found that pinning the wig in place before gluing or sewing made a world of difference in getting his expression just right. If you're feeling extra creative, you could even try making his tunic in blue or red to represent the different tunics from the games! It’s a project that really lets you geek out while you work, and I can't wait to see your version of our favorite hero.
There is nothing quite like the magic of bringing a childhood hero to life with your own two hands. This pattern lets you recreate the iconic Hero of Time in adorable amigurumi form, complete with his signature green tunic and pointed hat. You will love how the little details, like the tiny Master Sword and Hylian-style shield, really make him look like he stepped right out of a quest. It is the perfect project for anyone who loves a bit of gaming nostalgia mixed with their crafting time.
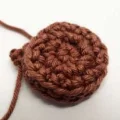
Using brown yarn, create a mr and work 6 sc into it [6]
Work a sequence of 1 sc and 1 inc three times around the ring [9]
Work 1 sc in each stitch around [9]
Work 1 sc in each stitch around [9]
Switch to off-white yarn and work 9 sc into the blo [9]
Work a sequence of 1 sc and 1 dec three times around [6]
Work 1 sc in each stitch around [6]
Work 1 sc in each stitch around [6]
Flatten the arm and work 2 sc through both layers to close the opening. Tie off.
Go back to the exposed front loops of Round 5 and work a round of slst to create the glove cuff detail.
Using brown yarn, work 6 sc into a mr. Leave a long starting tail to sew the button later [6]
Work 1 inc in every stitch around [12]
Work a sequence of 1 sc and 1 inc six times around [18]
Work 18 sc into the blo only [18]
Work 18 sc around [18]
Take your 2cm button and sew it securely inside the bottom of the boot using the starting yarn tail.
Work 6 sc, then 3 dec in a row, and finish with 6 sc [15]
Work 15 sc around [15]
Work 15 sc around [15]
Switch to off-white yarn and work 15 sc into the blo [15]
Work 15 sc around [15]
Work 15 sc around [15]
Work 15 sc around [15]. Fasten off.
To finish the boot, start at the front center: ch 3, work 13 sc around the edge, ch 2, and slst into the first stitch. Use yellow yarn to embroider a small horizontal line on the front of the boot.
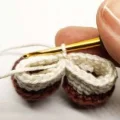
Using off-white yarn, join the two legs together with a slst. Ensure the heels are facing you when you connect them.
Work 1 sc in every stitch around both legs [30]
Work 6 sc, dec, 6 sc, dec, 6 sc, dec, 6 sc [27]
Work 1 sc in each stitch around [27]. Begin stuffing the legs firmly.
Switch to green yarn. Work 6 sc, dec, 5 sc, dec, 5 sc, dec, 5 sc [24]
Work 24 sc into the blo only [24]
Work 1 sc in each stitch around [24]
Work 5 sc, dec, 4 sc, dec, 4 sc, dec, 5 sc [21]
Work 1 sc in each stitch around [21]
Work 1 sc in each stitch around [21]
Work 4 sc, dec, 4 sc, dec, 4 sc, dec, 3 sc [18]
Attach the arms: Work 4 sc, then 2 sc through both the arm and body, 7 sc, 2 sc through the second arm and body, and finish with 3 sc [18]
Fasten off and leave a long tail. Check that the arms are centered; if they are slightly off, adjust your starting stitches for this round.
Attach green yarn to the exposed flo of Round 17 on the body.
Work a sequence of 5 sc and 1 inc four times around [28]
Work 1 sc in each stitch around [28]
Work a sequence of 6 sc and 1 inc four times around [32]
Work 1 sc in each stitch around [32]. Fasten off.
Using brown yarn, make two separate chains of 25 stitches each. Leave tails for sewing.
Wrap one chain around the waist and sew it under the right arm. Wrap the second chain diagonally over the shoulder and attach it to the waist belt. Embroider a yellow line down the center of each belt.
Using blue yarn, work 4 sc into a mr [4]
Work 1 sc in each stitch around [4]
Work 1 sc in each stitch around [4]
Work 1 sc in each stitch around [4]
Work 1 sc in each stitch around [4]
Work 1 sc, ch 2, slst 1 into the second ch from hook, 2 sc, ch 1, slst 1 into that ch, and finish with 1 sc. Fasten off.
Prepare the blade by wrapping adhesive tape around the head of a hammer. Hammer your craft wire flat, leaving 1cm untouched for the handle. Glue the crochet hilt onto the wire handle.
Using beige yarn, work 6 sc into a mr [6]
Work 1 inc in every stitch around [12]
Work (1 sc, inc) six times around [18]
Work (2 sc, inc) six times around [24]
Work (3 sc, inc) six times around [30]
Work (4 sc, inc) six times around [36]
Work (5 sc, inc) six times around [42]
Work 1 sc in each stitch around [42]
Work 1 sc in each stitch around [42]
Work 1 sc in each stitch around [42]
Work 1 sc in each stitch around [42]
Work 1 sc in each stitch around [42]
Work 1 sc in each stitch around [42]
Work 1 sc in each stitch around [42]
Place 9mm safety eyes between Rounds 11 and 12, leaving 8 stitches of space between them.
Work (5 sc, dec) six times around [36]
Work (4 sc, dec) six times around [30]
Work (3 sc, dec) six times around [24]
Work (2 sc, dec) six times around [18]
Fasten off and stuff the head firmly. Sew the head onto the body.
Using beige yarn, ch 6. Skip the first ch, then work: slst 1, 1 sc, 2 hdc, and slst 1. Fasten off with a long tail.
Sew the ears to the sides of the head between Rounds 12 and 13, about 5 stitches away from the eyes. Ensure the curve is at the top.
Using green yarn, ch 7. Skip the first ch, then work: 1 sc, 3 hdc, 1 sc, and slst 1. Fasten off.
Sew the sleeves onto the shoulders over the arms with the wrong side of the crochet piece facing out.
Using mustard yarn, work 6 sc into a mr [6]
Work 1 inc in each stitch around [12]
Work (1 sc, inc) six times around [18]
Work (2 sc, inc) six times around [24]
Work (3 sc, inc) six times around [30]
Work (4 sc, inc) six times around [36]
Work (5 sc, inc) six times around [42]
Work 1 sc in each stitch around [42]
Work 1 sc in each stitch around [42]
Work 1 sc in each stitch around [42]
Work 1 sc in each stitch around [42]
Ch 4, slst 1, 2 hdc, skip 1 stitch on the base, then slst 1 on the base. Repeat this until you have 4 small strands. Work 4 sc and a slst on the base.
Ch 10, slst 1, 8 sc. Slst 1 into the base.
Ch 7, slst 1, 2 hdc, 3 dc, then work 1 dc into the same base stitch where you started the chain. On the base, work 2 hdc and a slst.
Ch 6, slst 1, 2 hdc, 2 dc, then work 1 dc into the same base stitch where you started the chain. On the base, work 2 hdc, slst 1, 2 hdc, and 1 dc.
Ch 6, slst 1, 2 hdc, 2 dc, then slst 1 into the same base stitch where you started the chain. On the base, work 2 hdc and 1 dc.
Ch 7, slst 1, 2 hdc, 3 dc, then slst 1 into the same base stitch where you started the chain. On the base, work 1 slst.
Ch 10, slst 1, 8 sc. On the base, work 1 slst, 4 sc, and 1 slst.
Ch 4, slst 1, 2 hdc, skip 1 stitch on the base, then slst 1 on the base. Repeat until you have 4 strands. Fasten off.
Using green yarn, work 4 sc into a mr [4]
Work (1 sc, inc) twice [6]
Work (2 sc, inc) twice [8]
Work 2 slst, 1 sc, inc, 3 slst, inc [10]
Work 2 slst, 2 sc, inc, 4 slst, inc [12]
Work 2 slst, 3 sc, inc, 5 slst, inc [14]
Work 2 slst, 4 sc, inc, 6 slst, inc [16]
Work 2 slst, 5 sc, inc, 7 slst, inc [18]
Work 2 slst, 6 sc, inc, 8 slst, inc [20]
Work 2 slst, 7 sc, inc, 9 slst, inc [22]
Work 2 slst, 8 sc, inc, 10 slst, inc [24]
Work 2 slst, 9 sc, inc, 11 slst, inc [26]
Work 2 slst, 10 sc, inc, 12 slst, inc [28]
Work 2 slst, 11 sc, inc, 13 slst, inc [30]
Work 3 inc, 24 sc, then 3 inc [36]
Work (5 sc, inc) six times around [42]
Work (6 sc, inc) six times around [48]
Work 1 sc in each stitch around [48]
Work 1 sc in each stitch around [48]
Work 1 sc in each stitch around [48]
Work 1 sc in each stitch around [48]
Work 12 sc, 24 hdc, then 12 sc [48]
Work 12 sc, 24 hdc, then 12 sc [48]. Fasten off.
With blue yarn, work into a mr: 1 sc, ch 2, 2 sc, ch 2, 2 sc, ch 2, 1 sc. Close the ring.
Work 1 sc, then in the ch-sp work {1 sc, ch 2, 1 sc}. Work 2 sc, then {1 sc, ch 2, 1 sc} in the next ch-sp. Work 2 sc, then {1 sc, ch 2, 1 sc} in the last ch-sp, and finish with 1 sc.
Work 2 sc, then {1 sc, ch 2, 1 sc} in the ch-sp, 1 sc, 3 hdc, then {1 hdc, ch 2, 1 hdc} in the ch-sp, 3 hdc, 1 sc, then {1 sc, ch 2, 1 sc} in the ch-sp, and finish with 2 sc. Fasten off.
Using grey yarn, work 4 slst, then ch 1 (stitching over the round 3 chain), 2 slst, 1 hdc into round 3. Work 5 slst, ch 1, 5 slst, 1 hdc into round 3. Work 2 slst, ch 1, 4 slst, and 1 hdc into round 3. Fasten off.
Make a small handle on the back of the shield using a chain and sc, sized to fit Link's wrist.
I really hope you enjoyed adventuring through this pattern as much as I did! Seeing Link come together, from his tiny boots to that signature pointed hat, is such a rewarding experience for any maker. He looks absolutely fantastic sitting on a desk or a bookshelf, ready for his next quest. Don't forget to share your finished hero with the community—I love seeing the different shades of green and little personal touches everyone adds. Happy crocheting, and may your stitches always be even and your yarn never tangle! Keep on crafting magic! 🧶✨
You can use a pair of flat-nose pliers to squeeze the wire flat, or even a heavy book and some elbow grease, though a hammer gives the smoothest finish.
Amigurumi tension can vary! If the hat isn't reaching behind the ears, simply add one or two extra rounds of 48 single crochets at the end before finishing.
Absolutely! If you're making this for a small child, felt or embroidered eyes are actually safer and can give him a really cute, classic look.
Check your stuffing level in the legs. They need to be quite firm to support the weight of the head and hat. You can also try adding a little more stuffing right above the buttons.
