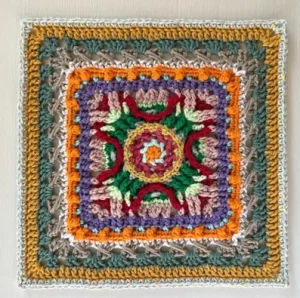
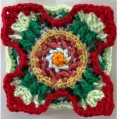
This square is a true labor of love, inspired by a granddaughter with a big personality and a sharp wit. You will find yourself playing with beautiful layers of texture, from intricate post stitches to puffy clusters, creating a piece that feels as complex and lovely as the person it was named for. It is a rewarding challenge that sees a sophisticated design bloom right from the center of your hook.
Progress Tracker
0% Complete
— 1. The Center Floral Core :
Round 1 :
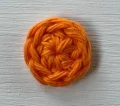
Using color A, start with a double magic circle. ch 3 (this counts as your first dc), then work 7 dc into the ring. Finish with an invisible join to the first actual dc. (8 dc)
Round 2 :
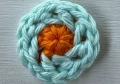
Join color B in any dc. *Work 1 hdc into the dc, then work a FPdc around the dc that sits immediately before the one you just used. Repeat from * all the way around. End with an invisible join. (8 hdc, 8 FPdc)
Round 3 :
Join color C in any hdc. *Work 1 hdc in the hdc and 1 hdc in the next FPdc, then work a FPdc around the FPdc from the previous round (the one right before the hdc you just made). Repeat from * around. End with an invisible join. (16 hdc, 8 FPdc)
Info :
Note: After finishing the BPsc in the next round, the following stitch might be slightly tucked away or hidden.
Round 4 :
Join color D in the first hdc of any two-stitch group. *Work 1 shallow BPsc around the stitch, then work 2 sc into the next stitch. Repeat from * around. End with an invisible join. (24 sc, 12 BPsc)
— 2. Squaring the Design :
Info :
Note: For this entire round, work only into the 3LP of the stitches.
Round 5 :
Join color E in the first sc of any pair. *Work 1 dc in each of the next 2 sc (place a marker around these posts), ch 2, then work 1 dc, 1 hdc, 3 sc, 1 hdc, and 1 dc across the next 7 sts, ch 2. Repeat from * around. End with an invisible join. (12 sc, 8 hdc, 16 dc, 8 ch-2 sp)
Round 6 :
Join color F in the ch-2 sp before your first marked post. *Work 3 hdc in the space (mark the first one), BPhdc around the next 2 dc, 3 hdc in the next ch-2 sp (mark the third one). [ch 1, sk st, 2FPdc-cluster around the next st] 3 times, ch 1, sk 1 dc. Repeat from * around. End with an invisible join. (24 hdc, 12 2FPdc-cluster, 8 BPhdc, 16 ch-1 sp)
Round 7 :
Start in the first marked hdc from the previous round. *hdc in that hdc, sc in the next 6 sts, hdc in the next marked hdc. ch 1, sk the ch-sp, dc in the next cluster, ch 1, sk the ch-sp, (2 dc, ch 2, 2 dc) in the next cluster for the corner, ch 1, sk the ch-sp, dc in the next cluster, ch 1, sk the ch-sp. Repeat from * around. End with an invisible join. (24 sc, 8 hdc, 24 dc, 16 ch-1 sp, 4 ch-2 corner sp)
Round 8 :
Join color E in any corner ch-2 sp. *(2 hdc, ch 2, 2 hdc) in the corner, sk 2 dc, 2 hdc in the ch-1 sp, sk dc, 2 hdc in the next ch-1 sp, ch 1. FPsc around the hdc from round 6 (marker 3), ch 1. FPsc around the 2 dc from round 5 (markers 1 & 2), ch 1. FPsc around the hdc from round 6 (marker 4), ch 1. sk the next group of sts from round 7, 2 hdc in the next ch-1 sp, sk dc, 2 hdc in the final ch-1 sp, sk 2 dc. Repeat from * around. End with an invisible join. (48 hdc, 16 FPsc, 16 ch-1 sp, 4 ch-2 corner sp)
— 3. Intricate Texture Layers :
Round 9 :
Join color G in any corner ch-2 sp. *(2 hdc, ch 2, 2 hdc) in the corner, ch 1, sk 2 hdc, FPtr around the next 2 dc from round 7. Work hdc in the space behind the FPtr. ch 1, sk 2 hdc, hdc in the space after the skipped sts, ch 2. dc2tog over the first two unworked sc from round 7, ch 1, dc3tog over the next 3 sc, ch 1, dc2tog over the last sc and hdc from round 7. ch 2, sk 2 hdc, hdc in the space after them, ch 1, sk 2 hdc, hdc in the space after them. FPtr around the 2 corner dc from round 7, ch 1, sk 2 hdc. Repeat from * around. End with an invisible join. (32 hdc, 16 FPtr, 8 dc2tog, 4 dc3tog, 24 ch-1 sp, 8 ch-2 sp, 4 ch-2 corner sp)
Round 10 :
Join color G in any corner ch-2 sp. *(2 hdc, ch 2, 2 hdc) in the corner, hdc in next 2 sts, sk ch-sp, shallow FPhdc around the 2 FPtr, sk hdc, hdc in ch-sp. FPhdc around the hdc, hdc in ch-sp, FPhdc around dc2tog, hdc in ch-sp, FPhdc around dc3tog, hdc in ch-sp, FPhdc around dc2tog, hdc in ch-sp, FPhdc around hdc, hdc in ch-sp. shallow FPhdc around the 2 FPtr, sk ch-sp, hdc in next 2 sts. Repeat from * around. End with an invisible join. (56 hdc, 16 shallow FPhdc, 20 FPhdc, 4 ch-2 corner sp)
Info :
Note: Watch your tension in this round; keep your stitches loose enough to prevent the square from pulling inward.
Round 11 :
Join color C in any corner ch-2 sp. *(sc, ch 2, sc) in the corner space, then [ch 1, sk 1 st, sc in next st] 11 times, ch 1. Repeat from * around. End with an invisible join. (52 sc, 48 ch-1 sp, 4 ch-2 corner sp)
Round 12 :
Join color B in any corner ch-2 sp. *(sc, ch 2, sc) in the corner. [2FPdc-cluster around the next sc from the round below, ch 1, sc in the next ch-sp, sc and ch-sp] 6 times. Work a final cluster around the next sc, ch 1. Repeat from * around. End with an invisible join. (80 sc, 28 2FPdc-cluster, 28 ch-1 sp, 4 ch-2 corner sp)
— 4. Final Borders and Cables :
Round 13 :
Join color E in any corner ch-2 sp. *(sc, ch 2, sc) in the corner, then work sc into every stitch across the side, using only the BL and skipping all ch-1 spaces. Repeat from * around. End with an invisible join. (8 sc, 108 BLsc, 4 ch-2 corner sp)
Round 14 :
Join color E in any corner ch-2 sp. *(2 dc, ch 2, 2 dc) in the corner, ch 1, sk 1 sc, [cable st] 7 times, ch 1. Repeat from * around. End with an invisible join. (16 dc, 28 cable st, 8 ch-1 sp, 4 ch-2 corner sp)
Round 15 :
Join color F in any corner ch-2 sp. *(2 dc, ch 2, 2 dc) in the corner, ch 1, sk 2 dc, dc in the ch-sp, sk the cable stitch, then work 4 dc into the space between the next 2 cables. Repeat the 4 dc groups across the side, sk the last cable, dc in the ch-sp, ch 1, sk 2 dc. Repeat from * around. End with an invisible join. (128 dc, 8 ch-1 sp, 4 ch-2 corner sp)
Round 16 :
Join color G in any corner ch-2 sp. *(2 dc, ch 2, 2 dc) in the corner, dc in the next 2 dc and the ch-sp, dc in the next 13 dc, dc2tog over the next 2 dc, dc in the next 13 dc, dc in the ch-sp and the last 2 dc. Repeat from * around. End with an invisible join. (144 dc, 4 dc2tog, 4 ch-2 corner sp)
Info :
Note: If your square feels a bit small at this point, you can substitute the sc in the final round for hdc instead.
Round 17 :
Join color E in any corner ch-2 sp. *(sc, ch 2, sc) in the corner, then sc in every stitch across the side to the next corner. Repeat from * around. End with an invisible join and weave in all remaining ends. (156 sc, 4 ch-2 corner sp)
I hope you enjoy every single stitch of this Marley Mae square as much as I did. There is something so deeply satisfying about finishing that final round and seeing all those layers of texture finally sitting perfectly together. It is a piece that truly shows off your skills and makes for a wonderful conversation starter in any home. Don't forget to block your finished square—it makes a world of difference in showing off those intricate details! Happy crocheting, and I can't wait to see the beautiful projects you create with this block! 🧶✨