🧶 Beautiful ✨ Detailed 💝 Adorable

Marshmallow Kittie Amigurumi Pattern

Marshmallow Kittie Amigurumi Pattern
4.9★Rating
3-5 HoursTime Needed
3.5KMade This
✂️

Intermediate Level

Ideal for those with basic crocheting experience, featuring slightly more advanced stitches and techniques to expand your skills.

⏱️

Quick Craft

Fits nicely into a free afternoon — 2 to 5 hours of focused, enjoyable crocheting.

🐥

Charming Critter

Delightful animal designs with sweet details that capture the essence of your favorite woodland and farmyard friends.

About This Marshmallow Kittie Amigurumi Pattern

Marshmallow Kittie Amigurumi Pattern crochet pattern - detailed view

She makes a genuinely beautiful handmade gift — the kind that gets picked up and hugged the moment someone sees her. Perfect for cat lovers, new babies, or anyone who appreciates something made with real care.

Why You'll Love This Marshmallow Kittie Amigurumi Pattern

I love this one because it's one of those rare patterns where the stuffing process is half the fun. Shaping that round belly, pushing fiberfill into just the right spots — it feels like sculpting. And when those embroidered eyes go on at the end and she suddenly has a personality? That moment gets me every single time.

Marshmallow Kittie Amigurumi Pattern step 1 Marshmallow Kittie Amigurumi Pattern step 2 Marshmallow Kittie Amigurumi Pattern step 3 Marshmallow Kittie Amigurumi Pattern step 4

Switch Things Up

I picked up this pattern on a rainy afternoon when I just wanted something soft and low-stakes to work on — and I ended up staying up way too late because I couldn't put it down.

The thing about velvet yarn is that it makes everything feel luxurious from the very first round. Even a half-finished blob of white velvet looks adorable sitting on your lap. But what really got me with the Marshmallow Kittie was that nose construction. Working into both sides of a foundation chain is one of those techniques that sounds more complicated than it is, and the moment you see that little snout shape emerge from Round 4 onward, you feel incredibly clever.

I made my first version exactly as written — white with a yellow calico patch — and it came out looking just like the photos. For my second one, I tried a soft grey velvet for the base with a peach ear, and honestly? It might be even cuter. The pattern is flexible that way. You could go full tortoiseshell with three colors, or keep it simple with an all-cream version that looks like a sleepy cloud.

One thing I'd tell anyone making this for the first time: don't rush the stuffing. I know it feels like a minor step, but spending an extra ten minutes shaping the cheeks and filling the nose area changes the whole face. The kittie goes from looking a bit flat to having this round, pillow-like quality that makes her irresistible.

She lives on my bookshelf now, tucked between two plants, and I get asked about her constantly. Make her in any color you love — she'll be perfect.

Common Mistakes & How to Fix Them

✗ Working the head and body as two separate pieces is a common misread — the body continues directly from Round 16 of the head, so don't fasten off when you get there or you'll have an awkward seam to deal with later.✗ The calico yellow patch shifts position across rounds 8 through 32, and it's easy to start it in the wrong spot if you're not tracking where your round begins — use a stitch marker religiously and cross-reference the stitch count at each color section.✗ When closing the tail after Round 52, pulling the yarn through only the top loop instead of all front loops of the final round leaves a visible gap — thread your needle through every front loop before cinching it shut.✗ The nose area of the head is worked from a foundation chain in both directions, and many crafters accidentally skip working into both sides — you end up with too few stitches in Round 1 if you only work one side of the chain.✗ Attaching the ears too far back on the head is one of the most common finishing mistakes here — they belong between Rounds 11 and 12, with exactly 5 stitches of distance between them, so pin and measure before sewing.✗ Under-stuffing the tail makes it flop and lose its gentle curve — pack fiberfill in firmly before the final decrease rounds so it holds its shape once closed.

Marshmallow Kittie Amigurumi Pattern

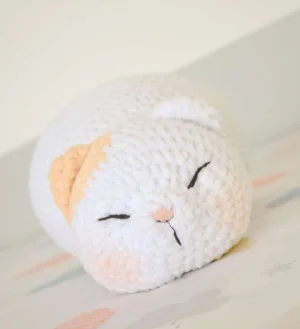
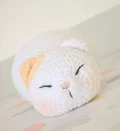
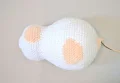
This squishy little cat is honestly one of those projects you pick up and just can't put down. The velvet yarn gives it this irresistibly soft, cloud-like texture that makes the finished piece feel like it belongs on a cozy shelf or tucked into a child's arms. You'll work the head and body as one continuous piece, which keeps the construction clean and satisfying. The calico-style color patch adds just enough character without making the color changes feel fussy or stressful.

Intermediate 3-5 Hours

Materials Needed for Marshmallow Kittie Amigurumi Pattern

— Main Fabric

  • 01
    One full skein of Himalaya Velvet yarn in white (#90001) — this is the primary color used throughout the head, body, and one ear
  • 02
    Approximately a quarter skein of Himalaya Velvet yarn in yellow/golden (#90033) — used for the calico color patch on the head and body, the tail, and one ear
  • 03
    A small length of dark brown yarn (such as a semi-cotton weight like Yarnart Jeans) for embroidering the eyes and nose outline
  • 04
    A small length of pink yarn for embroidering the inner nose detail

— Tools Required

  • 01
    4.00mm or 4.50mm crochet hook
  • 02
    Polyester fiberfill stuffing
  • 03
    Tapestry needle for sewing and embroidery
  • 04
    Scissors
  • 05
    Straight pins for positioning ears before sewing
  • 06
    Stitch marker or a short length of contrast-color yarn to mark round beginnings
  • 07
    Pink blush makeup powder or pink acrylic paint for optional cheek blush

Progress Tracker

0% Complete

— 1. Head :

Info :

Start with white yarn. Ch 4, then begin in the second chain from the hook. You'll work into both sides of the foundation chain for the first 3 rounds.

Round 1 :

1 inc, 1 sc, work 3 sc into the final stitch, then continue along the other side of the foundation chain: 2 sc. (8 sts)

Round 2 :

2 inc, 1 sc, 3 inc, 1 sc, 1 inc. (14 sts)

Round 3 :

14 sc. (14 sts)

Round 4 :

2 sc, 8 inc, 4 sc. (22 sts)

Round 5 :

1 sc, 3 inc, (1 sc, inc) x 6 times, 3 inc, 3 sc. (34 sts)

Round 6 :

1 sc, (1 sc, inc) x 4 times, (2 sc, inc) x 4 times, 2 sc, (inc, 1 sc) x 4 times, 3 sc. (46 sts)

Round 7 :

46 sc. (46 sts)

Round 8 :

(W) 24 sc, (Y) 5 sc, (W) 13 sc, 2 dec. (44 sts)

Round 9 :

(W) 23 sc, (Y) 8 sc, (W) 6 sc, dec, 5 sc. (43 sts)

Round 10 :

(W) 5 sc, dec, 16 sc, (Y) 9 sc, (W) 11 sc. (42 sts)

Round 11 :

(W) 22 sc, (Y) 9 sc, (W) 11 sc. (42 sts)

Round 12 :

(W) 22 sc, (Y) 9 sc, (W) 5 sc, dec, 4 sc. (41 sts)

Round 13 :

(W) 4 sc, dec, 17 sc, (Y) 7 sc, (W) 11 sc. (40 sts)

Round 14 :

(W) 3 sc, (dec, 6 sc) x 2 times, dec, 2 sc, (Y) 4 sc, dec, (W) 6 sc, dec, 3 sc. (35 sts) — cut yellow yarn.

Round 15 :

35 sc. (35 sts)

Round 16 :

35 sc. (35 sts)

Info :

Stuff the head firmly with fiberfill before moving on. Tip: The crocheted nose will naturally sit quite pointed. To make it sink and look more natural, wait until after stuffing to embroider the nose — pressing the needle through will help flatten and shape it.

Info :

Embroidery details for the face: Using dark brown yarn, embroider the nose over Rounds 1–2, working 2 stitches wide. Embroider the eyes between Rounds 4–6, each eye 3 stitches wide, with 8 stitches of space between them. Fill in the center of the nose using pink yarn. A smooth semi-cotton weight yarn works well for these embroidered details.
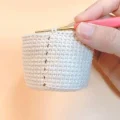
— 2. Body :

Info :

The body continues directly from Round 16 of the head. Do not fasten off — keep working in the same spiral.

Round 17 :

8 sc, (inc, 4 sc) x 4 times, inc, 6 sc. (40 sts)

Round 18 :

7 sc, (inc, 5 sc) x 4 times, inc, 8 sc. (45 sts)

Round 19 :

9 sc, (inc, 6 sc) x 4 times, inc, 7 sc. (50 sts)

Round 20 :

50 sc. (50 sts)

Round 21 :

12 sc, (inc, 7 sc) x 4 times, inc, 5 sc. (55 sts)

Round 22 :

55 sc. (55 sts)

Round 23 :

55 sc. (55 sts)

Round 24 :

5 sc, (8 sc, inc) x 5 times, 5 sc. (60 sts)

Round 25 :

60 sc. (60 sts)

Round 26 :

(W) 28 sc, (Y) 6 sc, (W) 26 sc. (60 sts)

Round 27 :

(W) 26 sc, (Y) 10 sc, (W) 24 sc. (60 sts)

Round 28 :

(W) 26 sc, (Y) 11 sc, (W) 23 sc. (60 sts)

Round 29 :

(W) 26 sc, (Y) 11 sc, (W) 23 sc. (60 sts)

Round 30 :

(W) 26 sc, (Y) 11 sc, (W) 23 sc. (60 sts)

Round 31 :

(W) 27 sc, (Y) 9 sc, (W) 24 sc. (60 sts)

Round 32 :

(W) 28 sc, (Y) 8 sc, (W) 24 sc. (60 sts) — cut yellow yarn.

Round 33 :

(W) 60 sc. (60 sts)

Round 34 :

(W) 60 sc. (60 sts)

Round 35 :

12 sc, (dec, 6 sc) x 6 times. (54 sts)

Round 36 :

12 sc, (dec, 5 sc) x 6 times. (48 sts)

Round 37 :

10 sc, (dec, 4 sc) x 6 times, 2 sc. (42 sts)

Info :

Begin stuffing the body now while the opening is still large enough to work comfortably.

Round 38 :

10 sc, (dec, 3 sc) x 6 times, 2 sc. (36 sts)

Round 39 :

(4 sc, dec) x 6 times. (30 sts)

Round 40 :

(3 sc, dec) x 6 times. (24 sts) — cut white yarn. Stuff the body firmly before continuing.

— 3. Tail :

Info :

Switch to yellow yarn and continue working in the same spiral from Round 40.

Round 41 :

24 sc. (24 sts)

Round 42 :

(2 sc, dec) x 6 times. (18 sts)

Round 43 :

18 sc. (18 sts)

Round 44 :

18 sc. (18 sts)

Round 45 :

18 sc. (18 sts)

Round 46 :

18 sc. (18 sts)

Round 47 :

18 sc. (18 sts)

Round 48 :

2 dec, 10 sc, 2 dec. (14 sts)

Round 49 :

dec, 10 sc, dec. (12 sts)

Round 50 :

dec, 8 sc, dec. (10 sts)

Round 51 :

dec, 6 sc, dec. (8 sts)

Round 52 :

dec, 4 sc, dec. (6 sts)

Info :

Fill the tail firmly with fiberfill. Then fasten off, leaving a generous yarn tail. Thread it onto your tapestry needle and run it through the front loops of all stitches in the final round, then pull snug to close the opening completely. Tuck the remaining end inside.

— 4. Ears (Make 2 — one in yellow, one in white) :

Round 1 :

Work 6 sc into a MR. (6 sts)

Round 2 :

6 inc. (12 sts)

Round 3 :

(1 sc, inc, 1 sc) x 4 times. (16 sts)

Info :

Fasten off and leave a long yarn tail for sewing. Use this tail to stitch the open bottom edge of the ear closed before attaching it to the head.

Assembly Instructions

  • Complete all face embroidery on the head before attaching any other pieces — it's much easier to work on a standalone head. Embroider the nose outline over Rounds 1–2 in dark brown yarn (2 stitches wide), fill the center with pink yarn, then stitch the closed eyes between Rounds 4–6 in dark brown (each eye 3 stitches wide, 8 stitches apart).
  • Once the face is finished and the head is stuffed, use the long yarn tail on each ear to first close the flat bottom edge by stitching it together, then position both ears on the head. Place them between Rounds 11 and 12, with exactly 5 stitches of space between the two ears. Pin them in place and check from the front before sewing down.
  • Sew each ear securely to the head, passing the needle through several stitches on both the ear and the head to ensure they stay upright and don't flop. Weave in all ends from the ear attachment on the inside of the head.
  • The tail is worked as a continuous extension of the body, so it's already connected — no separate sewing needed. Just make sure the tip is fully closed and the stuffing is packed in well enough to give it a slight natural curve.
  • If using pink blush or acrylic paint for cheeks, apply it lightly with a dry brush or cotton swab to the cheek area now that everything is assembled. Build the color gradually — you can always add more, but you can't easily take it away from velvet yarn.
  • Do a final check of all yarn ends and make sure everything is tucked firmly inside. Give the kittie a gentle squeeze to redistribute the stuffing and even out the shape.

Important Notes

  • 💡Work in a continuous spiral throughout — never join at the end of a round unless the pattern specifically says so. Use a stitch marker or a scrap of yarn in a contrast color to flag the first stitch of each round.
  • 💡Velvet yarn can make it tricky to see your stitches clearly, especially on decrease rounds. Work in good lighting and slow down on rounds with multiple dec stitches to avoid accidentally skipping one.
  • 💡The invisible decrease is strongly recommended here — a regular decrease on velvet creates a visible bump that stands out against the plush texture. Insert your hook through the front loops only of the next two stitches for a much cleaner result.
  • 💡Color changes on this pattern span multiple rounds with gaps between sections. When the distance between color blocks is large, cut the inactive yarn rather than carrying it — tie the ends together on the inside and weave them in to prevent them from showing through the velvet.
  • 💡Take your time with stuffing — this is genuinely the step that makes or breaks the finished shape. Add fiberfill in small amounts, shaping as you go. The nose area and cheeks especially benefit from extra attention; push stuffing into those spots to create a fuller, rounder face.
  • 💡Don't skip pinning the ears before sewing. The placement between Rounds 11–12 with 5 stitches between them sounds precise because it is — even half a round off makes the ears look asymmetrical on the finished piece.

There's something about finishing a sleeping cat amigurumi that just feels right — like you've made something genuinely peaceful. The Marshmallow Kittie is one of those projects that photographs beautifully, sits prettily on a shelf, and gets picked up for a squeeze more often than you'd expect. 🧶 Whether she ends up as a gift or stays with you, she's the kind of handmade piece that lingers. Grab your velvet yarn and enjoy every round — you're going to love how she turns out. ✨

You ask,

we answer.

FAQs

Can I use a different brand of velvet yarn for this pattern?

Yes, any velvet or chenille yarn in a similar weight to Himalaya Velvet will work. Just be aware that velvet yarns can vary slightly in thickness between brands — if your gauge is off, your finished kittie may come out a bit larger or smaller than the 35cm stated in the pattern. Swatch a few rounds and compare your stitch size before committing.

How do I keep track of where the yellow color patch goes on the body?

The yellow section shifts gradually across Rounds 8–32, which can feel confusing. The best approach is to mark your round start carefully and count the exact stitch positions before switching colors each round. Cross-reference the stitch counts shown in parentheses — if your total doesn't match, backtrack before continuing.

The nose part of the head came out really pointy — is that normal?

Completely normal, and the pattern accounts for it. The pointed nose shape is intentional — it comes from working in both directions of a foundation chain. The key is to wait until after stuffing to embroider the nose, since the embroidery stitches help press it down and flatten it into that cute, subtle cat nose shape.

Is this pattern safe to make for a baby or very young child?

Because this pattern uses embroidered eyes rather than plastic safety eyes, it's a softer choice for young children than many amigurumi. That said, always check that all yarn ends are woven in securely and the stuffing is well-contained before giving any handmade toy to a small child.

Can I make both ears in white instead of one white and one yellow?

Absolutely — that's a totally valid creative choice. The original has one white and one yellow ear for the calico look, but if you prefer a solid white cat, simply work both ears in white. The stitch counts stay exactly the same.