About This Pippa the Panda Amigurumi Pattern
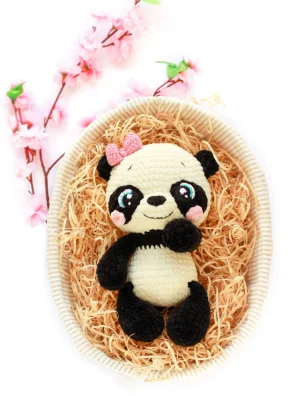
This cuddly panda makes the most thoughtful handmade gift for baby showers or birthdays—it's soft enough for snuggles and cute enough to be the star of any nursery shelf.
Ideal for those with basic crocheting experience, featuring slightly more advanced stitches and techniques to expand your skills.
Fits nicely into a free afternoon — 2 to 5 hours of focused, enjoyable crocheting.
Playful characters full of personality, designed to spark imagination and become cherished playtime favorites.
This cuddly panda makes the most thoughtful handmade gift for baby showers or birthdays—it's soft enough for snuggles and cute enough to be the star of any nursery shelf.
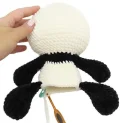
I absolutely adore this pattern because it uses a 'join-as-you-go' method for the arms and legs, which means way less sewing for us at the end! There is something so satisfying about watching the limbs become part of the body in real-time. Plus, working with plush yarn is a total tactile treat—it’s fast, forgiving, and incredibly soft on your hands while you work.
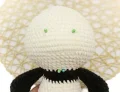
I have a confession to make: I am absolutely obsessed with pandas. There is just something about those clumsy, monochrome bears that makes my heart melt every single time. When I sat down to design Pippa, I knew she had to be the softest thing in the world, which is why I reached for that chunky plush yarn. If you haven't worked with velvet or chenille-style yarn before, you are in for a treat! It works up so fast, and the texture hides almost all of your stitches, making the finished toy look like it came straight from a high-end boutique.
One tip I really want to share from my own experience making this: don't be afraid to get a little aggressive with the muzzle tightening. It feels scary to pull that thread tight, but that’s what gives her that sweet, indented look for the eyes. Also, because we’re joining the arms and legs as we go, you’ll save yourself so much sewing time at the end—which, let’s be honest, is every crafter's dream! I hope you enjoy making her as much as I did. Happy hooking!
Get ready to create the ultimate snuggle buddy with this darling panda pattern! Pippa is designed with super-soft plush yarn to be as squishy as a cloud, making her the perfect companion for little ones or a sweet addition to your own shelf. You will love how her chunky features and oversized eye patches give her so much personality. This project is a joy to work up, and the best part is seeing those big, soulful eyes come to life as you finish the details.
Work 6 sc into a mr (6)
6 x inc (12)
6 x (sc, inc) (18)
sc in every st (18)
4 sc, 3 x (sc, dec), 5 sc (15)
sc in every st (15)
4 sc, 3 x dec, 5 sc (12)
sc in every st (12)
sc in every st (12)
sc in every st (12)
sc in every st (12)
sc in every st (12)
sc in every st (12)
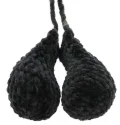
Stuff only the bottom section of the paw firmly.
Work 10-11 sc so the fold aligns with the decreases, ch 1, fold flat and sc 6 through both layers to close. Cut yarn and fasten off.
Work 6 sc into a mr (6)
6 x inc (12)
6 x (sc, inc) (18)
6 x (2 sc, inc) (24)
sc in every st (24)
6 sc, 3 x (2 sc, dec), 6 sc (21)
sc in every st (21)
6 sc, 3 x (sc, dec), 6 sc (18)
sc in every st (18)
6 sc, 3 x dec, 6 sc (15)
sc in every st (15)
sc in every st (15)
sc in every st (15)
Stuff only the lower portion of the leg.
Work 12-13 sc to reach the side, ch 1, fold flat and sc 7 through both layers to close. Cut yarn and fasten off.
Using white plush yarn, ch 9.
Starting in 2nd ch from hook: 7 sc, 3 sc in the last st. Turn to work along other side: 6 sc, inc (18)
inc, 6 sc, 3 x inc, 6 sc, 2 x inc (24)
sc, inc, 6 sc, 3 x (sc, inc), 6 sc, 2 x (sc, inc) (30)
2 sc, inc, 6 sc, 3 x (2 sc, inc), 6 sc, 2 x (2 sc, inc) (36)
3 sc, inc, 6 sc, 3 x (3 sc, inc), 6 sc, 2 x (3 sc, inc) (42)
4 sc, inc, 6 sc, 3 x (4 sc, inc), 6 sc, 2 x (4 sc, inc) (48)
sc in every st (48)
sc in every st (48)
5 sc, inc, 6 sc, 3 x (5 sc, inc), 6 sc, 2 x (5 sc, inc) (54)
sc in every st (54)
sc in every st (54)
Ensure your marker is exactly on the side bend so the muzzle increases are centered.
11 sc, 6 x inc, 37 sc (60)
sc in every st (60)
sc in every st (60)
sc in every st (60)
11 sc, 6 x dec, 37 sc (54)
5 sc, dec, 6 sc, 3 x (5 sc, dec), 6 sc, 2 x (5 sc, dec) (48)
4 sc, dec, 6 sc, 3 x (4 sc, dec), 6 sc, 2 x (4 sc, dec) (42)
3 sc, dec, 6 sc, 3 x (3 sc, dec), 6 sc, 2 x (3 sc, dec) (36)
2 sc, dec, 6 sc, 3 x (2 sc, dec), 6 sc, 2 x (2 sc, dec) (30)
sc, dec, 6 sc, 3 x (sc, dec), 6 sc, 2 x (sc, dec) (24)
Switch to black plush yarn.
6 sc joining the first paw, 6 sc, 6 sc joining the second paw, 6 sc (24)
3 x (7 sc, inc) (27)
sc in every st (27)
3 x (8 sc, inc) (30)
Switch back to white plush yarn.
sc in every st (30)
3 x (9 sc, inc) (33)
sc in every st (33)
3 x (10 sc, inc) (36)
8 sc, 6 x (sc, inc), 16 sc (42)
sc in every st (42)
sc in every st (42)
2 sc, 7 sc joining the first leg, 14 sc, 7 sc joining the second leg, 12 sc (42)
6 x (5 sc, dec) (36)
6 x (4 sc, dec) (30)
6 x (3 sc, dec) (24)
6 x (2 sc, dec) (18)
6 x (sc, dec) (12)
6 x dec (6)
Stuff the body as you go. Close the remaining hole and weave in the end.
Using black plush, work 6 sc into a mr (6)
6 x inc (12)
sc in every st (12)
Ch 1, fold flat and sc 6 through both sides. Leave a tail for sewing.
Using black plush, work 6 sc into a mr (6)
6 x inc (12)
sc in every st (12)
6 x dec (6)
Add a tiny bit of stuffing and leave a long yarn tail.
Using black semi-cotton, ch 6.
In 2nd ch from hook: inc, sc, 3 sc in one st, sc, 4 sc in the last ch. Turn to other side: 3 sc, inc (14). Fasten off with a sewing tail.
Using pink plush yarn, work 6 sc into a mr (6). Fasten off and leave a tail.
Using black plush, ch 6.
In 2nd ch from hook: 3 sc, hdc, 5 hdc in the last ch. Turn: hdc, 2 sc, inc (14)
inc, 2 sc, hdc, 5 x inc hdc, hdc, 2 sc, 2 x inc (22). Fasten off.
Using black semi-cotton, work 6 sc into a mr (6)
6 x inc (12)
4 x (sc, inc), switch to white, blo: sc, 3 x inc (20)
blo: inc, sc, ss (4). Fasten off.
Use blue yarn to embroider a chain stitch line just under the white section.
Embroider small white glares onto the black part of the eye.
Using pink semi-cotton, ch 30 (28 + 2 for turning).
hdc in 3rd ch from hook and each st across (28), ch 2, turn.
28 x hdc, ch 2, turn.
28 x hdc, ch 2, turn.
28 x hdc. Fasten off.
Fold into a loop and ss the ends together. Wrap yarn around the center to pinch it into a bow shape.
I truly hope you enjoyed every moment of bringing Pippa to life! There is something so special about creating a character from just a ball of yarn and a hook. Whether she is going to a new home as a gift or staying with you to brighten up your craft room, she’s sure to bring a smile to everyone who sees her. Don't forget to give her a big squeeze once she's finished—that plush yarn makes her the best hugger! I'd love to see your finished work, so keep on creating and sharing that handmade magic. Happy crocheting, friend! 🧶✨
Absolutely! If you prefer safety eyes, I recommend 12-14mm ones. Place them through the black eye patches before attaching the patches to the head.
Plush yarn can be fragile. Try chaining 2 and working your first round into the second chain from the hook instead of using a traditional magic ring.
The oval shape comes from the starting chain and the specific increases. Ensure you are stuffing the sides of the head more than the front and back to maintain that flat-faced look.
You can, but your panda will be much smaller (about half the size). Use a 3.5mm hook for the body and a 2.0mm hook for the details if you switch.
