About This Sleeping Pink Puff Amigurumi Pattern
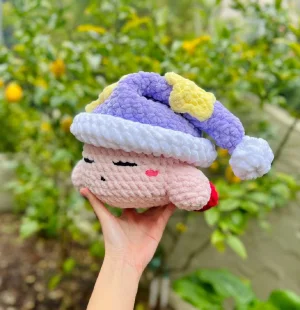
This sweet plushie makes a wonderful gift for retro gaming fans or an adorable addition to a nursery shelf where a touch of dreamy magic is needed.
Ideal for those with basic crocheting experience, featuring slightly more advanced stitches and techniques to expand your skills.
Takes 5-7 hours, making it an enjoyable project to finish over a couple of days.
Playful characters full of personality, designed to spark imagination and become cherished playtime favorites.
This sweet plushie makes a wonderful gift for retro gaming fans or an adorable addition to a nursery shelf where a touch of dreamy magic is needed.
I absolutely adore how customizable this project is! Making the sleepy hat and choosing where to place those little yellow stars felt like decorating a tiny masterpiece. Plus, working with chunky blanket yarn means it works up incredibly fast, and the texture is just unbelievably cuddly.
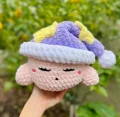
There is something incredibly therapeutic about working with thick, velvety blanket yarn. The way it glides on an 8mm hook makes the stitches fly by, and before you know it, you have a wonderfully squishy friend in your hands. When I first designed this sleepy little puffball, I wanted to capture that ultimate cozy, lazy Sunday vibe.
I ended up flipping his nightcap inside out completely by accident while trying to hide some yarn tails, and I fell in absolute love with the texture it created! It gave the hat this gorgeous, rustic ribbing that looked so much more detailed than standard stitches. That is the beauty of our craft—sometimes the happiest accidents turn into our favorite design features.
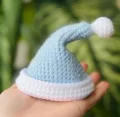
If you want to put your own spin on this, try experimenting with different hat colors! A soft mint green or a pastel blue looks incredibly dreamy. You can also swap the yellow stars for little white polka dots if you want a classic pajama look. I hope this project brings a little pocket of peace to your crafting corner today.
Bring this iconic, sleepy pink puffball to life with a project that is pure cozy joy. You will love watching this classic gaming character take shape as you craft his adorable nightcap and peaceful closed eyes. It is the ultimate relaxing make for a quiet weekend, resulting in a plushie so soft you will want to use it as a mini pillow yourself.
Make 5 sc into a MR (5)
Work 5 inc around (10)
Work 10 sc in each round (10)
Repeat (1 sc, 1 inc) 5 times (15)
Work 15 sc around (15)
Repeat (2 sc, 1 inc) 5 times (20)
Work 20 sc around (20)
Repeat (3 sc, 1 inc) 5 times (25)
Work 25 sc around (25)
Repeat (4 sc, 1 inc) 5 times (30)
Work 30 sc around (30)
Repeat (5 sc, 1 inc) 5 times (35)
Work 35 sc in each round (35)
Repeat (6 sc, 1 inc) 5 times (40)
Work 40 sc around (40)
Repeat (7 sc, 1 inc) 5 times (45)
Work 45 sc around (45)
Repeat (8 sc, 1 inc) 5 times (50)
Work 50 sc around (50)
Repeat (9 sc, 1 inc) 5 times (55)
Work 55 sc in each round (55)
Switch over to your white yarn
Work 55 sc in each round (55)
Fasten off. Flip the hat inside out to get the textured look. Fold the white section upwards along the color change line to make a raised brim.
Make 4 sc into a MR (4)
Work 4 inc around (8)
Repeat (1 sc, 1 inc) 4 times (12)
Work 12 sc in each round (12)
Repeat (1 sc, 1 dec) 4 times (8)
Add stuffing to the pom pom now.
Work 4 dec around (4)
Finish stuffing, fasten off leaving a long tail, weave through front loops to close, and sew to the tip of the hat.
Make 10 sc into a MR (10)
Repeat (1 sc, 1 inc) 5 times (15)
Repeat (1 sl st, [1 hdc, 1 dc, 1 hdc in the next stitch], 1 sl st) 5 times (25)
Fasten off and leave a long yarn tail for sewing onto the nightcap.
Make 8 sc into a MR (8)
Repeat (1 sc, 1 inc) 4 times (12)
Fasten off and leave a long tail for sewing.
Make 6 sc into a MR (6)
Work 6 inc around (12)
Repeat (1 sc, 1 inc) 6 times (18)
Repeat (1 sc, 1 inc, 1 sc) 6 times (24)
Repeat (3 sc, 1 inc) 6 times (30)
Repeat (2 sc, 1 inc, 2 sc) 6 times (36)
Repeat (5 sc, 1 inc) 6 times (42)
Repeat (3 sc, 1 inc, 3 sc) 6 times (48)
Work 48 sc in each round (48)
Repeat (6 sc, 1 dec) 6 times (42)
Repeat (5 sc, 1 dec) 6 times (36)
Repeat (4 sc, 1 dec) 6 times (30)
Start stuffing the body. Slip the sleepy hat on to ensure a comfortable fit around Round 10. Do not overstuff; the bottom must stay flat so he lays nicely on his belly.
Repeat (3 sc, 1 dec) 6 times (24)
Repeat (2 sc, 1 dec) 6 times (18)
Repeat (1 sc, 1 dec) 6 times (12)
Work 6 dec around (6)
Complete stuffing. Fasten off, weave through front loops of the final round, pull tight to close, and hide the yarn tail inside.
Make 5 sc into a MR (5)
Work 5 inc around (10)
Repeat (1 sc, 1 inc) 5 times (15)
Work 15 sc in each round (15)
Stuff the arms lightly and fasten off, leaving a long tail for sewing.
Make 6 sc into a MR (6)
Repeat (1 sc, 1 inc) 3 times (9)
Repeat (2 sc, 1 inc) 3 times (12)
Work 12 sc in each round (12)
Begin stuffing the feet lightly.
Repeat (2 sc, 1 dec) 3 times (9)
Repeat (1 sc, 1 dec) 3 times (6)
Add a bit more stuffing, fasten off leaving a long sewing tail. Keep the opening open.
I hope you had the absolute best time bringing this dreamy little pink puffball to life! There is nothing quite like finishing a project that instantly makes you smile, and this sleeping cutie does exactly that. Place him on your nightstand or gift him to a fellow gamer who needs a little extra cozy magic in their life. Don't forget to share your finished photos with our lovely community—I cannot wait to see your custom hats! Happy crocheting, friends! 🧶✨💤
Absolutely! If you switch to worsted weight yarn with a 4mm hook, your Kirby will turn out much smaller—perfect for a cute keychain! Just make sure to scale down all your hook sizes proportionally.
This usually happens if the bottom of the body is overstuffed. When you reach the final rounds, press the bottom against a flat table to flatten it before closing the hole, and ensure the feet are sewn flat on the bottom edges.
The pattern is designed so the hat fits snugly around Round 10. If it feels too loose, you can weave a thin strand of pink yarn through the brim and tie it discreetly to the head, or sew a tiny snap fastener inside.
Follow the overhand knot method! Pull the yarn from the bottom of the body up to the face, tie the knot, and insert the needle back into the exact same stitch. Pulling it through to the bottom secures it perfectly.
