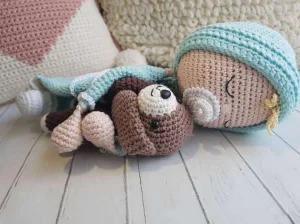
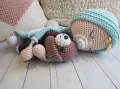
There is something so incredibly special about a handmade lovey that a child can carry through their earliest years. I designed this pattern to be more than just a toy; it is a duo of comforting companions that feel like a soft hug. You will love the way the gentle textures come together, from the sleepy embroidered eyes to the clever use of different hook sizes that give the blanket bodies their perfect, floppy drape. It is a project filled with personality and heart.
Progress Tracker
0% Complete
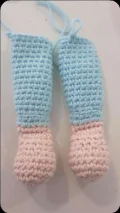
— 1. Baby Arms (Make 2) :
Round 1 :
Begin with 6 sc in a magic ring (6)
Round 2 :
Work 6 inc around the ring (12)
Round 3 :
Repeat (1 sc, 1 inc) 6 times (18)
Round 4-6 :
Work 18 sc (18)
Round 7 :
Repeat (1 sc, 1 dec) 6 times (12)
Round 8-9 :
Work 12 sc (12)
Info :
Begin adding stuffing to the hand area now.
Round 10 :
Flatten the top edge and work 6 sc through both layers to close (6)
Round 11 :
Work sc into the 6 front loops and then sc into the 6 back loops of the previous round to reopen the circle (12)
Round 12 :
Switch to light blue yarn and work 12 sc (12)
Round 13 :
Work 12 sc (12)
Round 14 :
In BLO, repeat (3 sc, 1 inc) 3 times (15)
Round 15-28 :
Work 15 sc (15)
— 2. Baby Body & Feet :
Info :
Start with white yarn and the 2.5mm hook.
Round 1 :
Create a magic ring and work 6 sc into it (6)
Round 2 :
Work 6 inc around (12)
Round 3 :
Repeat (1 sc, 1 inc) 6 times (18)
Round 4 :
Repeat (2 sc, 1 inc) 6 times (24)
Round 5-7 :
Work 24 sc (24)
Round 8 :
Work 6 sc, 6 dec, 6 sc (18)
Round 9 :
Work 6 sc, 3 dec, 6 sc (15)
Round 10 :
Work 15 sc in BLO (15)
Round 11 :
Work 15 sc and stuff the foot tip (15)
Round 12 :
Work 15 sc (15)
Round 13 :
Switch to skin tone yarn and work 15 sc in BLO (15)
Round 14 :
Work 15 sc (15)
Round 15 :
Switch to light blue yarn and work 15 sc (15)
Round 16 :
Work 15 sc (15)
Round 17 :
Work 15 sc, then work 3 more sc past the marker to shift the starting point.
Round 18 :
Flatten the top and work 7 sc through both layers to close (7)
Round 19 :
Work 7 sc into the front loops and 8 sc into the back loops, plus an additional 15 sc around to reach a total of 30 stitches.
Info :
Fasten off the first leg and repeat steps for the second leg, but do not cut the yarn on the second one.
Round 20 :
On the second leg, ch 5, join to the first leg with 1 sc, work 14 sc around leg, 5 sc along the chain, 15 sc around the other leg, and 5 sc along the opposite side of the chain (40)
Info :
Switch to the 3.5mm hook now for a softer body.
Round 21 :
Work 40 sc (40)
Round 22 :
Work 19 sc, 1 inc, 19 sc, 1 inc (42)
Round 23 :
Repeat (6 sc, 1 inc) 6 times (48)
Round 24-25 :
Work 48 sc (48)
Round 26 :
Repeat (7 sc, 1 inc) 6 times (54)
Round 27 :
Work 54 sc (54)
Round 28 :
Repeat (8 sc, 1 inc) 6 times (60)
Round 29-32 :
Work 60 sc (60)
Round 33 :
Work 60 sc in BLO (60)
Round 34 :
Work 60 sc (60)
Round 35 :
Repeat (8 sc, 1 dec) 6 times (54)
Round 36 :
Work 54 sc (54)
Round 37 :
Work 54 sc in BLO (54)
Round 38 :
Repeat (7 sc, 1 dec) 6 times (48)
Round 39 :
Work 48 sc (48)
Round 40 :
Work 48 sc in BLO (48)
Round 41 :
Repeat (6 sc, 1 dec) 6 times (42)
Round 42 :
Work 42 sc in BLO (42)
Info :
Switch back to the 2.5mm hook.
Round 43 :
Work 42 sc (42)
Round 44 :
Repeat (5 sc, 1 dec) 6 times (36)
Round 45 :
Work 36 sc (36)
Round 46 :
Work 3 sc, join first arm with 7 sc through both arm and body, work 11 sc, join second arm with 7 sc, work 8 sc (36)
Round 47 :
Work 3 sc, 8 sc along the top edge of the arm, 11 sc, 8 sc along the top of the other arm, and 8 sc (38)
Round 48 :
Work 17 sc, 1 dec, 17 sc, 1 dec (36)
Round 49 :
Repeat (4 sc, 1 dec) 6 times (30)
Round 50 :
Work 30 sc in BLO (30)
Round 51 :
Switch to skin tone yarn and work 30 sc (30)
Round 52 :
Repeat (3 sc, 1 dec) 6 times (24)
Round 53 :
Repeat (2 sc, 1 dec) 6 times (18)
Info :
Keep the yarn attached to continue directly into the head.
— 3. Baby Head :
Round 1 :
Work 2 dec, flatten the neck opening and close with 8 sc. Then work 8 sc in FLO and 8 sc in BLO to create a base for the head (16)
Round 2 :
Work 16 inc (32)
Round 3 :
Repeat (3 sc, 1 inc) 8 times (40)
Round 4 :
Repeat (4 sc, 1 inc) 8 times (48)
Round 5 :
Repeat (5 sc, 1 inc) 8 times (56)
Round 6-7 :
Work 56 sc (56)
Round 8 :
Repeat (6 sc, 1 inc) 8 times (64)
Round 9-16 :
Work 64 sc (64)
Round 17 :
Work 23 sc, (1 sc, 1 dec) twice, 26 sc, (1 sc, 1 dec) twice, 3 sc (60)
Round 18 :
Work 60 sc (60)
Round 19 :
Repeat (8 sc, 1 dec) 6 times (54)
Round 20-21 :
Work 54 sc (54)
Round 22 :
Repeat (7 sc, 1 dec) 6 times (48)
Round 23 :
Repeat (6 sc, 1 dec) 6 times (42)
Round 24 :
Repeat (5 sc, 1 dec) 6 times (36)
Round 25 :
Repeat (4 sc, 1 dec) 6 times (30)
Round 26 :
Repeat (3 sc, 1 dec) 6 times (24)
Round 27 :
Repeat (2 sc, 1 dec) 6 times (18)
Round 28 :
Repeat (1 sc, 1 dec) 6 times (12)
Info :
Stuff the head firmly and close the remaining gap.
— 4. Pacifier :
Round 1 :
Work 6 sc in a magic ring (6)
Round 3 :
Repeat (1 sc, 1 inc) 6 times (18)
Round 4 :
Repeat (2 sc, 1 inc) 6 times (24)
Round 5 :
Work 24 crab st around the edge (24)
Pacifier Ring :
Ch 6, sl st to join in a circle. Work 12 sc into the ring, then work 18 sc over those 12 sc to thicken it.
— 5. Hood Hat :
Info :
Use the 3.5mm hook and light blue yarn.
Round 1 :
Work 6 sc in a magic ring (6)
Round 3 :
Repeat (1 sc, 1 inc) 6 times (18)
Round 4 :
Repeat (2 sc, 1 inc) 6 times (24)
Round 5 :
Repeat (3 sc, 1 inc) 6 times (30)
Round 6 :
Repeat (4 sc, 1 inc) 6 times (36)
Round 7 :
Repeat (5 sc, 1 inc) 6 times (42)
Round 8 :
Repeat (6 sc, 1 inc) 6 times (48)
Round 9 :
Repeat (7 sc, 1 inc) 6 times (54)
Round 10 :
Repeat (8 sc, 1 inc) 6 times (60)
Round 11-17 :
Work 60 sc (60)
Round 18 :
Work 52 sc, ch 1 and turn leaving 8 stitches unworked (52)
Round 19-24 :
Work 52 sc across, using FLO on even rounds and BLO on odd rounds to create texture (52)
Round 25 :
Work 52 sl st (52)
Info :
Finish by chaining 20 for a tie, fasten off, and repeat on the other side.
— 6. Hair & Details :
Hair Row :
With 2mm hook and yellow yarn, ch 21. Work 20 sc back down the chain. Into each sc, work (ch 20, 1 sl st) to create loops.
Details :
On any remaining visible loops on the body, work (1 sl st, ch 1) in each loop for a decorative finish.
Collar :
Starting at the back of Round 50: (ch 3, 1 dc) in first st, 2 dc in each st until the 13th. In 14th st: (1 dc, 1 hdc). In 15th st: 1 sl st. In 16th st: (1 hdc, 1 dc). Continue with 2 dc in each remaining st and sl st to close.
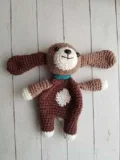
— 7. Puppy Head :
Info :
Use the 2.5mm hook and white yarn.
Round 1 :
Work 6 sc in a magic ring (6)
Round 3 :
Repeat (1 sc, 1 inc) 6 times (18)
Round 4-6 :
Work 18 sc (18)
Round 7 :
Switch to brown yarn: 6 sc, 6 inc, 6 sc (24)
Round 9 :
Repeat (3 sc, 1 inc) 6 times (30)
Round 10 :
Repeat (4 sc, 1 inc) 6 times (36)
Round 11-13 :
Work 36 sc (36)
Round 14 :
Repeat (4 sc, 1 dec) 6 times (30)
Round 15 :
Repeat (3 sc, 1 dec) 6 times (24)
Round 16 :
Repeat (2 sc, 1 dec) 6 times (18)
Round 17 :
Repeat (1 sc, 1 dec) 6 times (12)
Round 19 :
Work 2 dec and close using a tapestry needle (close)
— 8. Puppy Body & Limbs :
Arms :
R1-2: 6 sc in MR, then 12 sc. R3-12: Switch to brown and work rounds of 12 sc, tapering to 8 sc. R13: Flatten and close with 4 sc.
Ears :
R1-3: 6 sc in MR, then 12, then 18. R4-7: 18 sc. R8-14: Gradually decrease to 10 sc. R15: Flatten and close with 5 sc.
Feet R1-5 :
With white, R1-2: 6 sc in MR, then 12. R3-5: 12 sc. Repeat for second foot.
Legs R6-11 :
Switch to brown and work 12 sc for 6 rounds on each leg.
Body R12-15 :
Join legs with ch 4 (32 total). Work 2 rounds of 32 sc, then increase to 36 sc.
Body R16 :
Switch to 3.5mm hook and work 36 sc.
Body R17-22 :
Work rounds of 36 sc, incorporating a white belly spot (approx 2-6 sc wide) centered on the front.
Body R23-27 :
Switch back to 2.5mm hook. Dec to 30 sc, join arms in R24, then dec to 12 sc and flatten to close.
Tail :
R1: 6 sc in MR. R2-6: 6 sc. Sew to the back.
Scarf :
Ch 46, work 45 sl st back down the chain.
I hope this pattern brings a little extra magic to your crochet corner! There is nothing quite like the feeling of seeing these sleepy characters take shape under your hook. Whether you are making them for a new arrival in your family or as a special gift for a friend, they are sure to be loved. Don't forget to take a moment to admire that beautiful texture on the hood and those tiny puppy ears! I can’t wait to see your finished sets. Happy stitching, friends! 🧶 ✨ 🧸