About This Adorable Butterfly Doll Amigurumi Pattern
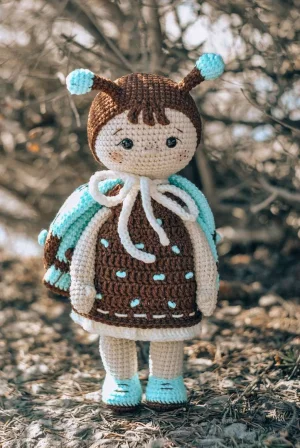
This doll is the ultimate gift for little ones who love nature and fairytales. Her removable accessories make her interactive and extra special for playtime or nursery decor.
Ideal for those with basic crocheting experience, featuring slightly more advanced stitches and techniques to expand your skills.
Requires 8-10 hours, ideal for a full day of immersive crocheting.
Playful characters full of personality, designed to spark imagination and become cherished playtime favorites.
This doll is the ultimate gift for little ones who love nature and fairytales. Her removable accessories make her interactive and extra special for playtime or nursery decor.
I absolutely love how the textures come together on this one. The tiny bubble stitches on the wings give it such a professional look, and the optional wire in the arms makes her so much more expressive. It's a project that keeps you engaged from the first stitch to the final embroidery, and the result is just pure magic.
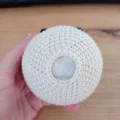
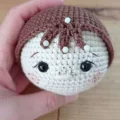
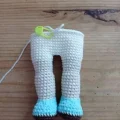
There is something so magical about making a doll that has its own little wardrobe, isn't there? I remember when I first finished the wings for this butterfly girl, I spent a good ten minutes just posing her on my desk. The wire in the arms really changes the game—it allows her to hold a little bouquet of dried flowers or just wave hello, which adds so much soul to the finished piece.
If you are feeling adventurous, you could totally play around with the wing colors. Imagine a sunset version with oranges and pinks, or a gothic moth version with deep purples and greys! I chose this turquoise and brown combo because it feels earthy yet bright, sort of like a spring morning.
One little tip from my workbench: when you are doing the needle sculpting for the eyes, don't be afraid to pull quite firmly. It creates that lovely 'sunken' look that makes amigurumi eyes pop. Just make sure your knots are hidden well under the hair cap. I can't wait to see how yours turns out—she really is a special one to keep or to give away to a very lucky friend.
Meet your new favorite project! This sweet butterfly-themed doll is such a joy to bring to life. With her removable wings and dainty dress, she's perfect for imaginative play or as a whimsical shelf sitter. I've designed her with plenty of character, from her tiny freckles to her curly antennae. You'll love seeing her personality emerge as you stitch! It's a wonderful way to use up those scraps of turquoise and brown in your stash while creating a keepsake that will be cherished for years.
Work 6 sc into a mr (6)
Work 6 inc around the ring (12)
Repeat (1 sc, 1 inc) 6 times (18)
Repeat (2 sc, 1 inc) 6 times (24)
Repeat (3 sc, 1 inc) 6 times (30)
Repeat (4 sc, 1 inc) 6 times (36)
Repeat (5 sc, 1 inc) 6 times (42)
Repeat (6 sc, 1 inc) 6 times (48)
Repeat (7 sc, 1 inc) 6 times (54)
Repeat (8 sc, 1 inc) 6 times (60)
Work 1 sc in every st around (60)
Pause here to place the 8mm safety eyes between Rounds 17 and 18, leaving a gap of 7 sts between them.
Repeat (8 sc, 1 dec) 6 times (54)
Repeat (7 sc, 1 dec) 6 times (48)
Repeat (6 sc, 1 dec) 6 times (42)
Repeat (5 sc, 1 dec) 6 times (36)
Repeat (4 sc, 1 dec) 6 times (30)
Begin stuffing the head firmly with fiberfill.
Repeat (3 sc, 1 dec) 6 times (24)
Repeat (6 sc, 1 dec) 3 times (21)
Work 21 sc, then end with a sl st (21)
Using brown yarn, work 6 sc into a mr (6)
Work 6 inc around (12)
Repeat (1 sc, 1 inc) 6 times (18)
Repeat (2 sc, 1 inc) 6 times (24)
Repeat (3 sc, 1 inc) 6 times (30)
Repeat (4 sc, 1 inc) 6 times (36)
Repeat (5 sc, 1 inc) 6 times (42)
Repeat (6 sc, 1 inc) 6 times (48)
Repeat (7 sc, 1 inc) 6 times (54)
Repeat (8 sc, 1 inc) 6 times (60)
Repeat (19 sc, 1 inc) 3 times (63)
Work 1 sc in every st around (63)
Work 29 sc, then repeat (ch 4, start in 2nd ch and work 3 sc back down, 1 sc in next st) 3 times, finish with 30 sc and 1 sl st
Mark the center of the cap at Rnd 4. Move 6 sts to each side and place pins. These are the base points for the antennae.
Attach brown yarn 1 st away from the pin and work 6 sc in a circle around the base point (6)
Work 1 sc in every st around (6)
Switch to light turquoise yarn and fasten off the brown.
Work 6 inc around (12)
Work 1 sc in every st around (12)
Work 6 dec around (6)
Lightly stuff the turquoise tip, then use a needle to pull the yarn through the front loops and close the gap.
Using main skin color, work 6 sc into a mr (6)
Repeat (1 sc, 1 inc) 3 times (9)
Repeat (2 sc, 1 inc) 3 times (12)
Work 1 sc in every st around (12)
Work 2 sc, 1 bubble, then 9 sc (12)
Work 1 sc in every st around (12)
Repeat (2 sc, 1 dec) 3 times (9)
Repeat (2 sc, 1 inc) 3 times (12)
Work 1 sc in every st around (12)
Insert the prepared 15cm wire and stuff the hand area firmly.
Work 1 sc in every st around (12)
Lightly stuff the upper portion of the arm before finishing.
Using brown yarn, ch 5. Starting in 2nd ch: 1 inc, 2 sc, 6 sc in last ch. On other side: 2 sc, 1 inc (14)
Work 1 inc, 3 sc, 6 inc, 3 sc, 1 inc (22)
Work 1 inc, 3 sc, repeat (1 sc, 1 inc) 6 times, 5 sc, 1 inc (30)
Switch to light turquoise yarn for the socks.
Work 1 sc in the BLO of every st around (30)
Work 9 sc, repeat (1 dec, 2 sc) 3 times, finish with 9 sc (27)
Work 1 sc in every st around (27)
Work 7 sc, repeat (1 sc, 1 dec) 5 times, finish with 5 sc (22)
Work 7 sc, 1 dec, then 1 sc dec over 3 sts, 1 dec, finish with 8 sc (18)
Switch to main skin color yarn.
Work in BLO: repeat (4 sc, 1 dec) 3 times (15)
Repeat (4 sc, 1 inc) 3 times (18)
Work 1 sc in every st around (18)
Repeat (4 sc, 1 dec) 3 times (15)
Repeat (4 sc, 1 inc) 3 times (18)
Work 1 sc in every st around (18)
Switch to cream yarn for the underwear.
Repeat (5 sc, 1 inc) 3 times (21)
Work 21 sc, then end with a sl st (21)
On the second leg, stop at Rnd 24 after 17 sc to ensure the join is correctly positioned on the inner leg.
From the second leg, ch 3 and join to the first leg with a sl st. Work 21 sc around first leg, 3 sc along chain, 21 sc around second leg, 3 sc along other side of chain (48)
Work 1 sc in every st around (48)
Repeat (14 sc, 1 dec) 3 times (45)
Switch back to main skin color yarn.
Work 1 sc in every st around (45)
Repeat (13 sc, 1 dec) 3 times (42)
Work 1 sc in every st around (42)
Repeat (12 sc, 1 dec) 3 times (39)
Work 1 sc in every st around (39)
Repeat (11 sc, 1 dec) 3 times (36)
Work 8 sc, join first arm by working 6 sc through both arm and body, 13 sc, join second arm with 6 sc through both, finish with 3 sc (36)
Work 8 sc, then 6 sc around the outer edge of the first arm, 13 sc, 6 sc around the outer edge of the second arm, finish with 3 sc (36)
Repeat (4 sc, 1 dec) 6 times (30)
Work 1 sc in every st around (30)
Twist the wire ends together inside the body and secure with tape. Stuff the body firmly.
Repeat (3 sc, 1 dec) 6 times (24)
Work 1 sc in every st around (24)
Repeat (6 sc, 1 dec) 3 times (21)
Work 21 sc, then end with a sl st (21)
Make 12 in brown and 8 in light turquoise for wing decoration.
Ch 3, then work 1 bubble into the 3rd ch from hook. Fasten off leaving a tail for attachment.
With brown yarn, ch 19. Starting in 2nd ch: 1 inc, 16 sc, 3 sc in last ch. On other side: 16 sc, 1 inc (39)
Work 1 sc in every st around (39)
Switch to light turquoise but do not cut the brown thread.
Work 1 sc in every st around (39)
Switch back to brown but do not cut the turquoise thread.
Work 1 sc in every st around (39)
Switch to light turquoise and fasten off the brown.
Work 1 sc in every st around (39)
1 sc, 1 dec, 15 sc, 1 dec, 1 sc, 1 dec, 14 sc, 1 dec (35)
Work 1 sc in every st around (35)
1 sc, 1 dec, 13 sc, 1 dec, 1 sc, 1 dec, 12 sc, 1 dec (31)
Work 1 sc in every st around (31)
1 sc, 1 dec, 11 sc, 1 dec, 1 sc, 1 dec, 10 sc, 1 dec (27)
Work 1 sc in every st around (27)
1 sc, 1 dec, 9 sc, 1 dec, 1 sc, 1 dec, 8 sc, 1 dec (23)
Work 1 sc in every st around (23)
1 sc, 1 dec, 7 sc, 1 dec, 1 sc, 1 dec, 6 sc, 1 dec (19)
Work 1 sc in every st around (19)
1 sc, 1 dec, 5 sc, 1 dec, 1 sc, 1 dec, 4 sc, 1 dec (15)
Work 1 sc in every st around (15)
Repeat (3 sc, 1 dec) 3 times (12)
Work 1 sc, then fold the wing flat and work 6 sc through both layers to close (6)
Using brown yarn, work 6 sc into a mr (6)
Repeat (1 sc, 1 inc) 3 times (9)
Repeat (2 sc, 1 inc) 3 times (12)
Repeat (1 sc, 1 inc) 6 times (18)
Work 1 sc in every st around (18)
Repeat (2 sc, 1 inc) 6 times (24)
Work 1 sc in every st around (24)
Repeat (3 sc, 1 inc) 6 times (30)
Repeat (4 sc, 1 inc) 6 times (36)
Repeat (5 sc, 1 inc) 6 times (42)
Work 1 sc in every st around (42)
Repeat (6 sc, 1 inc) 6 times (48)
Work 1 sc in every st around (48)
Repeat (7 sc, 1 inc) 6 times (54)
Work 1 sc in every st around (54)
Switch to light turquoise yarn.
Work 1 sc in every st around (54)
Work 25 sc, 1 dec, then 27 sc (53)
Work 24 sc, 1 dec, then 27 sc (52)
Work 24 sc, 1 dec, then 26 sc (51)
Work 24 sc, 1 dec, then 25 sc (50)
Work 23 sc, 1 dec, then 25 sc (49)
Work 23 sc, 1 dec, then 24 sc (48)
Work 21 sc, 1 dec, 1 sc, 1 dec, 22 sc (46)
Work 20 sc, 1 dec, 1 sc, 1 dec, 21 sc (44)
Work 19 sc, 1 dec, 1 sc, 1 dec, 20 sc (42)
Repeat (5 sc, 1 dec) 6 times (36)
Work 1 sc in every st around (36)
Repeat (4 sc, 1 dec) 6 times (30)
Work 1 sc in every st around (30)
Repeat (3 sc, 1 dec) 6 times (24)
Repeat (2 sc, 1 dec) 6 times (18)
Repeat (1 sc, 1 dec) 6 times (12)
Work 1 sc, fold wing flat and work 6 sc through both layers to close (6)
Using cream yarn, ch 51. Starting in 2nd ch from hook, work 50 sl st along the back bumps of the chain.
Place an upper wing over a lower wing and join them by working 6 sc through both pieces. Repeat for the second pair of wings.
Using brown yarn and 2.5mm hook, ch 27. Starting in 3rd ch: 25 dc (26)
Ch 2, 1 inc, repeat (1 dc, 1 inc) 12 times (39)
Ch 2, 7 dc, ch 6, skip 6 st, 11 dc, ch 6, skip 6 st, 8 dc (39)
Ch 2, 1 dc, 1 inc, repeat (2 dc, 1 inc) 12 times (52)
Ch 2, 51 dc, then join the row into a circle with a sl st (52)
Ch 2, 51 dc, join with sl st (52)
Switch to cream yarn and work in BLO: ch 2, 1 inc, repeat (1 dc, 1 inc) 25 times, join with sl st (78)
Switch back to brown yarn: ch 1, 52 sc around, join with sl st (52)
You've done it! Your little butterfly doll is ready to take flight. I hope you enjoyed every moment of this craft, from the rhythmic rounds of the body to the delicate finishing touches on her face. She's such a unique piece to add to any collection, and I'm sure she'll be cherished by whoever receives her. Don't forget to give her cheeks a little blush and dot on those tiny freckles—it's those small details that really bring her to life. Happy crocheting! 🧶✨🦋
When sewing the head to the body, add extra stuffing into the neck cavity as you close the seam. You can also insert a small piece of rolled-up felt or a thick plastic straw to act as a support.
Absolutely! The wire just makes her poseable. If you skip it, just stuff the lower half of the arms and leave the top half empty so they lie flat against the body.
To make the bubble, work 3 partial double crochets into the same stitch, leaving the last loop of each on your hook, then yarn over and pull through all 4 loops at once.
The 'X' shape comes from using the 'yarn under' technique instead of 'yarn over' for your single crochets. It creates a tighter, more defined fabric.
