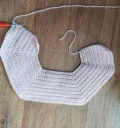
About This Simple Playdays Baby Cardigan Pattern

This pattern is a fantastic choice for gifting—it's practical, adorable, and the added appliques give it that special boutique feel that parents absolutely love.
Ideal for those with basic crocheting experience, featuring slightly more advanced stitches and techniques to expand your skills.
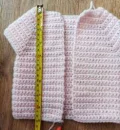
Takes 5-7 hours, making it an enjoyable project to finish over a couple of days.
Simple lines for everyday wear, focusing on quality stitchwork and timeless appeal that never goes out of fashion.
This pattern is a fantastic choice for gifting—it's practical, adorable, and the added appliques give it that special boutique feel that parents absolutely love.
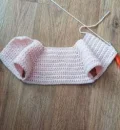
I love this pattern because it takes the stress out of assembly. Since it's worked from the top down, you don't have to worry about sewing huge seams at the end. Plus, the sleeve instructions are written to help you avoid those annoying gaps under the arms that usually happen with crochet sweaters!

I’ve always felt that baby cardigans are the ultimate 'soul food' for crocheters. There’s just something so satisfying about watching a tiny garment take shape in your hands over the course of an afternoon. When I was designing this piece, I really wanted to focus on two things: versatility and ease of construction. We’ve all been there—staring at a pile of finished pieces and dreading the sewing phase. By working this from the top down, you get to skip the heavy lifting and focus on the fun parts.
The best part about this pattern is how much room it leaves for your own personality. I love seeing it in soft pastels for a classic look, but it looks equally amazing in bold, bright primary colors. And those appliques! The little bunny is my personal favorite for a spring baby shower gift. If you're nervous about the armholes, just remember to take it slow and use those stitch markers. They are your best friends for keeping everything lined up perfectly. I hope you enjoy making this as much as I do!
Looking for that perfect go-to baby gift? This top-down cardigan is a joy to work up because it's mostly seamless and lets you play with colors. You can keep it classic and clean or dress it up with the sweet bunny and rainbow appliques included in the instructions. It's the kind of project that grows quickly under your hook, making it ideal for busy crafters who love seeing results fast.
Using your 4mm hook, start by making a ch 39.
Work 1 sc in the 2nd ch from the hook, then sc 4. In the next ch, work [3 sc]. sc 6, [3 sc] in the next, sc 12, [3 sc] in the next, sc 6, [3 sc] in the next, and sc 5 to finish. (46) Turn
ch 1, sc in the first st and every st across. (46) Turn
ch 1, sc in the first st and next 4. Work [3 sc] in the next, sc 8, [3 sc] in the next, sc 14, [3 sc] in the next, sc 8, [3 sc] in the next, and sc 6 to end. (54) Turn
ch 1, sc in the first st and every st across. (54) Turn
ch 1, sc in the first st and next 5. Work [3 sc] in the next, sc 10, [3 sc] in the next, sc 16, [3 sc] in the next, sc 10, [3 sc] in the next, and sc 7 to end. (62) Turn
ch 1, sc in the first st and every st across. (62) Turn
ch 1, sc in the first st and next 6. Work [3 sc] in the next, sc 12, [3 sc] in the next, sc 18, [3 sc] in the next, sc 12, [3 sc] in the next, and sc 8 to end. (70) Turn
ch 1, sc in the first st and every st across. (70) Turn
ch 1, sc in the first st and next 7. Work [3 sc] in the next, sc 14, [3 sc] in the next, sc 20, [3 sc] in the next, sc 14, [3 sc] in the next, and sc 9 to end. (78) Turn
ch 1, sc in the first st and every st across. (78) Turn
ch 1, sc in the first st and next 8. Work [3 sc] in the next, sc 16, [3 sc] in the next, sc 22, [3 sc] in the next, sc 16, [3 sc] in the next, and sc 10 to end. (86) Turn
ch 1, sc in the first st and every st across. (86) Turn
ch 1, sc in the first st and next 10. Work [3 sc] in the next, skip 18 sts for the armhole, [3 sc] in the next, sc 24, [3 sc] in the next, skip 18 sts for the second armhole, [3 sc] in the next, and sc 11 to end. (58) Turn
ch 1, sc in the first st and every st across. (58) Turn
Keep repeating Row 14 until your piece measures roughly 7 inches from the shoulder line, finishing on an even-numbered row.
With the wrong side facing you, join yarn to the first unworked st under the arm. ch 1, sc in the same st, sc 21, and join with a sl st to the first sc. (22) Turn
ch 1, sc in every st around, join with a sl st. (22) Turn
ch 1, dec, sc to the end, join with a sl st. (21) Turn
ch 1, sc in every st around, join with a sl st. (21) Turn
ch 1, dec, sc to the end, join with a sl st. (20) Turn
ch 1, sc in every st around, join with a sl st. (20) Turn
ch 1, dec, sc to the end, join with a sl st. (19) Turn
ch 1, sc in every st around, join with a sl st. (19) Turn
Repeat the Row 15 instructions until the sleeve is 7 inches long from the shoulder. Fasten off and repeat for the second sleeve.
Using your 4mm hook, start by making a ch 43.
Work 1 sc in the 2nd ch from the hook, then sc 4. In the next ch, work [3 sc]. sc 8, [3 sc] in the next, sc 12, [3 sc] in the next, sc 8, [3 sc] in the next, and sc 5 to finish. (50) Turn
ch 1, sc in the first st and every st across. (50) Turn
ch 1, sc in the first st and next 4. Work [3 sc] in the next, sc 10, [3 sc] in the next, sc 14, [3 sc] in the next, sc 10, [3 sc] in the next, and sc 6 to finish. (58) Turn
ch 1, sc in the first st and every st across. (58) Turn
ch 1, sc in the first st and next 5. Work [3 sc] in the next, sc 12, [3 sc] in the next, sc 16, [3 sc] in the next, sc 12, [3 sc] in the next, and sc 7 to end. (66) Turn
ch 1, sc in the first st and every st across. (66) Turn
ch 1, sc in the first st and next 6. Work [3 sc] in the next, sc 14, [3 sc] in the next, sc 18, [3 sc] in the next, sc 14, [3 sc] in the next, and sc 8 to end. (74) Turn
ch 1, sc in the first st and every st across. (74) Turn
ch 1, sc in the first st and next 7. Work [3 sc] in the next, sc 16, [3 sc] in the next, sc 20, [3 sc] in the next, sc 16, [3 sc] in the next, and sc 9 to end. (82) Turn
ch 1, sc in the first st and every st across. (82) Turn
ch 1, sc in the first st and next 8. Work [3 sc] in the next, sc 18, [3 sc] in the next, sc 22, [3 sc] in the next, sc 18, [3 sc] in the next, and sc 10 to end. (90) Turn
ch 1, sc in the first st and every st across. (90) Turn
ch 1, sc in the first st and next 9. Work [3 sc] in the next, sc 20, [3 sc] in the next, sc 24, [3 sc] in the next, sc 20, [3 sc] in the next, and sc 11 to end. (98) Turn
ch 1, sc in the first st and every st across. (98) Turn
ch 1, sc in the first st and next 11. Work [3 sc] in the next, skip 22 sts for the armhole, [3 sc] in the next, sc 26, [3 sc] in the next, skip 22 sts for the second armhole, [3 sc] in the next, and sc 12 to end. (62) Turn
ch 1, sc in the first st and every st across. (62) Turn
Continue working Row 16 until the cardigan is about 8 inches long from the shoulder, ending with an even row.
With the wrong side facing you, join yarn to the first unworked st under the arm. ch 1, sc in the same st, sc 25, and join with a sl st to the first sc. (26) Turn
ch 1, sc in every st around, join with a sl st. (26) Turn
ch 1, dec, sc to the end, join with a sl st. (25) Turn
ch 1, sc in every st around, join with a sl st. (25) Turn
ch 1, dec, sc to the end, join with a sl st. (24) Turn
ch 1, sc in every st around, join with a sl st. (24) Turn
ch 1, dec, sc to the end, join with a sl st. (23) Turn
ch 1, sc in every st around, join with a sl st. (23) Turn
ch 1, dec, sc to the end, join with a sl st. (22) Turn
ch 1, dec, sc to the end, join with a sl st. (21) Turn
ch 1, sc in every st around, join with a sl st. (21) Turn
Repeat Row 18 until the sleeve reaches 8 inches from the shoulder. Fasten off and repeat for the other side.
Using your 4mm hook, start by making a ch 47.
Work 1 sc in the 2nd ch from the hook, then sc 5. In the next ch, work [3 sc]. sc 8, [3 sc] in the next, sc 14, [3 sc] in the next, sc 8, [3 sc] in the next, and sc 6 to finish. (54) Turn
ch 1, sc in the first st and every st across. (54) Turn
ch 1, sc in the first st and next 5. Work [3 sc] in the next, sc 10, [3 sc] in the next, sc 16, [3 sc] in the next, sc 10, [3 sc] in the next, and sc 7 to finish. (62) Turn
ch 1, sc in the first st and every st across. (62) Turn
ch 1, sc in the first st and next 6. Work [3 sc] in the next, sc 12, [3 sc] in the next, sc 18, [3 sc] in the next, sc 12, [3 sc] in the next, and sc 8 to finish. (70) Turn
ch 1, sc in the first st and every st across. (70) Turn
ch 1, sc in the first st and next 7. Work [3 sc] in the next, sc 14, [3 sc] in the next, sc 20, [3 sc] in the next, sc 14, [3 sc] in the next, and sc 9 to finish. (78) Turn
ch 1, sc in the first st and every st across. (78) Turn
ch 1, sc in the first st and next 8. Work [3 sc] in the next, sc 16, [3 sc] in the next, sc 22, [3 sc] in the next, sc 16, [3 sc] in the next, and sc 10 to finish. (86) Turn
ch 1, sc in the first st and every st across. (86) Turn
ch 1, sc in the first st and next 9. Work [3 sc] in the next, sc 18, [3 sc] in the next, sc 24, [3 sc] in the next, sc 18, [3 sc] in the next, and sc 11 to finish. (94) Turn
ch 1, sc in the first st and every st across. (94) Turn
ch 1, sc in the first st and next 10. Work [3 sc] in the next, sc 20, [3 sc] in the next, sc 26, [3 sc] in the next, sc 20, [3 sc] in the next, and sc 12 to finish. (102) Turn
ch 1, sc in the first st and every st across. (102) Turn
ch 1, sc in the first st and next 11. Work [3 sc] in the next, sc 22, [3 sc] in the next, sc 28, [3 sc] in the next, sc 22, [3 sc] in the next, and sc 13 to finish. (110) Turn
ch 1, sc in the first st and every st across. (110) Turn
ch 1, sc in the first st and next 13. Work [3 sc] in the next, skip 24 sts for the armhole, [3 sc] in the next, sc 30, [3 sc] in the next, skip 24 sts for the second armhole, [3 sc] in the next, and sc 14 to end. (70) Turn
ch 1, sc in the first st and every st across. (70) Turn
Continue working Row 18 until the cardigan measures roughly 9 inches from the shoulder, ending with an even row.
With the wrong side facing you, join yarn to the first unworked st under the arm. ch 1, sc in the same st, sc 27, and join with a sl st to the first sc. (28) Turn
ch 1, sc in every st around, join with a sl st. (28) Turn
ch 1, dec, sc to the end, join with a sl st. (27) Turn
ch 1, sc in every st around, join with a sl st. (27) Turn
ch 1, dec, sc to the end, join with a sl st. (26) Turn
ch 1, sc in every st around, join with a sl st. (26) Turn
ch 1, dec, sc to the end, join with a sl st. (25) Turn
ch 1, sc in every st around, join with a sl st. (25) Turn
ch 1, dec, sc to the end, join with a sl st. (24) Turn
ch 1, sc in every st around, join with a sl st. (24) Turn
ch 1, dec, sc to the end, join with a sl st. (23) Turn
ch 1, dec, sc to the end, join with a sl st. (22) Turn
ch 1, sc in every st around, join with a sl st. (22) Turn
Repeat Row 18 until the sleeve reaches 9 inches from the shoulder. Fasten off and do the same for the other arm.
Using your 4mm hook, start by making a ch 51.
Work 1 sc in the 2nd ch from the hook, then sc 6. In the next ch, work [3 sc]. sc 8, [3 sc] in the next, sc 16, [3 sc] in the next, sc 8, [3 sc] in the next, and sc 7 to finish. (58) Turn
ch 1, sc in the first st and every st across. (58) Turn
ch 1, sc in the first st and next 6. Work [3 sc] in the next, sc 10, [3 sc] in the next, sc 18, [3 sc] in the next, sc 10, [3 sc] in the next, and sc 8 to finish. (66) Turn
ch 1, sc in the first st and every st across. (66) Turn
ch 1, sc in the first st and next 7. Work [3 sc] in the next, sc 12, [3 sc] in the next, sc 20, [3 sc] in the next, sc 12, [3 sc] in the next, and sc 9 to finish. (74) Turn
ch 1, sc in the first st and every st across. (74) Turn
ch 1, sc in the first st and next 8. Work [3 sc] in the next, sc 14, [3 sc] in the next, sc 22, [3 sc] in the next, sc 14, [3 sc] in the next, and sc 10 to finish. (82) Turn
ch 1, sc in the first st and every st across. (82) Turn
ch 1, sc in the first st and next 9. Work [3 sc] in the next, sc 16, [3 sc] in the next, sc 24, [3 sc] in the next, sc 16, [3 sc] in the next, and sc 11 to finish. (90) Turn
ch 1, sc in the first st and every st across. (90) Turn
ch 1, sc in the first st and next 10. Work [3 sc] in the next, sc 18, [3 sc] in the next, sc 26, [3 sc] in the next, sc 18, [3 sc] in the next, and sc 12 to finish. (98) Turn
ch 1, sc in the first st and every st across. (98) Turn
ch 1, sc in the first st and next 11. Work [3 sc] in the next, sc 20, [3 sc] in the next, sc 28, [3 sc] in the next, sc 20, [3 sc] in the next, and sc 13 to finish. (106) Turn
ch 1, sc in the first st and every st across. (106) Turn
ch 1, sc in the first st and next 12. Work [3 sc] in the next, sc 22, [3 sc] in the next, sc 30, [3 sc] in the next, sc 22, 3 sc in the next, and sc 14 to finish. (114) Turn
ch 1, sc in the first st and every st across. (114) Turn
ch 1, sc in the first st and next 13. Work [3 sc] in the next, sc 24, [3 sc] in the next, sc 32, [3 sc] in the next, sc 24, [3 sc] in the next, and sc 15 to finish. (122) Turn
ch 1, sc in the first st and next 15. Work [3 sc] in the next, skip 26 sts for the armhole, [3 sc] in the next, sc 34, [3 sc] in the next, skip 26 sts for the second armhole, [3 sc] in the next, and sc 16 to finish. (78) Turn
ch 1, sc in the first st and every st across. (78) Turn
Repeat the instructions for Row 19 until your work is 10 inches long from the shoulder, finishing on an even row.
With the right side facing, join yarn to the first unworked st under the arm. ch 1, sc in the same st, sc 28, and join with a sl st to the first sc. (30) Turn
ch 1, sc in every st around, join with a sl st. (30) Turn
ch 1, dec, sc to the end, join with a sl st. (29) Turn
ch 1, sc in every st around, join with a sl st. (29) Turn
ch 1, dec, sc to the end, join with a sl st. (28) Turn
ch 1, sc in every st around, join with a sl st. (28) Turn
ch 1, dec, sc to the end, join with a sl st. (27) Turn
ch 1, sc in every st around, join with a sl st. (27) Turn
ch 1, dec, sc to the end, join with a sl st. (26) Turn
ch 1, dec, sc to the end, join with a sl st. (25) Turn
ch 1, sc in every st around, join with a sl st. (25) Turn
Continue repeating Row 19 until the sleeve measures 10 inches from the shoulder. Fasten off and repeat for the other side.
Using your 4mm hook, start by making a ch 57.
Work 1 sc in the 2nd ch from the hook, then sc 7. In the next ch, work [3 sc]. sc 9, [3 sc] in the next, sc 18, [3 sc] in the next, sc 9, [3 sc] in the next, and sc 8 to finish. (64) Turn
ch 1, sc in the first st and every st across. (64) Turn
ch 1, sc in the first st and next 7. Work [3 sc] in the next, sc 11, [3 sc] in the next, sc 20, [3 sc] in the next, sc 11, [3 sc] in the next, and sc 9 to finish. (72) Turn
ch 1, sc in the first st and every st across. (72) Turn
ch 1, sc in the first st and next 8. Work [3 sc] in the next, sc 13, [3 sc] in the next, sc 22, [3 sc] in the next, sc 13, 3 sc in the next, and sc 10 to finish. (80) Turn
ch 1, sc in the first st and every st across. (80) Turn
ch 1, sc in the first st and next 9. Work [3 sc] in the next, sc 15, [3 sc] in the next, sc 24, [3 sc] in the next, sc 15, [3 sc] in the next, and sc 11 to finish. (88) Turn
ch 1, sc in the first st and every st across. (88) Turn
ch 1, sc in the first st and next 10. Work [3 sc] in the next, sc 17, [3 sc] in the next, sc 26, [3 sc] in the next, sc 17, [3 sc] in the next, and sc 12 to finish. (96) Turn
ch 1, sc in the first st and every st across. (96) Turn
ch 1, sc in the first st and next 11. Work [3 sc] in the next, sc 19, [3 sc] in the next, sc 28, [3 sc] in the next, sc 19, [3 sc] in the next, and sc 13 to finish. (104) Turn
ch 1, sc in the first st and every st across. (104) Turn
ch 1, sc in the first st and next 12. Work [3 sc] in the next, sc 21, [3 sc] in the next, sc 30, [3 sc] in the next, sc 21, [3 sc] in the next, and sc 14 to finish. (112) Turn
ch 1, sc in the first st and every st across. (112) Turn
ch 1, sc in the first st and next 13. Work [3 sc] in the next, sc 23, [3 sc] in the next, sc 32, [3 sc] in the next, sc 23, [3 sc] in the next, and sc 15 to finish. (120) Turn
ch 1, sc in the first st and every st across. (120) Turn
ch 1, sc in the first st and next 14. Work [3 sc] in the next, sc 25, [3 sc] in the next, sc 34, [3 sc] in the next, sc 25, [3 sc] in the next, and sc 16 to finish. (128) Turn
ch 1, sc in the first st and every st across. (128) Turn
ch 1, sc in the first st and next 15. Work [3 sc] in the next, sc 27, [3 sc] in the next, sc 36, [3 sc] in the next, sc 27, [3 sc] in the next, and sc 17 to finish. (136) Turn
ch 1, sc in the first st and every st across. (136) Turn
ch 1, sc in the first st and next 16. Work [3 sc] in the next, skip 29 sts for the armhole, [3 sc] in the next, sc 38, [3 sc] in the next, skip 29 sts for the second armhole, [3 sc] in the next, and sc 18 to finish. (86) Turn
ch 1, sc in the first st and every st across. (86) Turn
Keep repeating Row 22 until the cardigan measures 11.5 inches from the shoulder, ending with an even row.
With the wrong side facing, join yarn to the first unworked st under the arm. ch 1, sc in the same st, sc 32, and join with a sl st to the first sc. (33) Turn
ch 1, sc in every st around, join with a sl st. (33) Turn
ch 1, dec, sc to the end, join with a sl st. (32) Turn
ch 1, sc in every st around, join with a sl st. (32) Turn
ch 1, dec, sc to the end, join with a sl st. (31) Turn
ch 1, sc in every st around, join with a sl st. (31) Turn
ch 1, dec, sc to the end, join with a sl st. (30) Turn
ch 1, sc in every st around, join with a sl st. (30) Turn
ch 1, dec, sc to the end, join with a sl st. (29) Turn
ch 1, sc in every st around, join with a sl st. (29) Turn
ch 1, dec, sc to the end, join with a sl st. (28) Turn
ch 1, sc in every st around, join with a sl st. (28) Turn
ch 1, dec, sc to the end, join with a sl st. (27) Turn
ch 1, sc in every st around, join with a sl st. (27) Turn
ch 1, dec, sc to the end, join with a sl st. (26) Turn
ch 1, sc in every st around, join with a sl st. (26) Turn
Continue Row 26 until the sleeve is 11.5 inches from the shoulder. Fasten off and repeat for the other side.
Using your 4mm hook, start by making a ch 61.
Work 1 sc in the 2nd ch from the hook, then sc 8. In the next ch, work [3 sc]. sc 9, [3 sc] in the next, sc 20, [3 sc] in the next, sc 9, [3 sc] in the next, and sc 9 to finish. (68) Turn
ch 1, sc in the first st and every st across. (68) Turn
ch 1, sc in the first st and next 8. Work [3 sc] in the next, sc 11, [3 sc] in the next, sc 22, [3 sc] in the next, sc 11, [3 sc] in the next, and sc 10 to finish. (76) Turn
ch 1, sc in the first st and every st across. (76) Turn
ch 1, sc in the first st and next 9. Work [3 sc] in the next, sc 13, [3 sc] in the next, sc 24, [3 sc] in the next, sc 13, [3 sc] in the next, and sc 11 to finish. (84) Turn
ch 1, sc in the first st and every st across. (84) Turn
ch 1, sc in the first st and next 10. Work [3 sc] in the next, sc 15, [3 sc] in the next, sc 26, [3 sc] in the next, sc 15, [3 sc] in the next, and sc 12 to finish. (92) Turn
ch 1, sc in the first st and every st across. (92) Turn
ch 1, sc in the first st and next 11. Work [3 sc] in the next, sc 17, [3 sc] in the next, sc 28, [3 sc] in the next, sc 17, [3 sc] in the next, and sc 13 to finish. (100) Turn
ch 1, sc in the first st and every st across. (100) Turn
ch 1, sc in the first st and next 12. Work [3 sc] in the next, sc 19, [3 sc] in the next, sc 30, [3 sc] in the next, sc 19, [3 sc] in the next, and sc 14 to finish. (108) Turn
ch 1, sc in the first st and every st across. (108) Turn
ch 1, sc in the first st and next 13. Work [3 sc] in the next, sc 21, [3 sc] in the next, sc 32, [3 sc] in the next, sc 21, [3 sc] in the next, and sc 15 to finish. (116) Turn
ch 1, sc in the first st and every st across. (116) Turn
ch 1, sc in the first st and next 14. Work [3 sc] in the next, sc 23, [3 sc] in the next, sc 34, [3 sc] in the next, sc 23, [3 sc] in the next, and sc 16 to finish. (124) Turn
ch 1, sc in the first st and every st across. (124) Turn
ch 1, sc in the first st and next 15. Work [3 sc] in the next, sc 25, [3 sc] in the next, sc 36, [3 sc] in the next, sc 25, [3 sc] in the next, and sc 17 to finish. (132) Turn
ch 1, sc in the first st and every st across. (132) Turn
ch 1, sc in the first st and next 16. Work [3 sc] in the next, sc 27, [3 sc] in the next, sc 38, [3 sc] in the next, sc 27, [3 sc] in the next, and sc 18 to finish. (140) Turn
ch 1, sc in the first st and every st across. (140) Turn
ch 1, sc in the first st and next 17. Work [3 sc] in the next, sc 29, [3 sc] in the next, sc 40, [3 sc] in the next, sc 29, [3 sc] in the next, and sc 19 to finish. (148) Turn
ch 1, sc in the first st and every st across. (148) Turn
ch 1, sc in the first st and next 18. Work [3 sc] in the next, skip 31 sts for the armhole, [3 sc] in the next, sc 42, [3 sc] in the next, skip 31 sts for the second armhole, [3 sc] in the next, and sc 20 to finish. (94) Turn
ch 1, sc in the first st and every st across. (94) Turn
Repeat Row 24 until the cardigan is about 12.5 inches long from the shoulder, ending with an even row.
With the wrong side facing, join yarn to the first unworked st under the arm. ch 1, sc in the same st, sc 34, and join with a sl st to the first sc. (35) Turn
ch 1, sc in every st around, join with a sl st. (35) Turn
ch 1, dec, sc to the end, join with a sl st. (34) Turn
ch 1, sc in every st around, join with a sl st. (34) Turn
ch 1, dec, sc to the end, join with a sl st. (33) Turn
ch 1, sc in every st around, join with a sl st. (33) Turn
ch 1, dec, sc to the end, join with a sl st. (32) Turn
ch 1, sc in every st around, join with a sl st. (32) Turn
ch 1, dec, sc to the end, join with a sl st. (31) Turn
ch 1, sc in every st around, join with a sl st. (31) Turn
ch 1, dec, sc to the end, join with a sl st. (30) Turn
ch 1, sc in every st around, join with a sl st. (30) Turn
ch 1, dec, sc to the end, join with a sl st. (29) Turn
ch 1, sc in every st around, join with a sl st. (29) Turn
ch 1, dec, sc to the end, join with a sl st. (28) Turn
ch 1, sc in every st around, join with a sl st. (28) Turn
ch 1, dec, sc to the end, join with a sl st. (27) Turn
ch 1, sc in every st around, join with a sl st. (27) Turn
Repeat Row 23 until the sleeve reaches 13.5 inches from the shoulder. Fasten off and repeat for the other side.
Using your 4mm hook, start by making a ch 64.
Work 1 sc in the 2nd ch from the hook, then sc 9. In the next ch, work [3 sc]. sc 9, [3 sc] in the next, sc 21, [3 sc] in the next, sc 9, [3 sc] in the next, and sc 10 to finish. (71) Turn
ch 1, sc in the first st and every st across. (71) Turn
ch 1, sc in the first st and next 9. Work [3 sc] in the next, sc 11, [3 sc] in the next, sc 23, [3 sc] in the next, sc 11, [3 sc] in the next, and sc 11 to finish. (79) Turn
ch 1, sc in the first st and every st across. (79) Turn
ch 1, sc in the first st and next 10. Work [3 sc] in the next, sc 13, [3 sc] in the next, sc 25, [3 sc] in the next, sc 13, [3 sc] in the next, and sc 12 to finish. (87) Turn
ch 1, sc in the first st and every st across. (87) Turn
ch 1, sc in the first st and next 11. Work [3 sc] in the next, sc 15, [3 sc] in the next, sc 27, [3 sc] in the next, sc 15, [3 sc] in the next, and sc 13 to finish. (95) Turn
ch 1, sc in the first st and every st across. (95) Turn
ch 1, sc in the first st and next 12. Work [3 sc] in the next, sc 17, [3 sc] in the next, sc 29, [3 sc] in the next, sc 17, [3 sc] in the next, and sc 14 to finish. (103) Turn
ch 1, sc in the first st and every st across. (103) Turn
ch 1, sc in the first st and next 13. Work [3 sc] in the next, sc 19, [3 sc] in the next, sc 31, [3 sc] in the next, sc 19, [3 sc] in the next, and sc 15 to finish. (111) Turn
ch 1, sc in the first st and every st across. (111) Turn
ch 1, sc in the first st and next 14. Work [3 sc] in the next, sc 21, [3 sc] in the next, sc 33, [3 sc] in the next, sc 21, [3 sc] in the next, and sc 16 to finish. (119) Turn
ch 1, sc in the first st and every st across. (119) Turn
ch 1, sc in the first st and next 15. Work [3 sc] in the next, sc 23, [3 sc] in the next, sc 35, [3 sc] in the next, sc 23, [3 sc] in the next, and sc 17 to finish. (127) Turn
ch 1, sc in the first st and every st across. (127) Turn
ch 1, sc in the first st and next 16. Work [3 sc] in the next, sc 25, [3 sc] in the next, sc 37, [3 sc] in the next, sc 25, [3 sc] in the next, and sc 18 to finish. (135) Turn
ch 1, sc in the first st and every st across. (135) Turn
ch 1, sc in the first st and next 17. Work [3 sc] in the next, sc 27, [3 sc] in the next, sc 39, [3 sc] in the next, sc 27, [3 sc] in the next, and sc 19 to finish. (143) Turn
ch 1, sc in the first st and every st across. (143) Turn
ch 1, sc in the first st and next 18. Work [3 sc] in the next, sc 29, [3 sc] in the next, sc 41, [3 sc] in the next, sc 29, [3 sc] in the next, and sc 20 to finish. (151) Turn
ch 1, sc in the first st and every st across. (151) Turn
ch 1, sc in the first st and next 19. Work [3 sc] in the next, sc 31, [3 sc] in the next, sc 43, [3 sc] in the next, sc 31, [3 sc] in the next, and sc 21 to finish. (159) Turn
ch 1, sc in the first st and every st across. (159) Turn
ch 1, sc in the first st and next 20. Work [3 sc] in the next, skip 33 sts for the armhole, [3 sc] in the next, sc 45, [3 sc] in the next, skip 33 sts for the second armhole, [3 sc] in the next, and sc 22 to finish. (101) Turn
ch 1, sc in the first st and every st across. (101) Turn
Repeat Row 26 until the piece measures 14 inches from the shoulder, ending with an even row.
With the wrong side facing, join yarn to the first unworked st under the arm. ch 1, sc in the same st, sc 34, and join with a sl st to the first sc. (35) Turn
ch 1, sc in every st around, join with a sl st. (35) Turn
ch 1, dec, sc to the end, join with a sl st. (34) Turn
ch 1, sc in every st around, join with a sl st. (34) Turn
ch 1, dec, sc to the end, join with a sl st. (33) Turn
ch 1, sc in every st around, join with a sl st. (33) Turn
ch 1, dec, sc to the end, join with a sl st. (32) Turn
ch 1, sc in every st around, join with a sl st. (32) Turn
ch 1, dec, sc to the end, join with a sl st. (31) Turn
ch 1, sc in every st around, join with a sl st. (31) Turn
ch 1, dec, sc to the end, join with a sl st. (30) Turn
ch 1, sc in every st around, join with a sl st. (30) Turn
ch 1, dec, sc to the end, join with a sl st. (29) Turn
ch 1, sc in every st around, join with a sl st. (29) Turn
ch 1, dec, sc to the end, join with a sl st. (28) Turn
ch 1, sc in every st around, join with a sl st. (28) Turn
Repeat Row 20 until the sleeve is 15 inches long from the shoulder. Fasten off and do the same for the other sleeve.
Switch to your 3mm hook for both bands.
ch 1, work 1 sc in the same st and then sc 1 into every row edge up to the top. Turn
ch 1, sc in the same st and sc in every st back down to the bottom. Turn
ch 1, sc in the same st and sc in every st back up to the top. Fasten off.
With the right side facing, join your yarn at the top of the left front edge. ch 1, sc in the same st and work 1 sc in every row edge down to the bottom. Turn
Use stitch markers to mark out where you want your buttonholes to be on the next row.
ch 1, sc in the same st and every st across, but when you reach a marker, ch 1 and skip that st to create the hole. Turn
ch 1, sc in the same st and every st across, making sure to work 1 sc into each ch-1 space. Fasten off.
With the right side facing, join your yarn to the bottom right corner of the cardigan.
ch 1, sc in the first st. *skip 2 sts, work 5 dc in the next st, skip 2 sts, sc in the next.* Repeat from * to * across the bottom edge. Finish with a sc at the end of the button band.
Join your yarn to the bottom right corner with the right side facing.
ch 1, dc in the same st. Work 3 dc into every stitch across to the last st, then finish with 1 dc in that final st. Fasten off.
Using purple yarn, ch 2 and work 4 sc into the second ch from your hook. (4) Fasten off.
Join blue yarn to the end of Row 1. ch 1, work 2 sc into each st across. (8) Fasten off.
Join green yarn. ch 1, sc in the same st, inc in next. *sc 1, [2 sc] in the next* repeat across. (12) Fasten off.
Join yellow yarn. ch 1, sc in same st, sc in next, inc in next. *sc 2, [2 sc] in the next* repeat across. (16) Fasten off.
Join orange yarn. ch 1, sc in same and next two sts, inc in next. *sc 3, [2 sc] in the next* repeat across. (20) Fasten off.
Join red yarn. ch 1, sc in the same and every st across. (20) Fasten off.
With beige yarn, ch 4 and sl st to the first ch to form a ring. ch 3, work 11 dc into the center of the ring. Join with a sl st to the top of the ch 3. (12)
ch 6, sc in the 2nd ch from hook, sc 4, sl st back into the base of the ear. sl st into the next st on the head, ch 6, sc in the 2nd ch from hook, sc 4, sl st to the base. Fasten off.
Skip one st from where the head ended and join your sweater-colored yarn. ch 1, work [2 hdc] in the same st, then hdc 3. (5) Turn
ch 1, hdc in same, hdc 1, [2 hdc] in next, hdc 2. (6) Turn
Join beige yarn. ch 1, [2 hdc] in same, hdc 4, [2 hdc] in the last st. (8) Turn
ch 1, dec, hdc 4, dec. (6) Fasten off.
With the back facing, join beige to the bottom of the first beige row. ch 1, *yarn over, insert hook and pull up loop, yarn over and pull through 2* three times until 4 loops remain, yarn over and pull through all. Fasten off.
Join beige to the top of the sweater-colored section. ch 1, *yarn over, insert hook and pull up loop, yarn over and pull through 2* twice until 3 loops remain, yarn over and pull through all. Fasten off.
Join white yarn to the first beige round. ch 1, *yarn over, insert hook and pull up loop, yarn over and pull through 2* three times until 4 loops remain, yarn over and pull through all. Fasten off.
I can’t wait to see the beautiful cardigans you create with this pattern! Whether you choose the dainty shell edging or the playful ruffle, each sweater is going to be a unique masterpiece. Don't forget to share your progress and your finished photos with our community. There is nothing more encouraging than seeing a finished project ready for its new little owner. Take your time with the button placement to ensure a professional finish, and most importantly, have fun with it! Happy crocheting, and may your hooks always fly fast and your yarn never tangle. ✨
You can, but this pattern is specifically designed for DK weight yarn. Switching to worsted weight will make the cardigan significantly larger and heavier, while fingering weight will result in a much smaller, daintier garment. Always check your gauge if you substitute!
The trick is to start your first sleeve stitch in the first unworked stitch from the division row and work a couple of extra stitches into the 'corners' where the armhole meets the body. This fills in the space that usually creates a hole.
Absolutely! Since it is worked from the top down in one piece, you don't have to worry about complex seaming. It's a great 'first sweater' project because the construction is very logical and easy to follow.
The pattern recommends 15mm buttons. If you use larger buttons, you'll need to adjust the buttonhole band by skipping more stitches (e.g., ch 2 and skip 2) to make sure they fit through.
Yes! Because the sleeves are worked from the shoulder down, you can simply add or subtract rows of single crochet at the end of the sleeve section until you reach your desired length.
