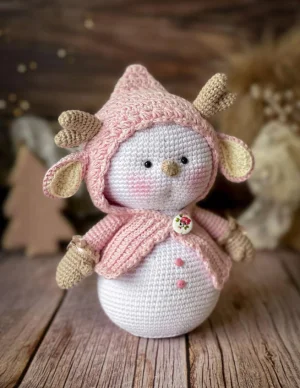
🧢 Beautiful ✨ Detailed πŸ’ Adorable

Nieves the Snowman Reindeer Amigurumi Pattern

Nieves the Snowman Reindeer Amigurumi Pattern
4.4β˜…Rating
5-7 HoursTime Needed
4.0KMade This
βœ‚οΈ

Intermediate Level

Ideal for those with basic crocheting experience, featuring slightly more advanced stitches and techniques to expand your skills.

⏱️

Weekend Treat

Takes 5-7 hours, making it an enjoyable project to finish over a couple of days.

🐰

Whimsical Buddy

Playful characters full of personality, designed to spark imagination and become cherished playtime favorites.

About This Nieves the Snowman Reindeer Amigurumi Pattern

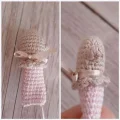
Nieves the Snowman Reindeer Amigurumi Pattern crochet pattern - detailed view

He makes a wonderful centerpiece for your holiday mantel or a heartfelt gift for someone who loves a bit of winter magic. Style him on a shelf or tuck him into a gift basket for a truly thoughtful seasonal surprise.

Why You'll Love This Nieves the Snowman Reindeer Amigurumi Pattern

I am obsessed with how the textures on the cap turned out. Combining bobbles with that ribbed cape section gives it such a high-end, boutique feel without being overly complicated. Plus, seeing his little face come together with the nose and eyes is just pure joy for any crafter!

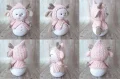
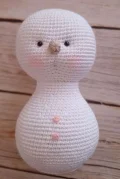
Nieves the Snowman Reindeer Amigurumi Pattern step 1 Nieves the Snowman Reindeer Amigurumi Pattern step 2 Nieves the Snowman Reindeer Amigurumi Pattern step 3 Nieves the Snowman Reindeer Amigurumi Pattern step 4

Switch Things Up

I remember the first time I saw a snowman amigurumi; it was cute, but it felt a bit plain. That is why I love Nieves so much! Adding that reindeer cap completely transforms him into a character with a story. When I was working on the prototype, I spent ages getting the cape part of the hat just right. I wanted it to have that perfect ruffly drape that makes him look like he is actually wearing a tiny coat.

One tip I always give my friends when they start this pattern is to not rush the facial sculpting. It is tempting to just pop the eyes in and be done, but taking those extra few minutes to pull the thread through to the back of the neck makes such a difference. It gives him that soulful, please take me home look that everyone loves. And do not be afraid to play with colors! While I chose a soft pink for his outfit, he would look just as dashing in a deep forest green or a classic festive red. It is your creation, so let your personality shine through every stitch!

Common Mistakes & How to Fix Them

βœ— Forgetting the cardboard insert in the base will make Nieves wobbly; that flat bottom is key for him to sit properly on your shelf.βœ— When joining the two base circles at Round 10, ensure you are working through the back loops only to create that crisp edge for the body.βœ— The cap lower section joins at a specific corner; if you start on the wrong side, the cape will sit lopsided rather than draping evenly.βœ— If you pull the facial sculpting threads too tight, you might distort the head shape, so go slow and check the symmetry as you sink the eyes.

Nieves the Snowman Reindeer Amigurumi Pattern

Meet Nieves, the most charming little snowman you will ever hook up! He is not just any winter friend; he is all bundled up in a cozy pink reindeer cap that makes him look absolutely precious. I loved designing this one because of the textures, from the bobble stitches on his hat to the sweet little ruffles. He is the perfect project for those chilly evenings when you want to create something that feels like a warm, handmade hug.

Intermediate 5-7 Hours

Materials Needed for Nieves the Snowman Reindeer Amigurumi Pattern

β€” Main Fabric

  • 01
    Cotton yarn in white for the main snowman body and head
  • 02
    Cotton yarn in beige for the reindeer horns and the nose
  • 03
    Cotton yarn in pink for the decorative cap and the arms
  • 04
    Cotton yarn in ecru for the inner ear details

β€” Tools Required

  • 01
    2mm crochet hook
  • 02
    Two 5mm safety eyes
  • 03
    Tapestry needle for sewing and assembly
  • 04
    One decorative floral button
  • 05
    Two tiny pink buttons for the snowman chest
  • 06
    Beige ribbon for the glove cuffs
  • 07
    Soft fiberfill stuffing
  • 08
    A small piece of cardboard for the base

Progress Tracker

0% Complete

β€” 1. Body Base :

Info :

Using white yarn, work in a continuous spiral. You need to make two identical pieces for the base.

Round 1 :

6 sc in mr (6)

Round 2 :

6 x inc (12)

Round 3 :

(1 sc, 1 inc) x 6 (18)

Round 4 :

(2 sc, 1 inc) x 6 (24)

Round 5 :

(3 sc, 1 inc) x 6 (30)

Round 6 :

(4 sc, 1 inc) x 6 (36)

Round 7 :

(5 sc, 1 inc) x 6 (42)

Round 8 :

(6 sc, 1 inc) x 6 (48)

Round 9 :

(7 sc, 1 inc) x 6 (54)

Info :

Cut the yarn on the first piece. Do not cut the yarn on the second piece. Place a circle of cardboard between them for stability.

β€” 2. Main Body :

Round 10 :

Join both base pieces by working through blo of both: 4 sc, 1 inc, (8 sc, 1 inc) x 5, 4 sc (60)

Round 11 :

(9 sc, 1 inc) x 6 (66)

Round 12 :

5 sc, 1 inc, (10 sc, 1 inc) x 5, 5 sc (72)

Round 13 :

(11 sc, 1 inc) x 6 (78)

Round 14-26 :

78 sc (78)

Round 27 :

(11 sc, 1 dec) x 6 (72)

Round 28 :

5 sc, 1 dec, (10 sc, 1 dec) x 5, 5 sc (66)

Round 29 :

(9 sc, 1 dec) x 6 (60)

Round 30 :

60 sc (60)

Round 31 :

4 sc, 1 dec, (8 sc, 1 dec) x 5, 4 sc (54)

Round 32 :

54 sc (54)

Round 33 :

(7 sc, 1 dec) x 6 (48)

Round 34 :

48 sc (48)

Round 35 :

3 sc, 1 dec, (6 sc, 1 dec) x 5, 3 sc (42)

Round 36-39 :

42 sc (42)

Info :

sl st to finish, leave a tail for sewing, and stuff the body firmly.

β€” 3. Head :

Round 1 :

6 sc in mr (6)

Round 2 :

6 x inc (12)

Round 3 :

(1 sc, 1 inc) x 6 (18)

Round 4 :

(2 sc, 1 inc) x 6 (24)

Round 5 :

1 sc, 1 inc, (3 sc, 1 inc) x 5, 2 sc (30)

Round 6 :

(4 sc, 1 inc) x 6 (36)

Round 7 :

2 sc, 1 inc, (5 sc, 1 inc) x 5, 3 sc (42)

Round 8 :

(6 sc, 1 inc) x 6 (48)

Round 9 :

(7 sc, 1 inc) x 6 (54)

Round 10 :

5 sc, 1 inc, (8 sc, 1 inc) x 5, 1 sc (60)

Round 11 :

(9 sc, 1 inc) x 6 (66)

Round 12 :

(10 sc, 1 inc) x 6 (72)

Round 13-28 :

72 sc (72)

Info :

Place safety eyes between Rnd 20 and 21, leaving 7 st between them.

Round 29 :

5 sc, 1 dec, (10 sc, 1 dec) x 5, 5 sc (66)

Round 30 :

(9 sc, 1 dec) x 6 (60)

Round 31 :

4 sc, 1 dec, (8 sc, 1 dec) x 5, 4 sc (54)

Round 32 :

(7 sc, 1 dec) x 6 (48)

Round 33 :

3 sc, 1 dec, (6 sc, 1 dec) x 5, 3 sc (42)

Info :

Stuff the head well and fasten off.

β€” 4. Arms & Gloves :

Finger :

With beige, 6 hdc in mr, sl st to join, cut yarn and set aside.

Round 1 :

With beige, ch 4, start in 2nd ch: 1 sc, 1 sc, 3 sc in last ch, 2 sc on other side, 3 sc in final st (10)

Round 2 :

3 sc, 3 sc in next st, 4 sc, 3 sc in next st, 1 sc (14)

Round 3 :

4 sc, 3 sc in next st, 6 sc, 3 sc in next st, 2 sc (18)

Round 4 :

5 sc, 1 inc, 11 sc (18)

Round 5-8 :

18 sc (18)

Round 9 :

4 sc, attach finger by folding it and working through 3 sc of finger and glove together, finish round (18)

Round 10 :

7 sc, 1 dec, 7 sc, 1 dec (16)

Round 11 :

Switch to pink, blo: (6 sc, 1 dec) x 2 (14)

Round 12-21 :

14 sc (14)

Cuff Detail :

Join beige to flo of Rnd 11: (ch 3, puff of 2 hdc in base of ch, skip 1 st, sl st) repeat 8 times.

β€” 5. Nose & Horns :

Nose :

With beige, in mr: ch 2, 7 hdc, sl st to 2nd ch. Close ring and leave tail.

Horn Piece A :

Make 2. Rnd 1: 6 sc in mr (6). Rnd 2: (1 sc, 1 inc) x 3 (9). Rnd 3-7: 9 sc (9). Fasten off.

Horn Piece B :

Make 2. Rnd 1: 6 sc in mr (6). Rnd 2: (1 sc, 1 inc) x 3 (9). Rnd 3-5: 9 sc (9). Rnd 6: (1 sc, 1 dec) x 3 (6).

Horn Join :

Rnd 8: Crochet 9 sc around Piece A, then 6 sc around Piece B (15).

Round 9-10 :

15 sc (15)

β€” 6. Reindeer Cap :

Row 1 :

With pink, ch 57 + 3. Work 1 bobble using 5 hdc across the next 5 ch. Repeat until you have 28 bobbles.

Row 2 :

Turn, ch 1, 56 sc (56)

Row 3-13 :

Repeat Rows 1 and 2 alternating. Fasten off with long tail.

Info :

Fold rectangle and sew the back seam to form the hood shape.

Cape Setup :

Join pink to lower left rear corner, ch 15 and cut. Join pink to lower left front corner, ch 31.

Cape Row 1 :

ch 2, 9 hdc, 6 sc through blo.

Cape Row 2 :

skip 1, sl st in next, turn, 16 sl st through blo.

Cape Row 3-49 :

Repeat Rows 1 and 2 of cape, using the 15 ch at the end.

Edge :

ch 7 for buttonhole, 1 sc in corner. Work sc along neck and face edges. Add 14 shells (3 hdc each) around the face opening. Finish with lapel curves.

β€” 7. Ears :

Info :

Make 2 in ecru and 2 in pink.

Round 1 :

ch 4, start in 2nd ch: 1 sc, 1 sc, 5 hdc in last ch, 2 sc on other side, 3 sc in final ch (12)

Round 2 :

2 sc, 5 x hdc inc, 3 sc, 3 sc in next st, 1 sc (19)

Round 3 :

2 sc, 2 hdc, 6 x hdc inc, 2 hdc, 4 sc, 3 sc in next st, 2 sc (25)

Info :

Place pink and ecru pieces together and sc around to join. Use flo on ecru piece.

Assembly Instructions

  • Sew the head to the body using a sturdy whipstitch, adding extra stuffing to the neck area just before closing to prevent a floppy head.
  • Position the horns on the cap between rounds 10 and 11, making sure to leave exactly 8 bobble groups between them for perfect spacing.
  • Attach the ears directly below the horns on the same line, folding the base of the ear slightly to give it a more natural look.
  • Secure the floral button on the second row of the slip stitch line on the cap lapel.
  • Place the two pink buttons on the snowman chest, centering them between rounds 22-23 and 26-27.
  • Tie small beige ribbons around the glove cuffs to add a delicate finishing touch.
  • Use transparent thread to sculpt the face, pulling from the eyes to the back of the neck to create that sweet, sunken-eye expression.

Important Notes

  • πŸ’‘Keep your tension consistent throughout the cap to ensure the bobbles look uniform and the cape drapes nicely.
  • πŸ’‘When working the base, use a piece of stiff cardboard or plastic to keep the bottom flat so Nieves stands upright.
  • πŸ’‘The safety eyes should be placed before finishing the head, but do not do the final sculpting until the whole piece is assembled.
  • πŸ’‘If you find the 2mm hook too small for your yarn weight, feel free to size up, but remember your snowman will end up a bit larger.
  • πŸ’‘Weave in your ends as you go, especially on the complex cap section, to save yourself a headache at the end.

I hope you have as much fun making Nieves as I did! There is something so satisfying about watching those little bobbles grow into a cozy hat. Whether he is a gift or a new addition to your own winter decor, he is sure to bring a smile to anyone who sees him. Don't forget to take a moment to really enjoy the facial sculpting part β€” it is where his little personality truly shines through. Happy crocheting, and stay cozy! πŸ§Άβ„οΈβœ¨

You ask,

we answer.

FAQs

Can I use acrylic yarn instead of cotton for this snowman?

Yes, you can substitute with acrylic, but cotton gives the snowman a cleaner finish and better stitch definition for the textured bobbles on the cap.

How do I make the base more stable so he doesn't tip?

The pattern suggests cardboard, but you can also use a plastic lid cut to size if you plan on washing the snowman later.

What exactly is the bobble stitch used in the cap?

It is a 5-hdc bobble worked across multiple chain stitches. It creates a wider, flatter texture than a standard bobble worked into a single stitch.

My cap seems too small for the head, what should I do?

Check your gauge on the initial chain. If your tension is very tight, you might need to add a few extra chains or use a slightly larger hook for the cap.