About This The Boy Wizard Amigurumi Pattern
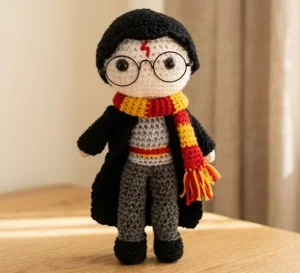
Perfect for gifting to the book lover in your life, this handmade doll is sturdy enough for gentle play and detailed enough to be a standout display piece in any collection.
Ideal for those with basic crocheting experience, featuring slightly more advanced stitches and techniques to expand your skills.
Takes 5-7 hours, making it an enjoyable project to finish over a couple of days.
Playful characters full of personality, designed to spark imagination and become cherished playtime favorites.
Perfect for gifting to the book lover in your life, this handmade doll is sturdy enough for gentle play and detailed enough to be a standout display piece in any collection.
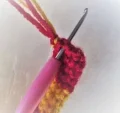
I absolutely adore how the small details make this piece come alive. The way the scarf fringe is added and the use of the back-loop-only technique for the color changes gives him such a polished, professional look. It’s one of those projects where you’ll find yourself smiling more and more as he starts to look like the character we all grew up with. Plus, the removable cloak is just so satisfying to finish!
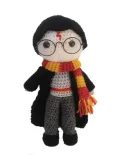
There is something so incredibly nostalgic about working on a project like this. As I was crocheting the messy black hair, I couldn't help but think about all the hours I spent lost in these stories. I really wanted this pattern to capture that specific charm—not just a generic doll, but something that felt like it stepped right off the page.
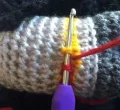
One little tip I discovered while making my prototype: when you're adding the red slip stitches to the sweater, try to keep your tension consistent with the rest of the body. If you pull too tight, the waist cinches in more than it should. Also, don't be afraid to get creative with the hair! If you want it even messier, you can add a few extra surface crochet strands after sewing the main piece down.
I think my favorite part of the whole process is adding the glasses at the very end. It’s that 'aha!' moment where the character truly comes to life. I hope this project brings a little bit of that same wonder to your craft room this weekend. It’s the perfect companion for a movie marathon or a quiet afternoon of reading.
Bring a touch of magic to your crochet hook with this darling little wizard! He's got all the iconic details we love, from the messy black hair and round glasses to that famous lightning bolt scar. You'll enjoy the clever construction of his removable cloak and the way his striped house scarf adds a pop of color. It's a nostalgic project that feels like a warm hug for any fan of the series, and he looks absolutely perfect perched on a bookshelf next to your favorite novels.
Using flesh yarn, work 4 sc into a magic ring (4)
Work 4 inc around (8)
8 sc (8)
Switch to your light grey yarn
8 sl around (8)
8 sc blo (8)
8 sc (8)
Fasten off and leave a tail for later.
Using black yarn, work 6 sc into a magic ring (6)
Work 6 inc around (12)
Repeat (3 sc, 3 inc) twice (18)
18 sc blo (18)
18 sc (18)
2 sc, 7 dec, 2 sc (11)
Switch to dark grey yarn
11 sl around (11)
11 sc blo (11)
11 sc (11)
Fasten off the first leg. For the second leg, do not cut the yarn. If you aren't at the side of the leg with the foot facing forward, work extra sc until you reach that point, then ch 1.
Work 11 sc around the first leg, 1 sc into the ch, 11 sc around the second leg, and 1 sc into the other side of the ch (24)
10 sc, dec, 10 sc, dec (22)
22 sc (22)
Work sc until you reach the center of the back. Stuff as you go from this point forward.
Switch to light grey yarn
22 sl around (22)
22 sc blo (22)
Switch to yellow yarn
22 sc (22)
Switch back to light grey yarn
22 sc (22)
5 sc, dec, 9 sc, dec, 4 sc (20)
20 sc (20)
Work sc until you are at the side of the body with the feet facing forward.
Work 8 sc around the first arm, 10 sc across the body, 8 sc around the second arm, and 10 sc across the other side of the body (36)
Repeat (1 sc, 1 dec) 12 times (24)
12 dec around (12)
Switch to flesh yarn
12 sl around (12)
12 sc blo (12)
12 inc around (24)
24 inc around (48)
48 sc (48)
Insert safety eyes between Rounds 24 and 25. Space them 8 stitches apart, centered with the face.
Repeat (6 sc, 1 dec) 6 times (42)
Repeat (5 sc, 1 dec) 6 times (36)
Repeat (4 sc, 1 dec) 6 times (30)
Repeat (3 sc, 1 dec) 6 times (24)
Repeat (2 sc, 1 dec) 6 times (18)
Repeat (1 sc, 1 dec) 6 times (12)
6 dec (6)
Fasten off. Weave the tail through the remaining stitches and pull tight to close.
Using black yarn, work 7 sc into a magic ring (7)
7 inc around (14)
Repeat (1 sc, 1 inc) around (21)
Repeat (2 sc, 1 inc) around (28)
Repeat (3 sc, 1 inc) around (35)
Repeat (4 sc, 1 inc) around (42)
Repeat (5 sc, 1 inc) around (49)
49 sc (49)
Repeat (1 sc, 1 dc, 1 dc, 1 tr, 1 dc, 1 dc, 1 sc) 7 times around.
Fasten off and leave a long tail for sewing.
Using red yarn, ch 8 and join with a sl st to form a ring (8)
8 sc (8)
Switch to yellow yarn
8 sc (8)
Switch back to red yarn
8 sc (8)
Keep repeating these 4-round stripes until you have completed 13 stripes in total.
Using black yarn, ch 12 and join with a sl st to form a ring (12)
12 sc (12)
Fasten off and weave in your ends.
Using black yarn, ch 21 (21)
Starting in the 2nd ch from your hook, work 20 sc (20)
ch 1, turn. Starting in the 2nd st from hook, work 20 sc (20)
ch 1, turn. 5 sc, 12 sc around the sleeve opening, 10 sc across the back, 12 sc around the other sleeve opening, 5 sc (44)
ch 1, turn. 22 dec (22)
ch 1, turn. 22 sc (22)
ch 1, turn. 11 dec (11)
Fasten off and weave in all remaining ends.
I hope you have as much fun making this little wizard as I did! There’s something so special about creating a character that carries so many memories for people. Whether he’s destined to be a gift for a fellow fan or a new addition to your own collection, he’s sure to bring a bit of magic wherever he goes. Don't forget to share your finished photos with the community—I'd love to see how your version turns out! Happy crocheting, and may your stitches always be magical! 🧶 ✨
Yes! The pattern is actually designed so the cloak is a separate piece. You can slide the sleeves onto the arms and drape the body over the shoulders without sewing it down permanently.
If you are using DK weight yarn, 10mm or 12mm safety eyes usually look best. If you've opted for worsted weight, you might want to go up to 14mm to keep the proportions right.
The hair and cloak add some weight, so make sure to stuff the neck area very firmly. You can also insert a rolled-up piece of felt or a 'neck bone' made of tightly crocheted stitches inside the neck for extra support.
Not at all! Think of it like stitching a slanted 'N' or a couple of zig-zags. I recommend using a thinner strand of yarn or embroidery floss for a cleaner look.
