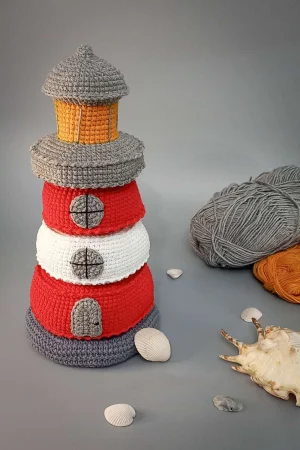
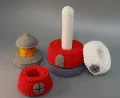
There is something so timeless about a lighthouse, and turning that classic shape into a soft, stackable toy is a project you are going to adore. This pattern is designed to be both a beautiful piece of nursery decor and a functional developmental toy for little hands. You will love watching the vibrant red and white rings come together, topped off with a cozy grey roof and a glowing yellow light. It is a rewarding make that combines simple shapes with thoughtful construction, resulting in a handmade treasure that will be cherished for years.
Progress Tracker
0% Complete
— 1. Base (Make 2) :
Info :
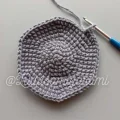
Using the light grey yarn, you will create two identical circular pieces that will be joined later.
Round 1 :
Work 6 sc into a MR (6)
Round 2 :
Work 1 inc in every stitch around (12)
Round 3 :
Repeat a sequence of 1 sc followed by 1 inc 6 times (18)
Round 4 :
Repeat a sequence of 2 sc followed by 1 inc 6 times (24)
Round 5 :
Repeat a sequence of 3 sc followed by 1 inc 6 times (30)
Round 6 :
Working in FLO, repeat a sequence of 4 sc followed by 1 inc 6 times (36)
Round 7 :
Repeat a sequence of 5 sc followed by 1 inc 6 times (42)
Round 8 :
Work 3 sc, then 1 inc, then repeat (6 sc, 1 inc) 5 times, finishing with 3 sc (48)
Round 9 :
Repeat a sequence of 7 sc followed by 1 inc 6 times (54)
Round 10 :
Work 4 sc, then 1 inc, then repeat (8 sc, 1 inc) 5 times, finishing with 4 sc (60)
Round 11 :
Working in FLO, repeat a sequence of 9 sc followed by 1 inc 6 times (66)
Round 12 :
Work 5 sc, then 1 inc, then repeat (10 sc, 1 inc) 5 times, finishing with 5 sc (72)
Round 13 :
Repeat a sequence of 11 sc followed by 1 inc 6 times (78)
Round 14 :
Work 6 sc, then 1 inc, then repeat (12 sc, 1 inc) 5 times, finishing with 6 sc (84)
Round 15 :
Repeat a sequence of 13 sc followed by 1 inc 6 times (90)
Round 16 :
Work 1 sc in each stitch around (90)
Round 17 :
Work 1 sc in each stitch around (90). Fasten off, ensuring you leave a long tail for sewing.
— 2. Center Pole :
Info :
Switch to white yarn. This part needs to be stuffed firmly as you work to maintain its structure.
Round 1 :
Work 6 sc into a MR (6)
Round 2 :
Work 1 inc in every stitch around (12)
Round 3 :
Repeat a sequence of 1 sc followed by 1 inc 6 times (18)
Round 4 :
Repeat a sequence of 2 sc followed by 1 inc 6 times (24)
Round 5-49 :
Work 1 sc in each stitch around for these 45 rounds (24)
Round 50 :
Repeat a sequence of 3 sc followed by 1 inc 6 times (30)
— 3. Large Ring :
Info :
Use the red yarn for this section. You will start with a chain and join it into a circle.
Round 1 :
ch 36, then join to the first chain with a sl st to form a ring (36)
Round 2-11 :
ch 1, work 36 sc around, and join with a sl st. Turn the piece inside out before continuing (36)
Round 12 :
Working in BLO, repeat a sequence of 5 sc followed by 1 inc 6 times (42)
Round 13 :
Work 3 sc, then 1 inc, then repeat (6 sc, 1 inc) 5 times, finishing with 3 sc (48)
Round 14 :
Repeat a sequence of 7 sc followed by 1 inc 6 times (54)
Round 15 :
Work 4 sc, then 1 inc, then repeat (8 sc, 1 inc) 5 times, finishing with 4 sc (60)
Round 16 :
Repeat a sequence of 9 sc followed by 1 inc 6 times (66)
Round 17 :
Work 5 sc, then 1 inc, then repeat (10 sc, 1 inc) 5 times, finishing with 5 sc (72)
Round 18 :
Repeat a sequence of 11 sc followed by 1 inc 6 times (78)
Round 19 :
Work 6 sc, then 1 inc, then repeat (12 sc, 1 inc) 5 times, finishing with 6 sc (84)
Round 20 :
Repeat a sequence of 13 sc followed by 1 inc 6 times (90)
Round 21 :
Working in BLO, repeat a sequence of 13 sc followed by 1 dec 6 times (84)
Round 22-25 :
Work 1 sc in each stitch around (84)
Round 26 :
Work 6 sc, then 1 dec, then repeat (12 sc, 1 dec) 5 times, finishing with 6 sc (78)
Round 27-30 :
Work 1 sc in each stitch around (78)
Round 31 :
Working in BLO, repeat a sequence of 11 sc followed by 1 dec 6 times (72)
Round 32 :
Work 5 sc, then 1 dec, then repeat (10 sc, 1 dec) 5 times, finishing with 5 sc (66)
Round 33 :
Repeat a sequence of 9 sc followed by 1 dec 6 times (60)
Round 34 :
Work 4 sc, then 1 dec, then repeat (8 sc, 1 dec) 5 times, finishing with 4 sc (54)
Round 35 :
Repeat a sequence of 7 sc followed by 1 dec 6 times (48)
Round 36 :
Work 3 sc, then 1 dec, then repeat (6 sc, 1 dec) 5 times, finishing with 3 sc (42)
Round 37 :
Repeat a sequence of 5 sc followed by 1 dec 6 times (36). Add stuffing, fasten off, and leave a tail.
Info :
For a decorative edge, go back to the front loops of Round 21 and Round 31. You can either work a round of 90/78 sl st or a round of 45/39 rev stitches (skipping every other sc).
— 4. Middle Ring :
Info :
Switch to white yarn for this ring. Follow the same start as the large ring.
Round 1 :
ch 36, then join to the first chain with a sl st (36)
Round 2-11 :
ch 1, work 36 sc around, and join with a sl st. Turn inside out (36)
Round 12 :
Working in BLO, repeat a sequence of 5 sc followed by 1 inc 6 times (42)
Round 13 :
Work 3 sc, then 1 inc, then repeat (6 sc, 1 inc) 5 times, finishing with 3 sc (48)
Round 14 :
Repeat a sequence of 7 sc followed by 1 inc 6 times (54)
Round 15 :
Work 4 sc, then 1 inc, then repeat (8 sc, 1 inc) 5 times, finishing with 4 sc (60)
Round 16 :
Repeat a sequence of 9 sc followed by 1 inc 6 times (66)
Round 17 :
Work 5 sc, then 1 inc, then repeat (10 sc, 1 inc) 5 times, finishing with 5 sc (72)
Round 18 :
Repeat a sequence of 11 sc followed by 1 inc 6 times (78)
Round 19 :
Working in BLO, repeat a sequence of 11 sc followed by 1 dec 6 times (72)
Round 20-23 :
Work 1 sc in each stitch around (72)
Round 24 :
Work 5 sc, then 1 dec, then repeat (10 sc, 1 dec) 5 times, finishing with 5 sc (66)
Round 25-28 :
Work 1 sc in each stitch around (66)
Round 29 :
Working in BLO, repeat a sequence of 9 sc followed by 1 dec 6 times (60)
Round 30 :
Work 4 sc, then 1 dec, then repeat (8 sc, 1 dec) 5 times, finishing with 4 sc (54)
Round 31 :
Repeat a sequence of 7 sc followed by 1 dec 6 times (48)
Round 32 :
Work 3 sc, then 1 dec, then repeat (6 sc, 1 dec) 5 times, finishing with 3 sc (42)
Round 33 :
Repeat a sequence of 5 sc followed by 1 dec 6 times (36). Stuff, fasten off, and leave a tail.
Info :
Note: The source numbering for the final rounds of this ring was slightly inconsistent; follow the stitch counts provided here for a smooth shape. Add decorative edging in the front loops of Round 19 and 29.
— 5. Small Ring :
Info :
Use red yarn for this final, smallest ring.
Round 1 :
ch 36, then join to the first chain with a sl st (36)
Round 2-11 :
ch 1, work 36 sc around, and join with a sl st. Turn inside out (36)
Round 12 :
Working in BLO, repeat a sequence of 5 sc followed by 1 inc 6 times (42)
Round 13 :
Work 3 sc, then 1 inc, then repeat (6 sc, 1 inc) 5 times, finishing with 3 sc (48)
Round 14 :
Repeat a sequence of 7 sc followed by 1 inc 6 times (54)
Round 15 :
Work 4 sc, then 1 inc, then repeat (8 sc, 1 inc) 5 times, finishing with 4 sc (60)
Round 16 :
Repeat a sequence of 9 sc followed by 1 inc 6 times (66)
Round 17 :
Working in BLO, repeat a sequence of 9 sc followed by 1 dec 6 times (60)
Round 18-21 :
Work 1 sc in each stitch around (60)
Round 22 :
Work 4 sc, then 1 dec, then repeat (8 sc, 1 dec) 5 times, finishing with 4 sc (54)
Round 23-26 :
Work 1 sc in each stitch around (54)
Round 27 :
Working in BLO, repeat a sequence of 7 sc followed by 1 dec 6 times (48)
Round 28 :
Work 3 sc, then 1 dec, then repeat (6 sc, 1 dec) 5 times, finishing with 3 sc (42)
Round 29 :
Repeat a sequence of 5 sc followed by 1 dec 6 times (36). Stuff, fasten off, and leave a tail.
— 6. Top Section :
Info :
Start with light grey yarn for the lantern house base.
Round 1 :
Work 6 sc into a MR (6)
Round 2 :
Work 1 inc in every stitch around (12)
Round 3 :
Repeat a sequence of 1 sc followed by 1 inc 6 times (18)
Round 4 :
Repeat a sequence of 2 sc followed by 1 inc 6 times (24)
Round 5 :
Repeat a sequence of 3 sc followed by 1 inc 6 times (30)
Round 6 :
Repeat a sequence of 4 sc followed by 1 inc 6 times (36)
Round 7-14 :
ch 1, work 36 sc, join with sl st. Turn the piece inside out (36)
Round 15 :
Working in BLO, repeat a sequence of 5 sc followed by 1 inc 6 times (42)
Round 16 :
Work 3 sc, then 1 inc, then repeat (6 sc, 1 inc) 5 times, finishing with 3 sc (48)
Round 17 :
Repeat a sequence of 7 sc followed by 1 inc 6 times (54)
Round 18 :
Work 4 sc, then 1 inc, then repeat (8 sc, 1 inc) 5 times, finishing with 4 sc (60)
Round 19 :
Repeat a sequence of 9 sc followed by 1 inc 6 times (66)
Round 20 :
Work 5 sc, then 1 inc, then repeat (10 sc, 1 inc) 5 times, finishing with 5 sc (72)
Round 21 :
Working in BLO, work 1 sc in each stitch around (72)
Round 22-24 :
Work 1 sc in each stitch around (72)
Round 25 :
Working in BLO, work 5 sc, then 1 dec, then repeat (10 sc, 1 dec) 5 times, finishing with 5 sc (66)
Round 26 :
Repeat a sequence of 9 sc followed by 1 dec 6 times (60)
Round 27 :
Work 4 sc, then 1 dec, then repeat (8 sc, 1 dec) 5 times, finishing with 4 sc (54)
Round 28 :
Repeat a sequence of 7 sc followed by 1 dec 6 times (48)
Round 29 :
Work 3 sc, then 1 dec, then repeat (6 sc, 1 dec) 5 times, finishing with 3 sc (42)
Round 30 :
Repeat a sequence of 5 sc followed by 1 dec 6 times (36). Stuff firmly.
Colour Change :
Switch to yellow yarn for the lantern window section.
Round 31 :
Working in FLO, work 1 sc in each stitch around (36)
Round 32-38 :
Work 1 sc in each stitch around (36)
Colour Change :
Switch back to light grey yarn.
Round 39 :
Working in FLO, repeat a sequence of 5 sc followed by 1 inc 6 times (42)
Round 40 :
Work 3 sc, then 1 inc, then repeat (6 sc, 1 inc) 5 times, finishing with 3 sc (48). Fasten off and hide the tail.
— 7. Roof :
Info :
Use the light grey yarn to make the pointed top of the lighthouse.
Round 1 :
Work 6 sc into a MR (6)
Round 2 :
Work 1 sc in each stitch around (6)
Round 3 :
Work 1 inc in every stitch around (12)
Round 4 :
Work 1 sc in each stitch around (12)
Round 5 :
Work 1 inc in every stitch around (24)
Round 6 :
Work 1 sc in each stitch around (24)
Round 7 :
Repeat a sequence of 1 sc followed by 1 inc 6 times (36)
Round 8 :
Work 1 sc in each stitch around (36)
Round 9 :
Repeat a sequence of 2 sc followed by 1 inc 6 times (48)
Round 10-12 :
Work 1 sc in each stitch around for these three rounds (48)
Round 13 :
Place the roof on top of the lighthouse and join them together by working one round of 48 sc through both pieces. Stuff as you close.
— 8. Door & Windows :
Info :
These pieces are worked in light grey to add detail to the rings.
Row 2 (Door) :
Work 7 sc across (7)
Round 3 (Door) :
ch 1, work 6 sc, 3 sc in the corner stitch, then 6 sc on the other side. Turn (15)
Round 4 (Door) :
ch 1, work 6 sc, 3 inc across the top curve, then 6 sc. Fasten off with a long tail (18)
Round 1 (Window) :
Work 6 sc into a MR (6). Make 3 windows total.
Round 2 (Window) :
Work 1 inc in every stitch around (12)
Round 3 (Window) :
Repeat a sequence of 1 sc followed by 1 inc 6 times (18). Fasten off and leave a tail.
I truly hope you enjoy every stitch of this lighthouse project! There is something so magical about seeing a pile of yarn transform into a beautiful, interactive toy. Whether you are making this for your own little one or as a thoughtful gift for a friend, it is sure to be a standout piece. Don't forget to take a moment to admire that crisp red and white contrast—it's just so classic! I can't wait to see your finished lighthouses standing tall. Happy crocheting, and may your creative light always shine bright! 🧶 ✨ ⚓