🧢 Beautiful ✨ Detailed πŸ’ Adorable

Plush Bunny Crochet Backpack Amigurumi Pattern

Plush Bunny Crochet Backpack Amigurumi Pattern
4.2β˜…Rating
5-7 HoursTime Needed
1.8KMade This
βœ‚οΈ

Intermediate Level

Ideal for those with basic crocheting experience, featuring slightly more advanced stitches and techniques to expand your skills.

⏱️

Weekend Treat

Takes 5-7 hours, making it an enjoyable project to finish over a couple of days.

🐰

Whimsical Buddy

Playful characters full of personality, designed to spark imagination and become cherished playtime favorites.

About This Plush Bunny Crochet Backpack Amigurumi Pattern

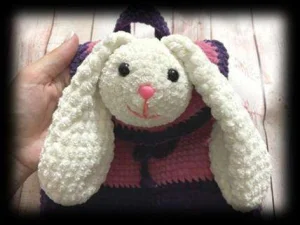
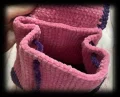
Plush Bunny Crochet Backpack Amigurumi Pattern crochet pattern - detailed view

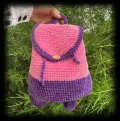
A wonderful gift for birthdays or holidays, this backpack is as fun to wear as it is to make. It’s sturdy enough for daily adventures while remaining light and cozy for small shoulders.

Why You'll Love This Plush Bunny Crochet Backpack Amigurumi Pattern

I love how the velvet yarn works up so quickly, making the backpack feel substantial and soft in no time. The way the bunny head is integrated into the flap is just geniusβ€”it gives the bag so much personality without being overly complicated to assemble.

Plush Bunny Crochet Backpack Amigurumi Pattern step 1 Plush Bunny Crochet Backpack Amigurumi Pattern step 2 Plush Bunny Crochet Backpack Amigurumi Pattern step 3 Plush Bunny Crochet Backpack Amigurumi Pattern step 4

Switch Things Up

When I first saw this design, I knew I had to make it for my niece. There's something so nostalgic about a bunny with long ears, and turning it into a backpack is just so practical! I decided to use a deep plum and a soft lavender for mine, and it looked stunning.

One thing I learned while making this is that the assembly is where the magic happens. Taking the time to pin the head and ears exactly where you want them before sewing makes a world of difference. If you find the velvet yarn a bit tricky to sew with, don't be afraid to switch to a matching embroidery floss or cotton threadβ€”it's much easier to pull through the stitches and hides perfectly in the fluff.

I also love that you can customize the face. Give your bunny sleepy eyes or a big toothy grin to match the personality of the child who'll be wearing it. It’s these little handmade touches that make our craft so special!

Common Mistakes & How to Fix Them

βœ— When working the flap's reverse sc edge, keep your tension loose or the border might pull and cause the flap to curl inward.βœ— Attaching the straps too close together at the top can make it uncomfortable to wear; ensure you maintain the 12-stitch gap as specified.βœ— If you skip the BLO round on the backpack base, the bag won't have that nice flat bottom to help it keep its shape when set down.βœ— Sewing the head through both layers of the flap will show stitches on the inside; make sure to only catch the top loops of the flap fabric.βœ— The cord for the drawstring needs to be exactly 150 chains; if it's too short, the backpack won't open wide enough for easy access.

Plush Bunny Crochet Backpack Amigurumi Pattern

I am so excited to share this adorable bunny backpack with you! It's the perfect blend of a cuddly toy and a practical accessory that any little one would cherish. Using soft velvet yarn makes it incredibly squishy, and those long floppy ears add so much personality. You'll love seeing this come together row by row, and the finished piece is just so rewarding to hold.

Intermediate 5-7 Hours

Materials Needed for Plush Bunny Crochet Backpack Amigurumi Pattern

β€” Main Fabric

  • 01
    Two skeins of Super Bulky velvet yarn (like Himalaya Dolphin Baby) in contrasting colors
  • 02
    Small amount of Sport weight black yarn for facial details
  • 03
    Pink thread for embroidering the mouth

β€” Tools Required

  • 01
    3.75 mm crochet hook
  • 02
    5 mm crochet hook
  • 03
    Sewing needle
  • 04
    One wooden button
  • 05
    Pair of 8-10 mm safety eyes
  • 06
    10 mm safety nose
  • 07
    Polyfill stuffing material
  • 08
    Stitch markers

Progress Tracker

0% Complete

β€” 1. Flap :

Info :

Using pink yarn, we will work in rows.

Row 1 :

ch2, 5 sc into the 2nd ch from hook. Do not close the ring. Turn. (5)

Row 2 :

t-ch, 1 sc, 4 x inc, turn (9)

Row 3 :

t-ch, (1 sc, inc) * 4, 1 sc, turn (13)

Row 4 :

t-ch, (2 sc, inc) * 4, 1 sc, turn (17)

Row 5 :

t-ch, (3 sc, inc) * 4, 1 sc, turn (21)

Row 6 :

t-ch, (4 sc, inc) * 4, 1 sc, turn (25)

Row 7 :

t-ch, (5 sc, inc) * 4, 1 sc, turn (29)

Row 8 :

t-ch, (7 sc, inc) * 3, 5 sc, turn (32)

Row 9 :

t-ch, (8 sc, inc) * 3, 5 sc (35)

Info :

Continue without turning, working across the straight top edge of the piece.

Row 10 :

t-ch, 19 sc, turn (19)

Row 11-15 :

t-ch, 19 sc, turn (19)

Row 16 :

t-ch, 19 sc (19)

Colour Change :

Switch to purple yarn and fasten off the pink.

Round 17 :

t-ch, 22 sc, ch3, skip 3 stitches, 22 sc, turn (47)

Round 18 :

t-ch, 47 reverse sc, sl st (47)

β€” 2. Backpack Body :

Info :

Start with purple yarn. We will work in a continuous spiral.

Round 1 :

ch20. Starting in the 2nd ch from hook: 18 sc, 3 sc in the last ch. Rotate to work on the bottom of the chain: 17 sc, inc, inc into the t-ch (42)

Round 2 :

16 sc, (inc, 1 sc) * 2, inc, 15 sc, (inc, 1 sc) * 3 (48)

Round 3 :

inc, 15 sc, (inc, 1 sc) * 4, inc, 14 sc, (inc, 1 sc) * 4, 1 sc (58)

Round 4 :

inc, 15 sc, (inc, 3 sc) * 3, inc, 17 sc, (inc, 3 sc) * 3 (66)

Round 5 :

inc, 18 sc, (inc, 4 sc) * 3, inc, 16 sc, (inc, 4 sc) * 3 (74)

Round 6 :

74 sc (74)

Round 7 :

BLO 74 sc (74)

Round 8-16 :

74 sc (74)

Round 17 :

26 sc, dec, 34 sc, dec, 10 sc (72)

Colour Change :

Switch to pink yarn and fasten off the purple.

Round 18-35 :

72 sc (72)

Round 36 :

71 sc, then 1 sc through both the body and the flap (72)

Round 37 :

20 sc through both the body and the flap, 52 sc, sl st (72)

β€” 3. Straps :

Info :

Make two using purple yarn, working in rows.

Row 1 :

ch71. Starting in the 2nd ch from hook: 70 sc, turn (70)

Row 2-4 :

t-ch, 70 sc, turn (70)

β€” 4. Handle :

Info :

Use purple yarn and work in rows.

Row 1 :

ch21. Starting in the 2nd ch from hook: 20 sc, turn (20)

Row 2-3 :

t-ch, 20 sc, turn (20)

β€” 5. Drawstring Cord :

Row 1 :

ch150 using purple yarn. Fasten off and tie knots at both ends.

β€” 6. Bunny Head :

Info :

Use milk colored yarn and work in a spiral.

Round 1 :

ch2, 6 sc into the 2nd ch from hook (6)

Round 2 :

6 x inc (12)

Round 3 :

(1 sc, inc) * 6 (18)

Round 4 :

1 sc, inc, (2 sc, inc) * 5, 1 sc (24)

Round 5 :

(3 sc, inc) * 6 (30)

Round 6 :

(4 sc, inc) * 6 (36)

Round 7-10 :

36 sc (36)

Round 11 :

(4 sc, dec) * 6 (30)

Round 12 :

(3 sc, dec) * 3 (24)

β€” 7. Bunny Ears :

Info :

Make two using milk yarn and a 5 mm hook.

Round 1 :

ch2, 6 sc into the 2nd ch from hook (6)

Round 2 :

6 x hdcinc (12)

Round 3 :

(hdc, hdcinc) * 6 (18)

Round 4 :

(5 hdc, hdcinc) * 3 (21)

Round 5-6 :

21 hdc (21)

Round 7 :

(5 hdc, hdc2tog) * 3 (18)

Round 8 :

18 hdc (18)

Round 9 :

(4 hdc, hdc2tog) * 3 (15)

Round 10-11 :

15 hdc (15)

Round 12 :

(3 hdc, hdc2tog) * 3 (12)

Round 13-14 :

12 hdc (12)

Round 15 :

(2 hdc, hdc2tog) * 3 (9)

Round 16-17 :

9 hdc (9)

Round 18 :

9 sc (9)

Finish :

Flatten the ear and work 4 sc through both layers to close.

Assembly Instructions

  • Position the safety eyes between Rounds 4 and 5 of the head, leaving about 7 stitches between them.
  • Secure the safety nose in the center of the magic ring and embroider a small mouth below it before stuffing.
  • Sew the head onto the center of the flap, taking care to only stitch into the top layer of fabric.
  • Attach the ears to the top of the head and add cute eyelashes using black sport weight yarn.
  • Fix the straps to the bottom between Rounds 7-11 and to the top between Rounds 32-36.
  • Mount the handle centered at the top of the bag and sew the button to the body to match the flap hole.
  • Thread the drawstring cord through the top of the bag, two rounds down from the edge, to create the closure.

Important Notes

  • πŸ’‘Use a stitch marker at the start of every round to keep track of your place in the spiral.
  • πŸ’‘If your velvet yarn is shedding, try lightly singeing the ends with a lighter to seal the fibers.
  • πŸ’‘For a more durable finish, use matching cotton thread to sew the pieces together instead of the bulky yarn.
  • πŸ’‘Make sure to stuff the bunny head firmly so it keeps its round shape against the flap.
  • πŸ’‘You can easily adjust the strap length by adding or subtracting chains at the beginning of the strap section.

I really hope you enjoy making this bunny backpack as much as I did! It's one of those projects that brings a smile to your face the moment the ears are attached. Whether you're making it for a little one in your life or as a special gift, it's bound to be a huge hit. Don't forget to play around with different color combinations to make it truly unique. Happy crocheting, and enjoy your new plush companion! 🧢✨🐰

You ask,

we answer.

FAQs

Can I use regular worsted weight yarn instead of velvet yarn?

You can, but the backpack will turn out much smaller and won't have that signature plush look. You'd likely need to double the strands or adjust the stitch counts.

Is the buttonhole built into the pattern?

Yes, the 3-chain space in Round 17 of the flap creates a natural buttonhole that fits a standard wooden button perfectly.

How do I prevent the straps from stretching over time?

Crocheting the straps in rows of single crochet helps, but for extra stability, you can sew a strip of cotton fabric to the underside of the straps.

My flap looks a bit lopsided, what did I do wrong?

Double-check your increases in Rows 2 through 9. If one side has an extra stitch, the curve won't be symmetrical. Counting every row is key here!