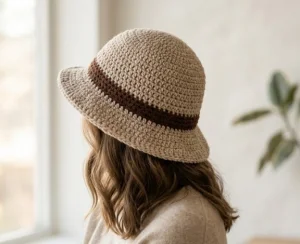
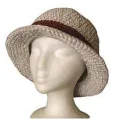
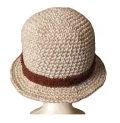
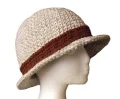
This cozy bucket hat is such a satisfying project when you want something stylish that works up in a flash. By holding two strands of yarn together, you create a sturdy, structured fabric that holds its shape beautifully without being stiff. It's the perfect accessory for those crisp morning walks or just adding a bit of handmade flair to your favorite outfit.
Progress Tracker
0% Complete
— 1. Hat Body — Size Small (18 inch) :
Info :
Hold two strands of yarn together throughout the entire project. This size fits an 18-inch head circumference.
Setup :
Create a magic ring and work 6 sc into the center. Alternatively, ch 2 and work 6 sc into the second chain from your hook.
Round 1 :
Work 2 sc into every stitch around (12).
Round 2 :
(1 sc, inc) repeat 6 times around (18).
Round 3 :
(2 sc, inc) repeat 6 times around (24).
Round 4 :
(3 sc, inc) repeat 6 times around (30).
Round 5 :
(4 sc, inc) repeat 6 times around (36).
Round 6 :
(5 sc, inc) repeat 6 times around (42).
Round 7 :
(6 sc, inc) repeat 6 times around (48).
Round 8 :
(7 sc, inc) repeat 6 times around (54).
Round 11 :
Work 1 sc into every stitch around (54).
Round 12 :
Work 1 sc into every stitch around (54).
Round 13 :
Work 1 sc into every stitch around (54).
Round 14 :
Work 1 sc into every stitch around (54).
Round 15 :
Work 1 sc into every stitch around (54).
Round 16 :
Work 1 sc into every stitch around (54).
Round 17 :
Work 1 sc into every stitch around (54).
Round 18 :
Work 1 sc into every stitch around (54).
Round 19 :
Work 1 sc into every stitch around (54).
Round 20 :
Work 1 sc into every stitch around (54).
Round 21 :
Work 1 sc into every stitch around (54).
Round 22 :
Work 1 sc into every stitch around (54).
Round 23 :
Work 1 sc into every stitch around (54).
Round 24 :
Work 1 sc into every stitch around (54).
— 2. Hat Body — Size Medium (20 inch) :
Info :
Hold two strands of yarn together throughout. This size fits a 20-inch head circumference.
Setup :
Create a magic ring and work 6 sc into the center.
Round 1 :
Work 2 sc into every stitch around (12).
Round 2 :
(1 sc, inc) repeat 6 times around (18).
Round 3 :
(2 sc, inc) repeat 6 times around (24).
Round 4 :
(3 sc, inc) repeat 6 times around (30).
Round 5 :
(4 sc, inc) repeat 6 times around (36).
Round 6 :
(5 sc, inc) repeat 6 times around (42).
Round 7 :
(6 sc, inc) repeat 6 times around (48).
Round 8 :
(7 sc, inc) repeat 6 times around (54).
Round 9 :
(8 sc, inc) repeat 6 times around (60).
Round 11 :
Work 1 sc into every stitch around (60).
Round 12 :
Work 1 sc into every stitch around (60).
Round 13 :
Work 1 sc into every stitch around (60).
Round 14 :
Work 1 sc into every stitch around (60).
Round 15 :
Work 1 sc into every stitch around (60).
Round 16 :
Work 1 sc into every stitch around (60).
Round 17 :
Work 1 sc into every stitch around (60).
Round 18 :
Work 1 sc into every stitch around (60).
Round 19 :
Work 1 sc into every stitch around (60).
Round 20 :
Work 1 sc into every stitch around (60).
Round 21 :
Work 1 sc into every stitch around (60).
Round 22 :
Work 1 sc into every stitch around (60).
Round 23 :
Work 1 sc into every stitch around (60).
Round 24 :
Work 1 sc into every stitch around (60).
— 3. Hat Body — Size Large (22 inch) :
Info :
Hold two strands of yarn together throughout. This size fits a 22-inch head circumference.
Setup :
Create a magic ring and work 6 sc into the center.
Round 1 :
Work 2 sc into every stitch around (12).
Round 2 :
(1 sc, inc) repeat 6 times around (18).
Round 3 :
(2 sc, inc) repeat 6 times around (24).
Round 4 :
(3 sc, inc) repeat 6 times around (30).
Round 5 :
(4 sc, inc) repeat 6 times around (36).
Round 6 :
(5 sc, inc) repeat 6 times around (42).
Round 7 :
(6 sc, inc) repeat 6 times around (48).
Round 8 :
(7 sc, inc) repeat 6 times around (54).
Round 9 :
(8 sc, inc) repeat 6 times around (60).
Round 10 :
(9 sc, inc) repeat 6 times around (66).
Round 11 :
Work 1 sc into every stitch around (66).
Round 12 :
Work 1 sc into every stitch around (66).
Round 13 :
Work 1 sc into every stitch around (66).
Round 14 :
Work 1 sc into every stitch around (66).
Round 15 :
Work 1 sc into every stitch around (66).
Round 16 :
Work 1 sc into every stitch around (66).
Round 17 :
Work 1 sc into every stitch around (66).
Round 18 :
Work 1 sc into every stitch around (66).
Round 19 :
Work 1 sc into every stitch around (66).
Round 20 :
Work 1 sc into every stitch around (66).
Round 21 :
Work 1 sc into every stitch around (66).
Round 22 :
Work 1 sc into every stitch around (66).
Round 23 :
Work 1 sc into every stitch around (66).
Round 24 :
Work 1 sc into every stitch around (66).
— 4. The Brim (All Sizes) :
Note :
The following rounds begin the brim. If your stitch count from the body doesn't divide evenly by the increase repeats, simply work any leftover stitches as plain sc/fpsc at the end of the round.
Round 25 :
(10 fpsc, 2 fpsc in the next stitch) repeat around.
Round 26 :
(11 sc, inc) repeat around.
Round 27 :
Work 6 sc, inc, then repeat (12 sc, inc) 5 times, finishing with sc in any remaining stitches.
Round 28 :
Work 3 sc, inc, then repeat (13 sc, inc) 5 times, finishing with sc in any remaining stitches.
Round 29 :
(14 sc, inc) repeat around.
Round 30 :
Work 7 sc, inc, then repeat (15 sc, inc) 5 times, finishing with sc in any remaining stitches. Fasten off and hide your tail.
— 5. Decorative Hat Band :
Round 1 :
Using only a single strand of yarn, ch 66 and join with a sl st to the first chain to form a loop. Check the fit around your hat before continuing.
Round 2 :
ch 1, work 1 sc into every chain around, join with a sl st to the first sc (skip the ch 1).
Round 3 :
ch 1, work 1 sc into every stitch around, join with a sl st as before.
Round 4 :
Work rev sc into every stitch around the top edge.
Round 5 :
Either rejoin yarn to the bottom chain edge or sl st down the inside and work rev sc around the bottom edge. Fasten off and hide ends.
I really hope you enjoy making this bucket hat as much as I do! There’s something so rewarding about finishing a project that you can actually wear out the door the same day you started it. Don't be afraid to experiment with bold color combos or even variegated yarns for the band to make it truly yours. I love seeing how different colors can completely change the personality of the finished piece. Happy hooking, and I can't wait to see your finished hats popping up in the wild! 🧶 ✨