🧢 Beautiful ✨ Detailed πŸ’ Adorable

Adorable Spooky Ghost Amigurumi Pattern

Adorable Spooky Ghost Amigurumi Pattern
4.6β˜…Rating
3-5 HoursTime Needed
1.5KMade This
βœ‚οΈ

Intermediate Level

Ideal for those with basic crocheting experience, featuring slightly more advanced stitches and techniques to expand your skills.

⏱️

Quick Craft

Fits nicely into a free afternoon β€” 2 to 5 hours of focused, enjoyable crocheting.

🐰

Whimsical Buddy

Playful characters full of personality, designed to spark imagination and become cherished playtime favorites.

About This Adorable Spooky Ghost Amigurumi Pattern

Adorable Spooky Ghost Amigurumi Pattern crochet pattern - detailed view

This pattern makes a beautiful handmade gift β€” thoughtful enough for someone special, but quick enough to make a few before the holidays. He looks just as cute sitting on a mantel as he does being cuddled by a little one.

Why You'll Love This Adorable Spooky Ghost Amigurumi Pattern

I absolutely love this pattern because the arms are crocheted directly into the body! It saves so much time on sewing later, which is always a win in my book. Plus, using plush yarn is so satisfying because it works up fast and hides almost all your little mistakes.

Adorable Spooky Ghost Amigurumi Pattern step 1 Adorable Spooky Ghost Amigurumi Pattern step 2 Adorable Spooky Ghost Amigurumi Pattern step 3 Adorable Spooky Ghost Amigurumi Pattern step 4

Switch Things Up

Working with plush yarn is honestly one of my favorite ways to spend a rainy afternoon. There's something so therapeutic about how soft it feels sliding through your fingers, and the results are always so rewarding because everything looks like a professional store-bought plushie! When I first designed this ghost, I really wanted to capture that classic 'swish' in the tail without having to sew multiple pieces together.

I found that by grouping increases and decreases, you can actually 'sculpt' the yarn as you go. If you're finding it hard to see your stitches (we've all been there with white plush yarn!), my best advice is to feel for the gaps with your fingers rather than just relying on your eyes. It takes a little practice, but once you get the rhythm, you'll fly through this pattern. I also love playing around with the hat colorsβ€”try a lime green or a deep midnight blue for a different vibe! This little guy is such a joy to make, and I hope he brings a smile to your face every time you see him sitting on your shelf.

Common Mistakes & How to Fix Them

βœ— The tail uses a specific sequence of increases and decreases on the same side to create the curve; if you lose your place, the ghost might end up with a straight tail.βœ— When joining the arms in Round 22, ensure the flattened edge is aligned horizontally or the arms might point in odd directions once the body is stuffed.βœ— If you don't stuff the neck area firmly enough where the body meets the head, your ghost's head might wobble or tilt forward too much.βœ— Safety eyes can be tricky with plush yarn; if the hole is too big, the eye might pull through, so consider adding a small piece of felt behind the fabric for security.

Adorable Spooky Ghost Amigurumi Pattern

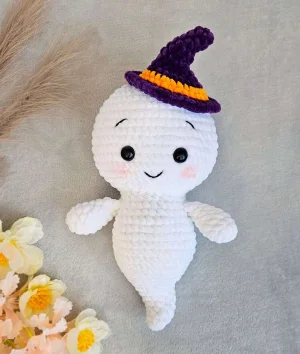
Halloween is just around the corner, and I couldn't resist making this little guy! He's super soft, squishy, and honestly way more sweet than scary. You'll love how quickly he comes together with plush yarn, making him the perfect last-minute addition to your spooky decor. Grab your favorite chunky yarn and let's get started on this friendly phantom!

Intermediate 3-5 Hours

Materials Needed for Adorable Spooky Ghost Amigurumi Pattern

β€” Main Fabric

  • 01
    Plush Chenille Yarn (100g/120m) in White for the main body
  • 02
    Plush Chenille Yarn (100g/120m) in Purple for the hat
  • 03
    Plush Chenille Yarn (100g/120m) in Orange for the hat band
  • 04
    Black cotton thread or thin yarn for the facial embroidery

β€” Tools Required

  • 01
    4.0mm crochet hook
  • 02
    14mm safety eyes
  • 03
    Polyester fiberfill stuffing
  • 04
    Yarn needle for assembly and embroidery
  • 05
    Scissors
  • 06
    Stitch markers to keep track of rounds
  • 07
    Pink makeup blush and a brush for the cheeks

Progress Tracker

0% Complete

β€” 1. Arms (Make 2) :

Round 1 :

Start with white yarn and work 6 sc into a mr (6)

Round 2 :

Work 6 inc around (12)

Round 3 :

12 sc (12)

Round 4 :

12 sc (12)

Round 5 :

(4 sc, 1 dec) repeated 2 times (10)

Round 6 :

10 sc (10)

Round 7 :

(3 sc, 1 dec) repeated 2 times (8)

Round 8 :

8 sc (8)

Info :

Stuff only the bottom half of the arm lightly.

Round 9 :

Press the top of the arm flat and work 4 sc through both layers to close. Fasten off and leave a short tail.

β€” 2. Body :

Round 1 :

Using white yarn, work 6 sc into a mr (6)

Round 2 :

6 sc (6)

Round 3 :

(1 sc, 1 inc) repeated 3 times (9)

Round 4 :

(2 sc, 1 inc) repeated 3 times (12)

Round 5 :

Work 4 inc followed by 4 dec (12)

Round 6 :

(1 sc, 1 inc) repeated 6 times (18)

Round 7 :

3 sc, 4 inc, 3 sc, 4 dec (18)

Round 8 :

(2 sc, 1 inc) repeated 6 times (24)

Round 9 :

6 sc, 4 inc, 6 sc, 4 dec (24)

Round 10 :

(3 sc, 1 inc) repeated 6 times (30)

Round 11 :

9 sc, 4 inc, 9 sc, 4 dec (30)

Round 12 :

(4 sc, 1 inc) repeated 6 times (36)

Round 13 :

12 sc, 4 inc, 12 sc, 4 dec (36)

Round 14 :

(11 sc, 1 inc) repeated 3 times (39)

Round 15 :

39 sc (39)

Round 16 :

39 sc (39)

Round 17 :

39 sc (39)

Round 18 :

39 sc (39)

Round 19 :

(11 sc, 1 dec) repeated 3 times (36)

Round 20 :

36 sc (36)

Round 21 :

(4 sc, 1 dec) repeated 6 times (30)

Round 22 :

7 sc, join first arm with 4 sc through both arm & body, 10 sc, join second arm with 4 sc through both arm & body, 5 sc (30)

Round 23 :

(3 sc, 1 dec) repeated 6 times (24)

Round 24 :

24 sc (24)

Info :

Do not cut the yarn; continue directly into the head section. Stuff the body firmly as you go.

β€” 3. Head :

Round 1 :

(1 sc, 1 inc) repeated 12 times (36)

Round 2 :

(2 sc, 1 inc) repeated 12 times (48)

Round 3 :

(7 sc, 1 inc) repeated 6 times (54)

Round 4 :

4 sc, 1 inc, (8 sc, 1 inc) repeated 5 times, 4 sc (60)

Round 5 :

60 sc (60)

Round 6 :

60 sc (60)

Round 7 :

60 sc (60)

Round 8 :

4 sc, 1 dec, (8 sc, 1 dec) repeated 5 times, 4 sc (54)

Round 9 :

54 sc (54)

Round 10 :

54 sc (54)

Round 11 :

54 sc (54)

Info :

Place the 14mm safety eyes between rounds 6 and 7. Leave 8 stitches between the eye stems (6 stitches should be visible between the eyes). Ensure the round marker is at the center back.

Round 12 :

(7 sc, 1 dec) repeated 6 times (48)

Round 13 :

3 sc, 1 dec, (6 sc, 1 dec) repeated 5 times, 3 sc (42)

Round 14 :

(5 sc, 1 dec) repeated 6 times (36)

Round 15 :

2 sc, 1 dec, (4 sc, 1 dec) repeated 5 times, 2 sc (30)

Round 16 :

(3 sc, 1 dec) repeated 6 times (24)

Round 17 :

1 sc, 1 dec, (2 sc, 1 dec) repeated 5 times, 1 sc (18)

Round 18 :

(1 sc, 1 dec) repeated 6 times (12)

Round 19 :

Work 6 dec (6)

Info :

Stuff the head very firmly. Fasten off, weave the tail through the remaining stitches to close the hole, and hide the end inside.

β€” 4. Witch Hat :

Round 1 :

With purple yarn, work 6 sc into a mr (6)

Round 2 :

6 sc (6)

Round 3 :

6 sc (6)

Round 4 :

(1 sc, 1 inc) repeated 3 times (9)

Round 5 :

9 sc (9)

Round 6 :

9 sc (9)

Round 7 :

6 sc, 3 inc (12)

Round 8 :

6 sc, (1 sc, 1 inc) repeated 3 times (15)

Round 9 :

9 sc, (1 sc, 1 inc) repeated 3 times (18)

Round 10 :

(2 sc, 1 inc) repeated 6 times (24)

Colour Change :

Switch to orange yarn.

Round 11 :

(3 sc, 1 inc) repeated 6 times (30)

Round 12 :

30 sc (30)

Colour Change :

Switch back to purple yarn.

Round 13 :

Working in flo: (1 sc, 1 inc) repeated 15 times (45)

Round 14 :

45 sc (45)

Info :

sl st into the next stitch. Fasten off, leaving a long tail for sewing. Stuff the hat lightly.

Assembly Instructions

  • Secure the top of the head by weaving the yarn tail through the front loops of the final 6 stitches and pulling tight.
  • Using black embroidery thread, stitch two small eyebrows at Round 10 of the head, each about 2 stitches wide with 8 stitches between them.
  • Create a small, friendly V-shaped mouth at Round 4 of the head using the same black embroidery thread.
  • Gently apply a small amount of pink blush or eyeshadow just below the eyes to give your ghost a rosy-cheeked look.
  • Place the hat on top of the head, tilting it slightly to one side for a more whimsical and cute appearance.
  • Sew the hat onto the head using the long purple yarn tail, working into the back loops left behind from Round 13 of the hat.

Important Notes

  • πŸ’‘To ensure your ghost stays soft and squishy, don't over-tighten your stitches when using plush yarn.
  • πŸ’‘The tail's curve is intentional; the increases and decreases on the same side create that signature ghostly wiggle.
  • πŸ’‘When embroidering on plush yarn, avoid pulling the thread too tight or it will disappear into the fluff.
  • πŸ’‘If you want a more secure hat, you can add a tiny bit more stuffing inside right before you finish sewing it to the head.

I hope you absolutely loved making this sweet little ghost! There is something so satisfying about watching that curvy tail take shape and then finishing it off with a tiny witch hat. He’s perfect for adding a touch of handmade charm to your Halloween festivities. Don't forget to give him those rosy cheeks β€” it really brings his whole personality to life! I can't wait to see your finished creations. Happy crafting, and may your spooky season be filled with lots of cozy crochet moments! 🧢 πŸ‘» ✨

You ask,

we answer.

FAQs

Can I use a different yarn weight for this pattern?

Absolutely! If you use worsted weight yarn and a 3.5mm hook, your ghost will be much smaller (around 5-6 inches), which makes for a perfect keychain or ornament.

How do I stop the plush yarn from shedding when I cut it?

Chenille yarn is notorious for shedding! A quick tip is to briefly singe the very end of the yarn tail with a lighter or tie a tiny knot at the end to keep the fluff in place.

My ghost's tail is straight instead of curved, what did I do wrong?

The curve is created by the 4 increases and 4 decreases in rounds 5, 7, 9, 11, and 13. Make sure these are placed exactly as written; if they shift, the tail won't bend properly.

Is this ghost safe for small children?

Because of the safety eyes, this toy is best for children over 3. For younger kids, I recommend embroidering the eyes with black yarn instead of using plastic safety eyes.