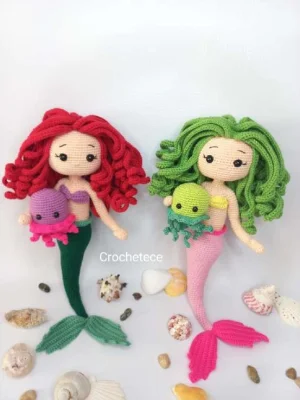
Create your own magical undersea world with this gorgeous mermaid and her cute little jellyfish companion. This detailed guide walks you through crafting every beautiful element, from her flowing, curly locks to her perfectly shaped tail. You will love watching this whimsical pair come to life stitch by stitch as you create a cherished keepsake or a stunning gift.
Progress Tracker
0% Complete
— 1. Arms (Make 2) :
Round 1 :
Start with skin color yarn, work 5 sc in mr (5)
Round 6 :
Work 1 bobble-3-dc, then 9 sc (10)
Round 8 :
Repeat (1 dec, 3 sc) 2 times (8)
Round 10 :
Repeat (1 inc, 3 sc) 2 times (10)
Round 11-19 :
Work 10 sc in each round (10)
Round 20 :
Repeat (1 dec, 3 sc) 2 times (8)
Round 21 :
Repeat (1 inc, 3 sc) 2 times (10)
Round 22-32 :
Work 10 sc in each round (10)
Info :
Do not stuff if you plan to use wire. If not using wire, add a small amount of fiberfill stuffing every 5 rounds. Sew the last remaining loop into the adjacent loop using a needle.
— 2. Head :
Round 1 :
Start with skin color yarn, work 6 sc in mr (6)
Round 3 :
Repeat (1 sc, 1 inc) 6 times (18)
Round 4 :
Repeat (2 sc, 1 inc) 6 times (24)
Round 5 :
Work 1 sc, 1 inc, then repeat (3 sc, 1 inc) 5 times, finish with 2 sc (30)
Round 6 :
Repeat (4 sc, 1 inc) 6 times (36)
Round 7 :
Work 2 sc, 1 inc, then repeat (5 sc, 1 inc) 5 times, finish with 3 sc (42)
Round 8 :
Repeat (6 sc, 1 inc) 6 times (48)
Round 9 :
Work 3 sc, 1 inc, then repeat (7 sc, 1 inc) 5 times, finish with 4 sc (54)
Round 10 :
Repeat (8 sc, 1 inc) 6 times (60)
Round 11-24 :
Work 60 sc in each round (60)
Info :
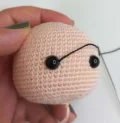
Insert the 8 mm safety eyes between rounds 17 and 18, leaving a space of 9 sc between them.
Round 25 :
Repeat (8 sc, 1 dec) 6 times (54)
Round 26 :
Work 3 sc, 1 dec, then repeat (7 sc, 1 dec) 5 times, finish with 4 sc (48)
Round 27 :
Repeat (6 sc, 1 dec) 6 times (42)
Round 28 :
Repeat (2 sc, 1 dec) 10 times, finish with 2 sc (32)
Info :
Begin stuffing the head firmly with fiberfill.
Round 29 :
Repeat (1 dec, 2 sc) 8 times (24)
Round 30 :
Repeat (2 sc, 1 dec) 6 times (18)
Round 31 :
Repeat (1 sc, 1 dec) 6 times (12)
Info :
Cut the yarn, leaving a long tail for sewing. Embroider the eyelashes and nose as shown in the reference photos.
— 3. Hair Base & Strands :
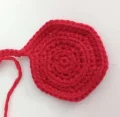
Round 1 :
Using red or green hair yarn, work 6 sc in mr (6)
Round 3 :
Work as BLO: repeat (1 sc, 1 inc) 6 times (18)
Round 4 :
Work 18 inc (36)
Round 5 :
Work as BLO: repeat (5 sc, 1 inc) 6 times (42)
Round 6 :
Repeat (6 sc, 1 inc) 6 times (48)
Info :
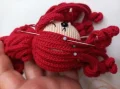
Do not cut the yarn. You will now begin working the hair strands directly from this base.
Hair Strand 1 :
For strands 1 to 24: ch 62, start from the 3rd ch from hook and work 60 hdc. Attach to the next loop on the base with 1 sl st, work 1 sc into the next loop to transition, and begin the next strand. Repeat until you have 24 strands, then fasten off.
Hair Strand 2 :
Go back to Round 5 of the hair base. Attach yarn to the FLO: ch 62, start from the 3rd ch from hook and work 60 hdc. Secure to the next loop with 1 sl st, work 1 sc into the next loop to transition, and begin the next strand. Repeat to make 18 strands, then fasten off.
Hair Strand 3 :
Go back to Round 3 of the hair base. Attach yarn to the FLO: ch 62, start from the 3rd ch from hook and work 60 hdc. Secure to the next loop with 1 sl st, work 1 sc into the next loop to transition, and begin the next strand. Repeat to make 6 strands, then fasten off.
— 4. Tail and Body :
Round 1 :
Using tail color yarn, work 6 sc in mr (6)
Round 3 :
Work 5 sc, 1 inc (7)
Round 5 :
Work 6 sc, 1 inc (8)
Round 7 :
Work 7 sc, 1 inc (9)
Round 9 :
Work 8 sc, 1 inc (10)
Info :
Begin adding fiberfill stuffing to the tail, stuffing gradually as you go.
Round 10 :
Work 10 sc (10)
Round 11 :
Work 9 sc, 1 inc (11)
Round 12 :
Work 11 sc (11)
Round 13 :
Work 10 sc, 1 inc (12)
Round 14 :
Work 12 sc (12)
Round 15 :
Work 10 sc, 2 inc (14)
Round 16 :
Work 14 sc (14)
Round 17 :
Work 10 sc, then repeat (1 sc, 1 inc) 2 times (16)
Round 18 :
Work 16 sc (16)
Round 19 :
Repeat (7 sc, 1 inc) 2 times (18)
Round 20-21 :
Work 18 sc in each round (18)
Round 22 :
Repeat (8 sc, 1 inc) 2 times (20)
Round 23 :
Work 20 sc (20)
Round 24 :
Work 19 sc, 1 inc (21)
Round 25 :
Work 21 sc (21)
Round 26 :
Work 20 sc, 1 inc (22)
Round 27 :
Work 22 sc (22)
Round 28 :
Repeat (10 sc, 1 inc) 2 times (24)
Round 29 :
Work 24 sc (24)
Round 30 :
Work 23 sc, 1 inc (25)
Round 31 :
Work 25 sc (25)
Round 32 :
Work 24 sc, 1 inc (26)
Round 33 :
Work 26 sc (26)
Round 34 :
Work 25 sc, 1 inc (27)
Round 35 :
Work 27 sc (27)
Round 36 :
Work 26 sc, 1 inc (28)
Round 37 :
Work 28 sc (28)
Round 38 :
Repeat (6 sc, 1 inc) 4 times (32)
Round 39 :
Work 32 sc (32)
Round 40 :
Repeat (7 sc, 1 inc) 4 times (36)
Round 41 :
Work 36 sc (36)
Round 42 :
Repeat (8 sc, 1 inc) 4 times (40)
Round 43 :
Work 40 sc (40)
Round 44 :
Repeat (9 sc, 1 inc) 4 times (44)
Round 45-48 :
Work 44 sc in each round (44)
Round 49 :
Repeat (9 sc, 1 dec) 4 times (40)
Round 50 :
Work 40 sc (40)
Round 51 :
Repeat (8 sc, 1 dec) 4 times (36)
Round 52 :
Work 36 sc (36)
Round 53 :
Repeat (7 sc, 1 dec) 4 times (32)
Round 54 :
Work 32 sc (32)
Round 55 :
Work 32 sc, changing to skin color yarn in the final loop of the last stitch (32)
Round 56 :
Work as BLO: 32 sc (32)
Round 57-70 :
Work 32 sc in each round (32)
Round 71 :
Work 10 sc, join first arm with 3 sc through both arm and body, work 13 sc, join second arm with 3 sc through both arm and body, work 3 sc (32)
Round 72 :
Work 10 sc on body, 7 sc around the outer edge of first arm, 13 sc on body, 7 sc around the outer edge of second arm, 3 sc on body (40)
Round 73 :
Work 40 sc (40)
Round 74 :
Repeat (3 sc, 1 dec) 8 times (32)
Info :
If using wire, cut a 23 cm length of electrical wire, twist the ends securely, and slide it through the arms.
Round 75 :
Repeat (2 sc, 1 dec) 8 times (24)
Round 76 :
Repeat (2 sc, 1 dec) 6 times (18)
Round 77 :
Repeat (1 sc, 1 dec) 6 times (12)
Round 78-79 :
Work 12 sc in each round (12)
Round 80 :
Work 12 sc, then cut the yarn (12)
Info :
Cut a 16 cm piece of electrical wire, fold it in half, wrap it with tape, and insert it into the neck as a support before sewing the head to the body.
— 5. Waist Detail :
Row 1 :
Go back to Round 56 of the body. Attach light green yarn to the FLO at the back: ch 2, repeat (2 dc, 1 incdc) 4 times, work 2 dc, 1 sc, repeat (2 dc, 1 incdc) 5 times, finish with 2 dc, 1 sl st. Fasten off and weave in ends.
— 6. Fish Tail Fins (Make 2) :
Row 1 :
ch 16, start in 2nd ch from hook: work 15 sc, ch 5, turn (15)
Row 2 :
Start in 2nd ch: work 4 sc along the chain, then work as BLO: 15 sc, ch 1, turn (19)
Row 3 :
Work as BLO: 19 sc, ch 5, turn (19)
Row 4 :
Start in 2nd ch: work 4 sc along the chain, then work as BLO: 19 sc, ch 1, turn (23)
Row 5-6 :
Work as BLO: 23 sc, ch 1, turn (23)
Row 7-8 :
Work as BLO: 19 sc, ch 1, turn (19)
Row 9-10 :
Work as BLO: 15 sc, ch 1, turn (15)
Info :
Fasten off after Row 10, leaving a long tail of yarn for sewing the fins together and attaching them to the body.
— 7. Bra :
Row 1 :
Using purple or yellow yarn, ch 16, start in 2nd ch from hook: work 15 sc, ch 1, turn (15)
Row 2-3 :
Work as BLO: 15 sc, ch 1, turn (15)
Row 4 :
Work as BLO: 1 sc, 2 hdc, 2 dc, 2 hdc, 1 sc, 2 hdc, 2 dc, 2 hdc, 1 sc, then fasten off (15)
Info :
Thread a needle with yarn, wrap it tightly around the center of the piece to pinch it into a bow shape, and secure. Attach yarn to each side edge and chain 30 to create the ties.
— 8. Jellyfish Head :
Round 1 :
Using jellyfish main color yarn, work 6 sc in mr (6)
Round 3 :
Repeat (1 sc, 1 inc) 6 times (18)
Round 4 :
Repeat (2 sc, 1 inc) 6 times (24)
Round 5 :
Work 1 sc, 1 inc, then repeat (3 sc, 1 inc) 5 times, finish with 2 sc (30)
Round 6 :
Repeat (4 sc, 1 inc) 6 times (36)
Round 7 :
Work 2 sc, 1 inc, then repeat (5 sc, 1 inc) 5 times, finish with 3 sc (42)
Round 8-16 :
Work 42 sc in each round (42)
Round 17 :
Repeat (5 sc, 1 dec) 6 times (36)
Round 18 :
Work as BLO: 36 sc, then fasten off (36)
Info :
Insert 6 mm safety eyes between rounds 13 and 14, keeping them 6 sc apart.
— 9. Jellyfish Lower Base & Tentacles :
Round 1 :
Using base color yarn, work 8 sc in mr (8)
Round 3 :
Work as BLO: repeat (1 sc, 1 inc) 8 times (24)
Round 4 :
Repeat (1 sc, 1 inc) 12 times, then cut yarn leaving a long tail for assembly (36)
Tentacles :
Go back to Round 3 of the lower base. Attach tentacle yarn to the FLO: ch 21, start in 2nd ch from hook and work 20 sc. Secure to the next loop with 1 sl st, work 1 sc into the next loop to transition, and begin the next tentacle. Repeat to create 8 tentacles in total.
Ruffle Detail :
Go back to Round 18 of the jellyfish head. Attach yarn to the FLO: work 36 incdc, finish with 1 sl st, then fasten off.
I hope you have the absolute best time crafting this sweet mermaid and her little jellyfish friend! They make such a whimsical pair and are so incredibly rewarding to finish. Don't forget to share your finished dolls with our community—I cannot wait to see the beautiful colors you choose for your mermaid's tail and curls! Happy crocheting, my friends! 🧶✨🧜♀️