About This Baby Grinch and Max Amigurumi Pattern
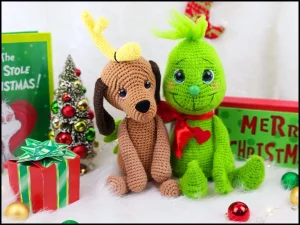
These handmade companions make an incredible gift for fans of all ages — they're substantial enough for a main nursery gift but charming enough for a collector's shelf.
Ideal for those with basic crocheting experience, featuring slightly more advanced stitches and techniques to expand your skills.
Requires 8-10 hours, ideal for a full day of immersive crocheting.
Playful characters full of personality, designed to spark imagination and become cherished playtime favorites.
These handmade companions make an incredible gift for fans of all ages — they're substantial enough for a main nursery gift but charming enough for a collector's shelf.
I honestly couldn't stop smiling while making these two. Joining the tiny fingers for the Grinch's hands is such a satisfying technique once it clicks, and brushing out the yarn for his hair gives him that perfect fuzzy texture. It's the kind of project that keeps you totally engaged from the first magic ring to the final embroidery stitch.
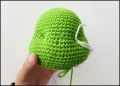
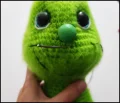
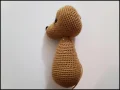
I remember the first time I sat down to design a holiday set like this. There’s something so nostalgic about these characters, isn't there? Making the Grinch was a fun challenge because I wanted him to look sweet despite his reputation. When you get to the eye indentation part, don't be intimidated! It’s just a bit of 'sculpting' with yarn, and it’s the secret to giving him that expressive face.
For Max, I really recommend adding those little jingle bells to his collar. The sound they make whenever you move him just adds that extra layer of magic. If you're feeling adventurous, try using a mohair blend yarn for the Grinch's hair tuft instead of brushing out regular acrylic—it gives a really ethereal, wispy look. I also found that using a slightly smaller hook than you usually would for worsted weight helps keep the stuffing from peeking through, especially around the decrease rounds. If you want to make them even more special, you could embroider the year on the bottom of their feet. It turns them into a real keepsake that you can pull out every December. I hope you enjoy the process as much as I did!
Bring a touch of holiday mischief and heart to your home with this darling duo! I've put together a guide to help you create both the iconic green grump and his faithful pup in their sweet baby forms. They're the perfect size for cuddling or as a nostalgic addition to your winter decor. You'll love seeing their unique personalities emerge with every stitch you make.
Start with green yarn, 6 sc into a mr (6)
6 x inc (12)
12 x sc (12)
6 x dec (6)
F/O and leave a long strand for sewing. Stuff the nose lightly before attaching.
Using green yarn, 6 sc into a mr (6)
6 x inc (12)
(1 sc, inc) x 6 (18)
(2 sc, inc) x 6 (24)
24 x sc (24)
(3 sc, inc) x 6 (30)
(4 sc, inc) x 6 (36)
(5 sc, inc) x 6 (42)
(6 sc, inc) x 6 (48)
Place markers on the first and last increases of Round 18 to help with eye placement later.
48 x sc (48)
(inc, 7 sc) x 6 (54)
3 x inc, 32 sc, 3 x inc, 16 sc (60)
(inc, 9 sc) x 6 (66)
66 x sc (66)
(dec, 9 sc) x 6 (60)
60 x sc (60)
(dec, 8 sc) x 6 (54)
Begin stuffing the head as you continue.
(dec, 7 sc) x 6 (48)
48 x sc (48)
(dec, 6 sc) x 6 (42)
42 x sc (42)
3 x dec, 21 sc, 3 x dec, 9 sc (36)
(dec, 4 sc) x 6 (30)
(dec, 3 sc) x 6 (24)
24 x sc (24)
(3 sc, inc) x 6 (30)
(4 sc, inc) x 6 (36)
36 x sc (36)
(5 sc, inc) x 6 (42)
42 x sc (42)
(6 sc, inc) x 6 (48)
48 x sc (48)
(7 sc, inc) x 6 (54)
54 x sc (54)
(inc, 1 sc) x 2, 42 sc, (inc, 1 sc) x 4 (60)
60 x sc (60)
(dec, 8 sc) x 6 (54)
54 x sc (54)
(7 sc, dec) x 6 (48)
(6 sc, dec) x 6 (42)
(5 sc, dec) x 6 (36)
(4 sc, dec) x 6 (30)
(3 sc, dec) x 6 (24)
(2 sc, dec) x 6 (18)
(1 sc, dec) x 6 (12)
6 x dec (6)
F/O and sew the remaining opening closed.
In green, 4 sc into a mr (4)
inc, 1 sc, dec (4)
2 x inc, 2 sc (6)
2 x inc, 4 sc (8)
2 x inc, 6 sc (10)
2 x inc, 8 sc (12)
12 x sc (12)
(1 sc, inc) x 6 (18)
18 x sc, then work 6 extra sc to shift the starting point (24)
ch 1, turn, 16 sc across (16)
ch 1, turn, 16 sc across (16)
ch 1, turn, 6 sc, 2 x dec, 6 sc (14)
ch 1, turn, dec, 3 sc, 4 hdc, 3 sc, dec (12)
ch 1, turn, dec, 3 sc, 2 hdc, 3 sc, dec (10)
ch 1, turn, dec, 6 sc, dec (8)
ch 1, turn, dec, 4 sc, dec (6)
ch 1, turn, 6 sc across top, 6 sc down side, 3 sc across front, 6 sc up side (21)
21 x sc (21)
(5 sc, dec) x 3 (18)
(4 sc, dec) x 3 (15)
Begin stuffing the foot and leg now.
15 x sc (15)
dec, 13 sc (14)
14 x sc (14)
dec, 12 sc (13)
Stop stuffing the leg here.
13 x sc (13)
dec, 11 sc (12)
F/O and leave a long tail for attachment.
For fingers (make 3): 4 sc into a mr (4)
4 x sc (4)
(inc, 1 sc) x 2 (6)
6 x sc (6)
(inc, 2 sc) x 2 (8)
8 x sc (8)
Do not F/O the 3rd finger. Join the fingers together in the next step.
sc onto 2nd finger, 3 sc across 2nd finger, sc onto 1st finger, 7 sc on 1st finger, 4 sc on back of 2nd finger, 8 sc on 3rd finger (24)
(6 sc, dec) x 3 (21)
(5 sc, dec) x 3 (18)
18 x sc (18)
(4 sc, dec) x 3 (15)
(3 sc, dec) x 3 (12)
12 x sc (12)
Stuff the hand lightly.
dec, 10 sc (11)
11 x sc (11)
Stop stuffing the arm.
dec, 9 sc (10)
10 x sc (10)
Work 2 sc, flatten the opening, and sc through both layers to close. F/O and leave sewing tail.
In brown, 6 sc into a mr (6)
6 x inc (12)
(1 sc, inc) x 6 (18)
(2 sc, inc) x 6 (24)
24 x sc (24)
(3 sc, inc) x 6 (30)
30 x sc (30)
(2 sc, inc) x 6, 12 sc (36)
(3 sc, inc) x 6, 12 sc (42)
(4 sc, inc) x 6, 12 sc (48)
(5 sc, inc) x 6, 12 sc (54)
54 x sc (54)
(7 sc, dec) x 6 (48)
(6 sc, dec) x 6 (42)
(5 sc, dec) x 6 (36)
(4 sc, dec) x 6 (30)
(3 sc, dec) x 6 (24)
(2 sc, dec) x 6 (18)
(1 sc, dec) x 6 (12)
6 x dec (6)
F/O and sew closed.
In brown, 6 sc into a mr (6)
6 x inc (12)
(1 sc, inc) x 6 (18)
(2 sc, inc) x 6 (24)
(3 sc, inc) x 6 (30)
(4 sc, inc) x 6 (36)
(5 sc, inc) x 6 (42)
(6 sc, inc) x 6 (48)
48 x sc (48)
3 x dec, 18 sc, 3 x dec, 18 sc (42)
42 x sc (42)
(5 sc, dec) x 6 (36)
36 x sc (36)
(4 sc, dec) x 6 (30)
30 x sc (30)
(3 sc, dec) x 6 (24)
24 x sc (24)
(2 sc, dec) x 6 (18)
(4 sc, dec) x 3 (15)
15 x sc (15)
F/O and leave a long tail for sewing.
In brown, 6 sc into a mr (6)
6 x sc (6)
(1 sc, inc) x 3 (9)
9 x sc (9)
(2 sc, inc) x 3 (12)
12 x sc (12)
(3 sc, inc) x 3 (15)
15 x sc (15)
F/O and leave a strand for sewing. Stuff as you work.
In brown, 6 sc into a mr (6)
6 x inc (12)
(1 sc, inc) x 6 (18)
18 x sc (18)
7 sc, 2 x dec, 7 sc (16)
6 sc, 2 x dec, 6 sc (14)
14 x sc (14)
dec, 12 sc (13)
13 x sc (13)
dec, 11 sc (12)
12 x sc (12)
dec, 10 sc (11)
11 x sc (11)
dec, 9 sc (10)
10 x sc (10)
F/O and leave a sewing tail.
In brown, 6 sc into a mr (6)
6 x inc (12)
(1 sc, inc) x 6 (18)
18 x sc (18)
7 sc, 2 x dec, 7 sc (16)
6 sc, 2 x dec, 6 sc (14)
14 x sc (14)
dec, 12 sc (13)
13 x sc (13)
dec, 11 sc (12)
12 x sc (12)
(4 sc, dec) x 2 (10)
10 x sc (10)
F/O and leave tail for sewing.
In dark brown, 6 sc into a mr (6)
6 x inc (12)
(1 sc, inc) x 6 (18)
(2 sc, inc) x 6 (24)
24 x sc (24)
(dec, 10 sc) x 2 (22)
22 x sc (22)
(dec, 9 sc) x 2 (20)
20 x sc (20)
(dec, 8 sc) x 2 (18)
18 x sc (18)
(dec, 7 sc) x 2 (16)
16 x sc (16)
(dec, 6 sc) x 2 (14)
14 x sc (14)
(dec, 5 sc) x 2 (12)
12 x sc (12)
(dec, 4 sc) x 2 (10)
10 x sc (10)
Fold in half and sc the opening closed. F/O and leave tail.
In yellow, 6 sc into a mr (6)
6 x inc (12)
(3 sc, inc) x 3 (15)
BLO 15 sc (15)
15 x sc (15)
(3 sc, dec) x 3 (12)
12 x sc (12)
(2 sc, dec) x 3 (9)
9 x sc (9)
BLO 9 sc (9)
(1 sc, dec) x 3 (6)
F/O and sew closed.
In yellow, 6 sc into a mr (6)
(1 sc, inc) x 3 (9)
BLO 9 sc (9)
9 x sc (9)
dec, 7 sc (8)
8 x sc (8)
dec, 6 sc (7)
7 x sc (7)
F/O and leave tail for sewing.
Ch 22, hdc in 2nd ch from hook and each ch across (21)
F/O and leave a long tail for sewing and attaching bells.
I hope you have as much fun bringing these two to life as I did! There’s nothing quite like the feeling of finishing a project and seeing that iconic duo staring back at you. Whether they're destined for a gift box or a spot on your own holiday mantel, they’re sure to be the star of the show. Don’t forget to share your finished photos with the community—I absolutely love seeing your unique takes on my designs. Happy crocheting and have a wonderful holiday season! 🧶✨🎄
You can, but it will change the size of the finished pieces. If you go up to a chunky yarn, you'll need larger safety eyes and more stuffing to keep the proportions looking right.
Once you've brushed it out with a wire brush, you can lightly spray it with a bit of extra-hold hairspray to keep the fibers from matting down over time.
Not at all! The wire just helps the antler maintain a specific 'bent' shape. If you're making this for a small child, I actually recommend skipping the wire for safety.
No worries! You can use the crochet nose instructions provided in the pattern, or take a standard black safety eye and paint it with green acrylic paint and a clear topcoat.
