About This Baby Tuk Tuk Armadillo Amigurumi Pattern
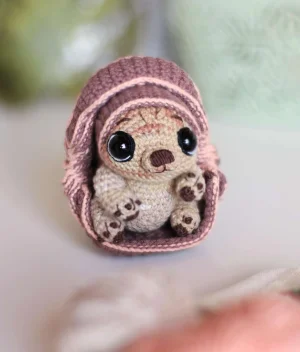
The perfect centerpiece for a nursery shelf or an unforgettable gift for a Disney fan. This interactive plushie brings a touch of magic and wonder to any toy collection.
Designed for experienced crocheters, these patterns involve intricate designs and complex techniques to challenge and inspire.
Requires 8-10 hours, ideal for a full day of immersive crocheting.
Delightful animal designs with sweet details that capture the essence of your favorite woodland and farmyard friends.
The perfect centerpiece for a nursery shelf or an unforgettable gift for a Disney fan. This interactive plushie brings a touch of magic and wonder to any toy collection.
I absolutely fell in love with designing the mechanism for his folding shell! It feels like pure magic when the individual segments join together to form a perfectly curved, flexible armor. Plus, the color blending technique used for the transitions gives it such a high-end, professional look that you'll be incredibly proud to show off.
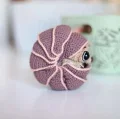
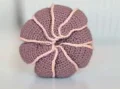
When I first saw Tuk Tuk rolling across the screen, I knew I had to translate that magical movement into crochet! Designing this pattern was a true labor of love, especially figuring out how to make the armor segments slide and fold over one another just like a real armadillo's shell. It took quite a bit of prototyping, but the result is so incredibly satisfying!
If you want to personalize your little guy, try experimenting with different colorways! While the classic dusty rose and warm beige tones capture his screen-accurate look beautifully, I've seen some absolutely stunning versions made in sage greens, soft blues, or even a magical galaxy-variegated yarn for the shell.
My biggest tip while working on this project is to take your time with the facial embroidery. The eyes are the window to his sweet soul, and those tiny loose stitches of white and black floss are what truly bring his expression to life. Don't rush the assembly—pour a warm cup of tea, put on your favorite movie, and enjoy every single stitch of this creative adventure!
Bring your favorite rolling Disney pet to life with this gorgeous, interactive armadillo amigurumi! This sweet little companion features a clever, fully functional outer armor that can fold and unfold, allowing him to curl up into a perfect little ball or peek out to say hello. You'll love watching his charming personality emerge stitch by stitch as you craft his expressive face and detailed little paws.
ch 2, work 6 sc in the second ch from hook (6)
work 1 inc in each of the next 6 stitches (12)
repeat [1 sc, 1 inc] 6 times (18)
repeat [2 sc, 1 inc] 6 times (24)
repeat [3 sc, 1 inc] 6 times (30)
repeat [4 sc, 1 inc] 6 times (36)
repeat [5 sc, 1 inc] 6 times (42)
repeat [6 sc, 1 inc] 6 times (48)
Fasten off and secure the yarn. The stitch marker indicating the start of the round marks the point where the tummy will connect to the head.
ch 6, turn, work 5 sc starting from the second ch from hook, then work 5 sc along the back side of the foundation chain (10)
repeat [4 sc, 1 inc] 2 times (12)
work 12 sc, then sl st into the first sc of the round (12)
Cut the yarn, leaving a long tail for sewing. Using a yarn needle, embroider the nose with brown embroidery floss. Split the floss in half to embroider the mouth details.
ch 10, turn, work 9 sc starting from the second ch from hook, then work 9 sc along the back side of the foundation chain (18)
work 3 sc into the next stitch, 7 sc, 3 sc into the next stitch, 3 sc, 1 inc, 1 sc, 1 inc, 3 sc (24)
work 1 sc, 3 sc into the next stitch, 9 sc, 3 sc into the next stitch, 5 sc, 1 inc, 2 sc, 1 inc, 3 sc (30)
work 2 sc, 3 sc into the next stitch, 11 sc, 3 sc into the next stitch, 7 sc, 1 inc, 3 sc, 1 inc, 3 sc (36)
work 3 sc, 3 sc into the next stitch, 13 sc, 3 sc into the next stitch, 9 sc, 1 inc, 4 sc, 1 inc, 3 sc (42)
work 4 sc, 3 sc into the next stitch, 15 sc, 3 sc into the next stitch, 11 sc, 1 inc, 5 sc, 1 inc, 3 sc (48)
work 48 sc (48)
Position the 12 mm safety eyes between Rounds 3 and 4, keeping them approximately 15 stitches apart. Do not secure the backings yet. Use white embroidery floss (double strand) to create a loose highlight stitch running from the inner corner to the top of each eye. Split the thread to secure with a smaller stitch.
Using black embroidery floss (double strand), make a loose stitch running above the eye, securing it with a single strand stitch. Repeat this process below the eye using a single strand of black floss. Push the eye firmly against the embroidery and secure the backings. Sew the muzzle to the face, then embroider the eyebrows using split brown floss.
work 48 sc (48)
work 48 sc (48)
work 4 sc, 1 sc3tog, 15 sc, 1 sc3tog, 11 sc, 1 dec, 5 sc, 1 dec, 3 sc (42)
In the next round, the head and tummy will be joined. Insert your hook from the inside of the tummy to the outside, then from the outside of the head to the inside to connect.
Incomplete round: work 8 sc along the head, work 12 sc of the head and 12 sc of the tummy together, then work 22 sc along the head
work 8 sc on the head, work 36 sc around the tummy, work 22 sc on the head (66)
Incomplete round: work 8 sc, do not finish the round. Do not cut the thread. Move your stitch marker 9 stitches to the left. Count 30 stitches counter-clockwise from the start of the round and place a temporary pin to mark where the head connects to the inner armor.
ch 2, turn, work 1 inc in the second ch from hook (2)
ch 1, turn, work 1 inc, 1 sc (3)
ch 1, turn, work 1 sc, 1 inc, 1 sc (4)
ch 1, turn, work 1 sc, 1 inc, 2 sc (5)
ch 1, turn, work 2 sc, 1 inc, 2 sc (6)
ch 1, turn, work 6 sc (6)
ch 1, turn, work 6 sc (6)
ch 1, turn, work 6 sc (6)
ch 1, turn, work 6 sc (6)
ch 1, turn, work 6 sc (6)
ch 1, turn, work 6 sc (6)
ch 1, turn, work 2 sc, 1 inc, 3 sc (7)
ch 1, turn, work 7 sc (7)
ch 1, turn, work 3 sc, 1 inc, 3 sc (8)
ch 1, turn, work 8 sc (8)
ch 1, turn, work 8 sc (8)
ch 1, turn, work 3 sc, 1 dec, 3 sc (7)
ch 1, turn, work 7 sc (7)
ch 1, turn, work 2 sc, 1 dec, 3 sc (6)
ch 1, turn, work 6 sc (6)
ch 1, turn, work 6 sc (6)
ch 1, turn, work 6 sc (6)
ch 1, turn, work 6 sc (6)
ch 1, turn, work 6 sc (6)
ch 1, turn, work 6 sc (6)
ch 1, turn, work 2 sc, 1 dec, 2 sc (5)
ch 1, turn, work 1 sc, 1 dec, 2 sc (4)
ch 1, turn, work 1 sc, 1 dec, 1 sc (3)
ch 1, turn, work 1 dec, 1 sc (2)
ch 1, turn, work 1 dec (1)
For a clean look on color changes, work the first half of the sc with brown thread and the second half with pink (Yarn B + Yarn C).
work 30 sc down the side of the armor using Yarn B + Yarn C. Align the armor to the head and work 30 sc of the armor and head together using Yarn B only
work 36 sc across the tummy using Yarn A + Yarn B, then work 30 sc along the armor using Yarn B (66)
work 66 sc (66)
work 66 sc (66)
work 66 sc (66)
repeat [9 sc, 1 dec] 6 times (60)
repeat [8 sc, 1 dec] 6 times (54)
repeat [7 sc, 1 dec] 6 times (48)
repeat [6 sc, 1 dec] 6 times (42)
repeat [5 sc, 1 dec] 6 times (36)
repeat [4 sc, 1 dec] 6 times (30)
Begin stuffing the body firmly with fiberfill.
repeat [3 sc, 1 dec] 6 times (24)
repeat [2 sc, 1 dec] 6 times (18)
repeat [1 sc, 1 dec] 6 times (12)
Sew any gaps between the head and tummy closed. Fill the body completely. Tip: Cut a small circle of brown felt slightly larger than the opening and place it inside to prevent the stuffing from catching on your hook while closing.
repeat [1 dec] 6 times (6)
Fasten off, weave the tail through the front loops of the remaining 6 stitches, pull tight to close, and secure.
ch 4, turn, work 3 sc starting from the second ch from hook, then work 3 sc along the back side of the foundation chain (6)
repeat [1 inc] 6 times (12)
work 12 sc (12)
work 3 sl st, 6 sc, 3 sl st (12)
repeat [1 dec] 2 times, 1 sc, repeat [1 inc] 2 times, 1 sc, repeat [1 dec] 2 times (10)
work 10 sc (10)
work 10 sc (10)
Start stuffing the lower part of the leg with fiberfill.
work 1 inc, 8 sc, 1 inc (12)
work 12 sc (12)
Finish stuffing the leg completely.
repeat [1 dec] 6 times (6)
Cut the yarn, thread the tail through the remaining stitches with a yarn needle, pull tight to secure, and weave in the end.
ch 4, turn, work 3 sc starting from the second ch from hook, then work 3 sc along the back side of the foundation chain (6)
Fasten off, leaving a long tail. Sew the spot to the foot. Do not cut the thread; run it diagonally upwards from the spot and make 3 French knots. Divide the floss in half to embroider 4 claw stripes on the foot.
Split Yarn A in half. Work with a 1.5 mm hook using two strands at once to create a cord. Leave a long tail at the start. Make 2 loops. Lay the yarn tail over the hook, grab the working yarn, and pull it through both loops on the hook. Repeat this process 4 more times to complete the cord. Sew the antennas to the head.
ch 6, turn, work 5 sc starting from the second ch from hook (5)
ch 1, turn, work 5 sc (5)
ch 1, turn, work 1 sc, 1 sc3tog, 1 sc (3)
ch 1, turn, work 3 sc (3)
ch 1, turn, work 3 sc (3)
ch 1, turn, work 3 sc (3)
ch 1, turn, work 1 inc, 1 sc, 1 inc (5)
ch 1, turn, work 5 sc (5)
ch 1, turn, work 1 inc, 3 sc, 1 inc (7)
ch 1, turn, work 7 sc (7)
ch 1, turn, work 1 dec, 3 sc, 1 dec (5)
ch 1, turn, work 5 sc (5)
ch 1, turn, work 1 dec, 1 sc, 1 dec (3)
ch 1, turn, work 3 sc (3)
ch 1, turn, work 3 sc (3)
ch 1, turn, work 3 sc (3)
ch 1, turn, work 1 sc, 3 sc in the next stitch, 1 sc (5)
ch 1, turn, work 5 sc (5)
ch 1, turn, work 5 sc (5)
To create a clean border line, work half of each sc with brown and the other half with pink (Yarn B + Yarn C).
Crocheting counter-clockwise around the perimeter: work 36 sc down, 5 sc across the flat end, repeat [4 sc, 1 dec] 3 times, repeat [1 dec, 4 sc] 3 times up the other side, 5 sc across the top, sl st in the first sc (Yarn B + Yarn C) (76)
ch 8, turn, work 7 sc starting from the second ch from hook (7)
ch 1, turn, work 7 sc (7)
ch 1, turn, work 2 sc, 1 sc3tog, 2 sc (5)
ch 1, turn, work 5 sc (5)
ch 1, turn, work 5 sc (5)
ch 1, turn, work 5 sc (5)
ch 1, turn, work 1 inc, 3 sc, 1 inc (7)
ch 1, turn, work 7 sc (7)
ch 1, turn, work 1 inc, 5 sc, 1 inc (9)
ch 1, turn, work 9 sc (9)
ch 1, turn, work 1 dec, 5 sc, 1 dec (7)
ch 1, turn, work 7 sc (7)
ch 1, turn, work 1 dec, 3 sc, 1 dec (5)
ch 1, turn, work 5 sc (5)
ch 1, turn, work 5 sc (5)
ch 1, turn, work 5 sc (5)
ch 1, turn, work 2 sc, 3 sc in the next stitch, 2 sc (7)
ch 1, turn, work 7 sc (7)
ch 1, turn, work 7 sc (7)
When joining the segments, make sure that the side with the decrease line on the previous piece remains on the left side.
Crocheting counter-clockwise: work 36 sc down, 3 sc across, place Detail 1 on top and work 1 sc through both Detail 1 and Detail 2 together, 3 sc across, repeat [4 sc, 1 dec] 3 times, repeat [1 dec, 4 sc] 3 times up, 3 sc across, place Detail 1 on top and work 1 sc through both Detail 1 and Detail 2 together, 3 sc across, sl st in the first sc (Yarn B + Yarn C) (80)
Crochet and join Details 3 through 8 in the exact same manner as Detail 2 to complete the cascading shell structure.
I hope you have the absolute best time bringing this little baby Tuk Tuk to life! There is nothing quite like the satisfaction of finishing an interactive project, and watching him roll up into his shell for the first time is pure joy. Don't forget to share your finished armadillos with our wonderful community—we all want to see your gorgeous creations! Happy stitching, my lovely friends! 🧶✨
You can certainly use worsted weight yarn, but keep in mind that your finished armadillo will turn out significantly larger. You will also need to scale up your hook size (try a 2.75mm or 3.0mm) and use larger safety eyes (around 16mm or 18mm) to keep the proportions correct.
The felt circle is a brilliant little trick! Placing it right under the final opening of the body before you finish the last round of decreases prevents your crochet hook from catching and pulling out bits of polyester stuffing while you work. It keeps the final closure incredibly clean.
This pattern uses a traditional thread-jointing (or bracing) method. By passing a strong thread completely through the body from one leg to the other and back again, you create a pivot joint that allows all four legs to rotate smoothly so your armadillo can sit or stand.
This usually happens due to uneven tension. If your stitches are too loose, the armor panels will be floppy and won't hold their natural curve. If they are too tight, they might curl up too much. Try to keep a firm, highly consistent tension across all eight segments.
