About This Little Floweret Amigurumi Pattern
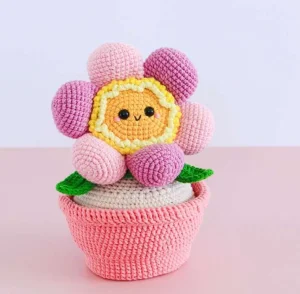
Perfect for adding a touch of handmade whimsy to your workspace, this cheeky little sprout makes an unforgettable gift for plant lovers and amigurumi collectors alike.
Ideal for those with basic crocheting experience, featuring slightly more advanced stitches and techniques to expand your skills.
Fits nicely into a free afternoon — 2 to 5 hours of focused, enjoyable crocheting.
An adorable friend to cherish, handcrafted with love to bring comfort and joy for years to come.
Perfect for adding a touch of handmade whimsy to your workspace, this cheeky little sprout makes an unforgettable gift for plant lovers and amigurumi collectors alike.
I absolutely fell in love with designing this because of how the petals are joined directly into the head as you crochet—it feels so clever and saves you from a mountain of sewing later! Plus, sculpting those little rosy cheeks at the end is pure joy.
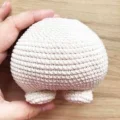
I have to admit, the moment I finished my very first floweret, I couldn't stop laughing at how adorable that little sculpted posterior turned out! It is exactly the kind of playful detail that makes handmade toys so special. When I was selecting the colors, I spent hours playing around with different combinations. While the classic pink and yellow give off a lovely spring vibe, I highly recommend trying out a sunflower version with warm golden petals and a dark brown face, or even a pastel lavender theme for a soft, dreamy look.
One little tip from my studio: when you are sewing the brim of the pot down, take your time to align the stitches perfectly so it sits completely straight. And don't skip the cardboard insert! It gives the base a sturdy, flat structure that keeps your little flower from tipping over. Grab your favorite mug of tea, put on a cozy show, and enjoy every stitch of this whimsical project!
Bring a touch of whimsical joy into your home with this incredibly sweet, potted floweret companion! Crafting this character is a delightful journey of shaping soft curves, playing with cheerful colors, and adding a cheeky little sculpted detail that is sure to make everyone smile. It is the perfect project to brighten up your desk or to share as a heartwarming, handmade gift.
sc 6 into an AMR (6)
6 inc (12)
(1 sc, 1 inc) 6 times (18)
(2 sc, 1 inc) 6 times (24)
sc 1 in each st around (24)
5 sc, 7 dec, 5 sc (17)
sc 1 in each st around (17)
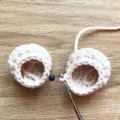
For the first leg: Fasten off, snip the yarn, and weave in your tail. For the second leg: Crochet an extra 4 sc to reach the inner thigh area. Do not cut the yarn on this second leg; you will use it to join and continue directly into the body.
Grab your first leg and slip your hook into the stitch on the inner side (approximately 4 stitches to the right of your round start). This spot marks the new beginning of your body rounds. Use a stitch marker here.
5 inc, 7 sc, 10 inc, 7 sc, 5 inc (54)
sc 1 in each st around (54)
4 sc, 1 inc, (8 sc, 1 inc) 5 times, 4 sc (60)
(9 sc, 1 inc) 6 times (66)
5 sc, 1 inc, (10 sc, 1 inc) 5 times, 5 sc (72)
Using a scrap piece of nude yarn, sew up the small gap left in the crotch area between the legs. Pull it snug from the inside to close the hole completely, then tie it off securely.
sc 1 in each st around (72)
sc 1 in each st around (72)
sc 1 in each st around (72)
sc 1 in each st around (72)
sc 1 in each st around (72)
sc 1 in each st around (72)
sc 1 in each st around (72)
sc 1 in each st around (72)
sc 1 in each st around (72)
sc 1 in each st around (72)
24 sc, 12 dec, 24 sc (60)
(8 sc, 1 dec) 6 times (54)
sc 1 in each st around (54)
(7 sc, 1 dec) 6 times (48)
sc 1 in each st around (48)
(6 sc, 1 dec) 6 times (42)
sc 1 in each st around (42)
(5 sc, 1 dec) 6 times (36)
sc 1 in each st around (36)
(4 sc, 1 dec) 6 times (30)
Fasten off, leaving a long yarn tail for sewing the body to the head later. Firmly stuff the body with fiberfill, shaping the hips and legs as you go.
To sculpt the cute bum cheeks: 1. Secure a length of nude yarn at the back center between the legs, leaving the tail outside. 2. Insert your needle and bring it out 12 rounds straight up. 3. Re-enter the body and exit back at your starting point between the legs. 4. Pull the yarn forward with moderate tension to create a vertical indentation. Repeat this stitch twice more to reinforce the sculpt, pull tight, tie off, and bury the ends inside.
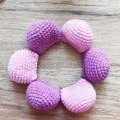
Make 6 petals in total. You can use two alternating shades of pink for a beautiful depth, or make them all a single solid color.
sc 6 into an AMR (6)
6 inc (12)
(1 sc, 1 inc) 6 times (18)
(2 sc, 1 inc) 6 times (24)
(3 sc, 1 inc) 6 times (30)
sc 1 in each st around (30)
sc 1 in each st around (30)
sc 1 in each st around (30)
(8 sc, 1 dec) 3 times (27)
sc 1 in each st around (27)
(7 sc, 1 dec) 3 times (24)
sc 1 in each st around (24)
(2 sc, 1 dec) 6 times (18)
Lightly stuff only the bottom half of the petal with fiberfill. Flatten the opening, matching the stitches of both sides, and crochet them shut with 8 sc. Fasten off and hide the yarn tail inside.
Start with your dark yellow yarn to create the face center.
ch 5 + ch 1. Starting in the second ch from hook, work: 4 sc, then 3 sc into the very last ch. Now rotate to work along the opposite side of the chain: 3 sc, 1 inc into the first ch loop (12)
1 inc, 3 sc, 3 inc, 3 sc, 2 inc (18)
1 sc, 1 inc, 3 sc, (1 sc, 1 inc) 3 times, 3 sc, (1 sc, 1 inc) 2 times (24)
2 sc, 1 inc, 3 sc, (2 sc, 1 inc) 3 times, 3 sc, (2 sc, 1 inc) 2 times (30)
3 sc, 1 inc, 3 sc, (3 sc, 1 inc) 3 times, 3 sc, (3 sc, 1 inc) 2 times (36)
4 sc, 1 inc, 3 sc, (4 sc, 1 inc) 3 times, 3 sc, (4 sc, 1 inc) 2 times (42)
blo - sc 1 in each st around (42)
To attach the petals as you crochet: 1. Insert hook through the second stitch of your first petal and the blo of the head center, then work 1 sc. 2. Work the next 5 sc, crocheting through both the petal stitches and the blo of the head. 3. Insert hook through the final stitch of the current petal, the first stitch of the next petal, and the blo of the head, then work 1 sc. 4. Crochet the next 6 sc through the petal and the head's blo. 5. Connect the next petal by inserting your hook into the last stitch of the current petal, the first stitch of the next petal, and the blo of the head, working 1 sc. Repeat this sequence all the way around to attach all 6 petals. Switch to green yarn at the end of the round.
In green yarn: (6 sc, 1 inc) 6 times (48)
Position your 8 mm safety eyes between Rounds 3 and 4 of the face center, leaving about 5 stitches between them. Secure the backings firmly. Use black embroidery floss to stitch a cute little smile, and pink yarn or pastel to add soft rosy cheeks.
To add the light green ruffle: Attach light green yarn to the front loops of Round 6. Work (ch 3, 1 sl-st in the same stitch, then ch 3, 1 sl-st in the next stitch) repeatedly all the way around. Fasten off and weave in the ends on the back side.
To add the yellow ruffle: Attach yellow yarn to the front loops of Round 7 on the face center. Work (ch 4, 1 sl-st in the same stitch, then ch 4, 1 sl-st in the next stitch) repeatedly all the way around. Fasten off and secure the tails.
sc 1 in each st around (48)
sc 1 in each st around (48)
sc 1 in each st around (48)
sc 1 in each st around (48)
sc 1 in each st around (48)
sc 1 in each st around (48)
sc 1 in each st around (48)
sc 1 in each st around (48)
3 sc, dec, (6 sc, 1 dec) 5 times, 3 sc (42)
(5 sc, 1 dec) 6 times (36)
2 sc, dec, (4 sc, 1 dec) 5 times, 2 sc (30)
(3 sc, 1 dec) 6 times (24)
Firmly stuff the back of the head with polyester fiberfill.
1 sc, dec, (2 sc, 1 dec) 5 times, 1 sc (18)
(1 sc, 1 dec) 6 times (12)
6 dec (6)
Add any final bits of stuffing to make the head perfectly round, cinch the remaining hole closed, and hide the yarn tail inside.
Make 2 leaves. They look best if you work Steps 1 and 2 in one shade of green, and the remaining steps in a slightly different shade.
ch 11 + ch 1
Work 11 sl-st back down the chain, then ch 1
Without turning your work, crochet into the unworked loops on the other side of the chain: 2 sc in the first loop, 1 hdc, 6 dc, 1 hdc, 2 sc, ch 2
Work mirror-inverted down the other side: Insert hook under the half-stitch loops beneath the center chain line and work: 2 sc, 1 hdc, 6 dc, 1 hdc, 2 sc in the final loop
Work 1 sl-st in each stitch all the way around the leaf. Fasten off, leaving a long tail for sewing.
ch 36 + ch 1. Work 1 sc in each chain across, ch 3, turn (36)
Work alternate (1 dc, 1 dc-inc) across to the end of the row, then ch 3, sl-st into the final stitch
Do not break the yarn. ch 30 to create a tie, then work 36 sl-st back along the top foundation edge of the collar. ch 30 to make the second tie, then sl-st into the very last stitch. Fasten off and secure.
Worked in pink yarn. Start with a foundation chain.
ch 5 + ch 1. Starting in the second ch from hook, work: 4 sc, then 3 sc into the last ch. Rotate to work along the opposite side of the chain: 3 sc, 1 inc in the first ch (12)
1 inc, 3 sc, 3 inc, 3 sc, 2 inc (18)
1 sc, 1 inc, 3 sc, (1 sc, 1 inc) 3 times, 3 sc, (1 sc, 1 inc) 2 times (24)
2 sc, 1 inc, 3 sc, (2 sc, 1 inc) 3 times, 3 sc, (2 sc, 1 inc) 2 times (30)
3 sc, 1 inc, 3 sc, (3 sc, 1 inc) 3 times, 3 sc, (3 sc, 1 inc) 2 times (36)
4 sc, 1 inc, 3 sc, (4 sc, 1 inc) 3 times, 3 sc, (4 sc, 1 inc) 2 times (42)
5 sc, 1 inc, 3 sc, (5 sc, 1 inc) 3 times, 3 sc, (5 sc, 1 inc) 2 times (48)
6 sc, 1 inc, 3 sc, (6 sc, 1 inc) 3 times, 3 sc, (6 sc, 1 inc) 2 times (54)
7 sc, 1 inc, 3 sc, (7 sc, 1 inc) 3 times, 3 sc, (7 sc, 1 inc) 2 times (60)
Trace the flat oval bottom onto a piece of sturdy cardboard, cut it out, and set it aside to insert later.
blo - sc 1 in each st around (60)
sc 1 in each st around (60)
(19 sc, 1 inc) 3 times (63)
sc 1 in each st around (63)
(20 sc, 1 inc) 3 times (66)
sc 1 in each st around (66)
sl-st 1 in each st around (66)
Working under both the blo of Round 16 and the corresponding stitch loops of Round 15 (under the 'braid'): (10 hdc, 1 hdc-inc) 6 times (72)
hdc 1 in each st around (72)
(11 hdc, 1 hdc-inc) 6 times (78)
hdc 1 in each st around (78)
hdc 1 in each st around (78)
hdc 1 in each st around (78)
blo - hdc 1 in each st around (78)
hdc 1 in each st around (78)
With the pot's bottom facing away from you, attach new yarn to the front loops of Round 24. ch 4, then work 1 tr in each stitch around. Fasten off, leaving a long tail. Fold this brim down and sew it to the unworked loops two rounds below. Place your cardboard circle inside the bottom of the pot.
I hope you had as much fun bringing this cheeky little floweret to life as I did! Place their cute little collar around their neck, tie it in a neat bow, and don't forget that touch of blush on their little cheeks. They are now ready to brighten up your favorite shelf or desk. Happy crocheting, and keep sharing your beautiful handmade creations with our wonderful crafting community! 🧶✨
Yes, but you will need to scale up your hook size (try a 4.5mm or 5.0mm) and use larger safety eyes (around 14mm-16mm) to match the increased scale.
The secret is the cardboard insert! Make sure to cut it to the exact size of the bottom of the pot (after Round 9) and push it flat against the bottom before stuffing the pot.
No, the floweret sits snugly inside the pot and can be taken out, making it a fun interactive toy!
Always rub the dry pastel chalk onto a soft cloth first, then gently buff it onto the yarn. Applying it directly can make the color too harsh and hard to blend.
Try using the invisible decrease method (working through the front loops only of the two stitches you are decreasing) to keep your fabric tight and prevent stuffing from peeking through.
