About This Adorable Rosy Piglet Amigurumi Pattern
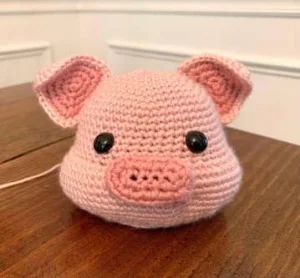
This pattern makes a beautiful handmade gift — thoughtful enough for a baby shower or a child's birthday, and it looks absolutely darling sitting on a nursery shelf.
Ideal for those with basic crocheting experience, featuring slightly more advanced stitches and techniques to expand your skills.
Takes 5-7 hours, making it an enjoyable project to finish over a couple of days.
Playful characters full of personality, designed to spark imagination and become cherished playtime favorites.
This pattern makes a beautiful handmade gift — thoughtful enough for a baby shower or a child's birthday, and it looks absolutely darling sitting on a nursery shelf.
I honestly can't get enough of the curly tail on this little guy! It's such a simple technique but it adds so much personality. I also love how the head shaping creates those squishy cheeks without needing any extra sewing.
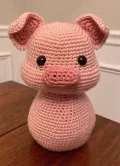
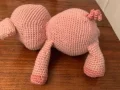
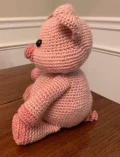
I still remember the first time I finished a pig amigurumi; there’s just something about those round snouts and curly tails that makes my heart melt! When I was designing this particular pattern, I really wanted to capture that 'chubby' look, which is why the head has that specific shaping at the bottom. It gives him those adorable jowls that look so cute when you add the nose.
One thing I always tell my friends when they start this project is to take their time with the ears. Joining two different sized triangles might feel a bit fiddly at first, but skipping those few stitches on the light pink side is exactly what gives them that perfect, slightly cupped shape. It’s those little details that really bring a character to life!
I personally used a soft cotton blend for mine because I love the stitch definition it gives, but a fuzzy acrylic would make a super cuddly version too. I can’t wait to see the personalities your little piggies take on—don't forget to give them a name once they're off your hook! Happy stitching!
There is nothing quite like the charm of a handmade piggy to brighten up your craft room. You are going to love watching this little character come to life, from his chubby jowled cheeks to that iconic curly tail. This project is a wonderful way for you to practice shaping techniques while creating a soft, cuddly friend that is perfect for gifting or keeping all to yourself.
Begin with your light pink yarn.
Start with 6 sc inside a mr (6)
Work 6 inc around the circle (12)
Repeat a sequence of 1 sc and 1 inc 6 times (18)
Repeat a sequence of 2 sc and 1 inc 6 times (24)
Repeat a sequence of 3 sc and 1 inc 6 times (30)
Repeat a sequence of 4 sc and 1 inc 6 times (36)
Repeat a sequence of 5 sc and 1 inc 6 times (42)
Repeat a sequence of 6 sc and 1 inc 6 times (48)
Repeat a sequence of 7 sc and 1 inc 6 times (54)
Work 1 sc in each st around (54)
Put 14 inc into the flo of the next stitches, then 4 sc, followed by another 14 inc into the flo, and finish the round with 22 sc (82)
Work 1 sc in each st around (82)
Work 60 sc, then 1 dec, 18 sc, and 1 dec (80)
Work 60 sc, then 1 dec, 16 sc, and 1 dec (78)
Work 60 sc, then 1 dec, 14 sc, and 1 dec (76)
Work 60 sc, then 1 dec, 12 sc, and 1 dec (74)
Work 60 sc, then 1 dec, 10 sc, and 1 dec (72)
Repeat a sequence of 10 sc and 1 dec 6 times (66)
Repeat [2 sc, dec] 5 times, then 12 sc, then [dec, 2 sc] 8 times, and 1 final dec (52)
Repeat [sc, dec] 6 times, then 6 sc, then [dec, sc] 8 times, and finish with 2 dec (36)
Repeat a sequence of 4 sc and 1 dec 6 times (30)
Repeat a sequence of 3 sc and 1 dec 6 times (24)
Tie off your yarn, making sure to leave a very long tail for assembly. Fill the head firmly with stuffing. Do not attach the head until you have secured the safety eyes.
Switch to your dark pink yarn.
ch 7 to start. Beginning in the 2nd ch from your hook, work 6 sc along one side, then rotate to work 6 sc along the underside of the foundation chain (12)
Work 12 inc around the oval (24)
Work 1 sc in each st around using only the blo (24)
Work 1 dec, 2 sc, 1 dec, 3 sc, 1 dec, 2 sc, 1 dec, 3 sc, 1 dec, and 4 sc (19)
Fasten off and leave a tail. Add a tiny bit of stuffing before sewing.
Make two using dark pink yarn.
Start with 3 sc inside a mr (3)
Work 4 sc into every st around (12)
Work 2 sc, then repeat [4 sc in one st, 3 sc] twice, then 4 sc in one st, and 1 sc (21)
Work 4 sc, then repeat [4 sc in one st, 6 sc] twice, then 4 sc in one st, and 2 sc (30)
Cut the yarn and pull through.
Make two using light pink yarn.
Start with 3 sc inside a mr (3)
Work 4 sc into every st around (12)
Work 2 sc, then repeat [4 sc in one st, 3 sc] twice, then 4 sc in one st, and 1 sc (21)
Work 4 sc, then repeat [4 sc in one st, 6 sc] twice, then 4 sc in one st, and 2 sc (30)
Work 6 sc, then repeat [4 sc in one st, 9 sc] twice, then 4 sc in one st, and 3 sc (39)
Do not cut the yarn on the light pink ear. Place a dark pink ear on top of a light pink one. Crochet through both layers with sc to join them. Since the light pink piece is larger, skip 3 stitches on each side of the light pink triangle while joining to keep things even.
Use light pink yarn.
Start with 6 sc inside a mr (6)
Work 6 inc around (12)
Repeat [1 sc, inc] 6 times (18)
Repeat [2 sc, inc] 6 times (24)
Repeat [3 sc, inc] 6 times (30)
Repeat [4 sc, inc] 6 times (36)
Repeat [5 sc, inc] 6 times (42)
Repeat [6 sc, inc] 6 times (48)
Repeat [7 sc, inc] 6 times (54)
Repeat [8 sc, inc] 6 times (60)
Repeat [9 sc, inc] 6 times (66)
Repeat [10 sc, inc] 6 times (72)
Work 1 sc in each st around (72)
Work 6 sc, 1 inc, then repeat [11 sc, inc] 5 times, and 5 sc (78)
Work 1 sc in each st around (78)
Repeat [11 sc, dec] 6 times (72)
Repeat [10 sc, dec] 6 times (66)
Work 1 sc in each st around (66)
Work 5 sc, 1 dec, then repeat [9 sc, dec] 5 times, and 4 sc (60)
Repeat [8 sc, dec] 6 times (54)
Work 4 sc, 1 dec, then repeat [7 sc, dec] 5 times, and 3 sc (48)
Work 1 sc in each st around (48)
Repeat [6 sc, dec] 6 times (42)
Work 1 sc in each st around (42)
Repeat [5 sc, dec] 6 times (36)
Repeat [4 sc, dec] 6 times (30)
Repeat [3 sc, dec] 6 times (24)
Fasten off and hide your yarn tail. Stuff the body very firmly.
Make two, starting with dark pink yarn.
Start with 6 sc inside a mr (6)
Work 6 inc around (12)
Work 12 inc around (24)
Work 1 sc in each st around using the blo (24)
Repeat [4 sc, dec] 4 times (20)
Switch to light pink yarn. To keep it seamless, pull the new color through the loops of your last stitch.
Repeat [3 sc, dec] 4 times (16)
Work 1 sc in each st around (16)
Repeat [6 sc, dec] 2 times (14)
Work 1 sc in each st around (14)
Repeat [5 sc, dec] 2 times (12)
Work 1 sc in each st around (12)
Fasten off and leave a sewing tail. Stuff the bottom lightly, leaving the top 4 rounds completely empty.
Make two, starting with dark pink yarn.
Start with 6 sc inside a mr (6)
Work 6 inc around (12)
Work 12 inc around (24)
Repeat [1 sc, inc] 12 times (36)
Work 1 sc in each st around using the blo (36)
Repeat [4 sc, dec] 6 times (30)
Repeat [3 sc, dec] 6 times (24)
Switch to light pink yarn using a seamless transition.
Repeat [10 sc, dec] 2 times (22)
Work 1 sc in each st around (22)
Repeat [9 sc, dec] 2 times (20)
Work 1 sc in each st around (20)
Repeat [8 sc, dec] 2 times (18)
Work 1 sc in each st around (18)
Fasten off and leave a tail. Stuff the bottom lightly, keeping the top 4 rounds empty.
Use dark pink yarn.
ch 16. Starting in the 2nd ch from your hook, work 4 sc into each of the next 13 chains. In the second to last chain, work 2 sc. Finish by working 1 sl st into the very last chain and tie off.
I hope you enjoyed making this little piglet as much as I did! There is something so satisfying about finishing that curly tail and seeing the whole character come together. Whether he is destined for a gift box or a spot on your own shelf, he is sure to bring a smile to anyone who sees him. Don't forget to share your finished photos with the community—I love seeing all the different personalities these piggies take on depending on the yarn choice! Happy crocheting, and I'll see you in the next pattern! 🧶 ✨
Absolutely! Just keep in mind that using a bulky plush yarn will make the pig significantly larger, likely around 12-15 inches tall, and you will need to size up your hook and safety eyes accordingly.
The curl comes from the 4 single crochets in each chain. If you want an even tighter spiral, you can try putting 5 single crochets in each chain, or simply twist it with your fingers once it is sewn on.
The shaping in Round 18 is very specific. Make sure you are working those increases into the front loops only (flo). This creates the ridge that defines the chubby cheek area.
It isn't mandatory, but cotton (or a cotton blend) is recommended because it provides great stitch definition, which helps the unique shaping of the head and the texture of the snout stand out.
