About This Bernat Alize EZ Baby Blanket Pattern

This makes an incredibly thoughtful baby shower gift — it's finished fast enough to whip up last-minute, but looks like it took real skill and intention to create.
Perfect for those just starting their crocheting journey, with clear instructions and simple techniques
Fits nicely into a free afternoon — 2 to 5 hours of focused, enjoyable crocheting.
Gentle, plush, and full of warmth, creating a sense of comfort and coziness wherever they find a home.
This makes an incredibly thoughtful baby shower gift — it's finished fast enough to whip up last-minute, but looks like it took real skill and intention to create.
I love this one because it genuinely surprises people. Nobody believes you made it with your hands until they see you do it. There's something so satisfying about the rhythm of pulling loop after loop — it's almost meditative. And that Thistle colorway? It photographs beautifully, so the finished blanket looks stunning even before it lands in a baby's arms.

I picked up my first skein of loop yarn on a whim at a craft store, mostly because I couldn't figure out what it was. The label said no hook required and honestly I thought it was a gimmick. Reader, I was wrong.
The EZ Baby Blanket was the first thing I made with it, and I finished it in one sitting while watching a movie. The rhythm of pulling loop through loop is almost hypnotic once you get going — right to left, left to right, back and forth until this thick, pillowy square of fabric appears in your lap. It sounds too simple to produce something that looks this good, but that's exactly what happens.
One thing I'd tell anyone just starting: really take your time on that foundation row. Count your 50 loops carefully and make sure every single one is facing upward before you pull through the first stitch. If one loop is twisted or facing the wrong way, you'll feel it in the row above — it creates a tight spot that's annoying to fix later. Two minutes of careful setup saves you ten minutes of head-scratching.
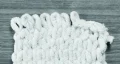
For color, the Thistle colorway is genuinely gorgeous. Those soft lavender and cream shifts look intentional and styled, even though you do absolutely nothing to make them happen. If you want something more gender-neutral, most loop yarn brands offer solid creams, greys, and soft greens that work identically with this pattern.
This has become my go-to baby shower gift. I can make one in an afternoon, it photographs beautifully, and every single person who receives one thinks it took way more effort than it did. That's the best kind of project.
This baby blanket is one of those projects that feels almost like magic — no hook, no needles, just your hands and a ball of chunky loop yarn pulling everything together. The finished piece comes out around 39 inches square, which is just the right size to wrap around a little one. If you've been wanting to try finger-craft techniques, this is the one to start with. The squishy, cozy texture practically makes itself, and you'll have something genuinely beautiful at the end.
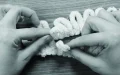
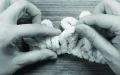
The right side of the blanket faces you throughout — you never flip or turn the work. The working yarn always stays behind the stitches, and every loop from it gets pulled from back to front. Note: This pattern uses a finger-craft loop yarn technique, not a standard crochet hook. The 'knit stitch' here means pulling a loop of working yarn up through a loop on the work from behind.
You can begin with your yarn end at the far right or far left — the instructions assume it starts at the far right. If starting from the left feels more natural, just reverse the direction of every row throughout.
Count out 50 loops along the length of the yarn, making sure the yarn end sits at the far right and every loop is facing upward. This is your foundation row. (50 loops)
Working left to right: take the 51st loop from the working yarn and pull it up through the 50th loop of your foundation row from behind — this creates your first K. Continue pulling the next working yarn loop up through each following foundation loop in the same way across the entire row. Do not turn the work. (50 sts)
Working right to left: pull the next working yarn loop up from behind through the very last stitch you worked in the previous row. Then pull the next loop up through each following stitch across to the end. Do not turn. (50 sts)
Working left to right: pull the next working yarn loop up from behind through the last stitch of the previous row, then continue pulling through each stitch across to the end. Do not turn. (50 sts)
Keep repeating Row 2 (right to left) and Row 3 (left to right) alternately until your blanket measures roughly 39 inches / 99 cm. Always stop after completing a Row 3 (left-to-right row).
Working in the same direction as the last row you completed: pull the second stitch through the first stitch, then the third stitch through the second, the fourth through the third, and so on across to the end of the row. Once you reach the final loop, cut it to leave a yarn tail. Tie the tail in a firm knot to secure, then weave in the end.
There's really nothing quite like finishing a baby blanket and knowing every stitch was made by hand — literally. 🧶 This EZ Baby Blanket comes together so quickly that you might just find yourself making two or three before the season's out. The chunky, cloud-like texture and those dreamy Thistle tones make it the kind of handmade gift that people actually keep and use, not just admire. Whether it's for your own little one or someone else's new arrival, this one's going to be loved for years. Happy making! ✨
Nope — that's actually what makes this pattern so fun. It uses Bernat Alize Blanket-EZ loop yarn, which you work entirely with your hands. The pre-formed loops on the yarn are the stitches, and you pull them through each other finger-craft style. No hook, no needles.
Not easily, unfortunately. This pattern is specifically designed for loop yarn — the pre-formed loops on the yarn are what make the technique work. Standard bulky yarn won't behave the same way and can't be worked with this pull-through method. Stick with any brand of loop yarn in a similar weight for best results.
Lay the blanket flat and measure from the cast-on edge down to your current row. You're aiming for approximately 39 inches (99 cm). Make sure you stop after completing a left-to-right row — not a right-to-left one — before working the bind-off row.
That's all from the yarn itself. Thistle (color 37021) is a self-striping loop yarn that shifts through lavender, dusty purple, and cream as you work. No color changes needed — just keep going and watch the stripes form naturally.
This usually happens when a stitch gets skipped or the loops aren't pulled all the way through before moving to the next one. Undo back to where it went uneven and redo it slowly, making sure each stitch is fully pulled through the previous one before moving on. A snug, even pull on each one makes a big difference.
