About This Boho Leaf Garland Amigurumi Pattern
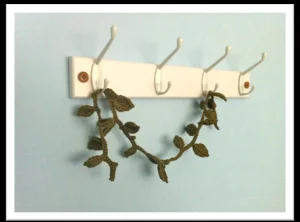
This pattern makes a beautiful handmade gift — thoughtful enough for someone special, but quick enough to make a few before the holidays to use as eco-friendly gift wrap accents.
Ideal for those with basic crocheting experience, featuring slightly more advanced stitches and techniques to expand your skills.
Fits nicely into a free afternoon — 2 to 5 hours of focused, enjoyable crocheting.
A warm touch for your space that transforms ordinary corners into inviting nooks filled with handmade charm.
This pattern makes a beautiful handmade gift — thoughtful enough for someone special, but quick enough to make a few before the holidays to use as eco-friendly gift wrap accents.
I honestly adore this pattern because it's completely 'no-sew'—everything is worked directly onto the vine! There's something so satisfying about watching the leaves sprout from your hook as you go. Plus, using different yarn weights completely changes the vibe, from a chunky autumn scarf to a dainty cotton necklace.
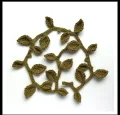
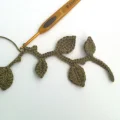
I’ve always felt that the best crochet projects are the ones that let you bring a little bit of the natural world inside, and this leaf garland does exactly that. There’s something so rhythmic and soothing about watching the little vines grow as you work. I remember the first time I made one of these; I used a rustic hemp twine to create a display for my kitchen window, and it completely transformed the space with that earthy, organic vibe.
What I love most is that you aren't tied down to a specific size. You can make a tiny version to wrap around a gift or go all out with a five-foot garland for a fireplace mantel. If you’re feeling adventurous, try mixing different shades of green or even autumnal oranges and browns for a seasonal shift. Don't worry too much about perfection here—leaves in nature aren't identical, and yours don't have to be either. Just enjoy the flow of the stitches and the way the cotton feels in your hands. It’s a wonderful way to use up those leftover scraps from bigger projects while making something truly beautiful for your home.
Bring a touch of the outdoors inside with this versatile and organic leaf garland. Whether you're looking to spruce up a mantle, create a unique nature-inspired necklace, or add a whimsical touch to your holiday table, this pattern is your new best friend. You'll love how the delicate vines and leaves come together without any tedious sewing, making it a relaxing project you can customize to any length you desire.
Begin your project by making a foundation of 9 ch.
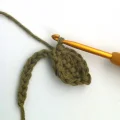
The small leaf is worked in stages to create its teardrop shape.
Work 6 ch to start the leaf stem.
Work 1 sl st into the BLO of the second ch from your hook, then 1 sl st into the BLO of each of the next 4 ch (5 sl st total).
Rotate your work so the right side stays facing you. Now, work into the loops you haven't used yet on those 5 ch: 1 sc, 3 hdc, 1 sc. This completes the first side.
To create the pointy tip, work 2 ch, then 1 sl st into the BLO of the second ch from your hook.
Now work back down the other side into the BLO of your previous sl st: 1 sc, 3 hdc, 1 sl st.
Secure the leaf by working 1 sl st into the spot where the leaf base meets your long main vine chain.
Add some length to your vine by working 14 ch.
To start a large leaf, work 8 ch.
Work 1 sl st into the BLO of the second ch from your hook and in the next 6 ch (7 sl st total).
Working into the unworked loops: 1 sc, 1 hdc, 2 dc, 2 hdc, 1 sc.
For the tip: 2 ch, 1 sl st into the BLO of the second ch from your hook.
Work back down the BLO of the sl st: 1 sc, 2 hdc, 2 dc, 1 hdc, 1 sl st.
Work 1 sl st where the leaf base meets the main chain to finish the attachment.
Work 3 ch along the main vine.
Work 2 ch, then 1 sl st in the BLO of the second ch from your hook to create the small textured nodule.
You have now completed one full sequence of the vine.
Repeat the entire process from the very first 9 ch until the garland reaches your desired length.
Once you are happy with the length, work 10 ch to finish off the end of the vine.
If you want a sturdier, thicker vine, you can work back along the length you just created.
Work 5 ch.
Starting in the second ch from your hook, work 12 sl st into the BLO of the main vine chain.
Create a Small Leaf (follow the instructions in Section 2).
Continue along the main vine with 12 sl st.
Create a Large Leaf (follow the instructions in Section 3).
Continue along the main vine with 10 sl st.
Create a Nodule (follow the instructions in Section 4).
Finish the sequence with 4 sl st.
Repeat this return sequence or improvise your own leaf placement until you reach the start of the garland.
There is nothing quite like the satisfaction of hanging up a handmade decoration that you've poured your heart into. This garland is more than just a project; it's a versatile piece of art that can grow as long as your imagination allows. Whether you're draping it over a mirror, using it to dress up a holiday table, or gifting it to a nature-loving friend, I hope you find as much joy in the making as I do. Grab your favorite hook, find a cozy spot, and let’s get those leaves growing! Happy crafting, everyone! 🧶🌿✨
I highly recommend using a non-stretchy fiber like cotton, linen, or hemp. If you use a stretchy wool or acrylic, the weight of the leaves will cause the vine to sag and lose its shape once you hang it up.
The beauty of this pattern is that it is a repeating sequence. Simply keep repeating the 'Small Leaf, Large Leaf, Nodule' steps until it reaches your desired length before moving on to the finishing instructions.
Absolutely! Tension isn't critical here. Choose a hook that feels comfortable with your chosen yarn. A smaller hook will result in daintier, tighter leaves, while a larger hook will make them look more open and airy.
This usually happens if your tension is too tight or if you aren't rotating the work correctly. Make sure the 'pretty side' is always facing you, and give the leaves a gentle tug or a light steam block once you're finished to flatten them out.
