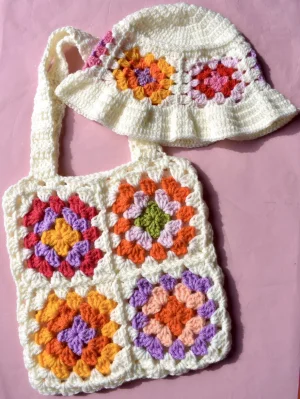
You are going to love how this bag comes together! It has that perfect vintage vibe with a modern pop of color that really makes a statement. Whether you're headed to the farmer's market or just need a stylish way to carry your current project, this tote is as practical as it is cute. I've designed the construction to be sturdy enough for daily use while still keeping that classic crochet charm we all adore. It's the kind of project that feels like a treat for your hook!
Progress Tracker
0% Complete
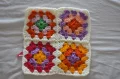
— 1. Small Granny Squares (Make 4) :
Round 1 :
Using your first color, ch4 and ss into the first ch to create a ring. ch3 (this counts as your first tr), then work 2tr into the center of the ring. *ch2, 3tr into the ring* three times. Finish with a ch2 and ss into the top of the starting ch3. Fasten off.
Round 2 :
Attach a new color in any ch2 corner sp. ch3, then work (2tr, ch2, 3tr) in that same corner. ch1. *Work (3tr, ch2, 3tr) in the next corner sp, then ch1.* Repeat from * twice more. ss into the top of the beg ch3 and fasten off.
Round 3 :
Join a third color in any corner sp. ch3, then (2tr, ch2, 3tr) in the same sp. ch1, 3tr in the next ch1 sp, ch1. *Work (3tr, ch2, 3tr) in the next corner, ch1, 3tr in the next ch1 sp, ch1.* Repeat from * twice more. ss into the top of the beg ch3 and fasten off.
Round 4 :
Using Yarn A, join in any corner. ch3, (2tr, ch2, 3tr) in the same sp. ch1, 3tr in the next ch1 sp, ch1, 3tr in the next ch1 sp, ch1. *Work (3tr, ch2, 3tr) in the corner, ch1, 3tr in the next two ch1 sps, ch1.* Repeat from * twice more. ss into the top of the beg ch3 and fasten off.
Info :
For the first square, complete Round 4 fully. For squares 2, 3, and 4, you will join them to the previous squares during Round 4 using the join-as-you-go method.
— 2. Joining the Front Squares :
Info :
When joining Square 2 to Square 1: Start Round 4 of Square 2. At the corner where you need to join, work 3tr, ch1, then ss into the corresponding corner of Square 1. Complete the corner with 3tr back on Square 2.
Info :
Continue along the side: ss into the next ch1 sp of Square 1, then work 3tr into the next sp of Square 2. Repeat this across the side to connect the pieces.
Info :
Join Square 3 to Square 2 in the same way to form an L-shape. Finally, join Square 4 on two sides to connect to both Square 3 and Square 1, completing your large front panel.
— 3. Front Panel Outer Border :
Round 5 :
Join Yarn A in any outer corner sp. ch3, (2tr, ch2, 3tr) in the same sp, ch1. *Work 3tr in each of the next two ch1 sps, ch1. Work 3tr in the next ch1 sp, ch1. Work 1tr in the corner sp, 1tr in the join between squares, and 1tr in the next corner sp. ch1, 3tr in each of the next three ch1 sps, ch1, (3tr, ch2, 3tr) in the outer corner, ch1.* Repeat from * around the panel. ss to join and fasten off.
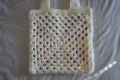
— 4. Back Granny Square :
Round 1 :
ch4 and ss to join. ch3, 2tr in ring, (ch2, 3tr) in ring 3 times, ch2, ss to join.
Round 2 :
ch3 and turn your work. (2tr, ch2, 3tr) in the corner sp, ch1. *Work (3tr, ch2, 3tr) in the next corner, ch1.* Repeat from * twice more, ss to join.
Round 3 :
ch3 and turn. 2tr in the first ch1 sp, ch1. *(3tr, ch2, 3tr) in corner, ch1, 3tr in next sp, ch1.* Repeat from * around, finishing with a corner and ss to join.
Round 4 :
ch3 and turn. 2tr in the first ch1 sp, ch1, (3tr, ch2, 3tr) in corner, ch1. *3tr in next two sps, ch1, (3tr, ch2, 3tr) in corner, ch1.* Repeat from * around, finishing with 3tr in the last sp and ss to join.
Round 5 :
ch3 and turn. 2tr in first sp, ch1, 3tr in next sp, ch1, (3tr, ch2, 3tr) in corner, ch1. *(3tr in next sp, ch1) 3 times, (3tr, ch2, 3tr) in corner, ch1.* Repeat from * around, ss to join.
Round 6 :
ch3 and turn. 2tr in first sp, ch1, 3tr in next sp, ch1, (3tr, ch2, 3tr) in corner, ch1. *(3tr in next sp, ch1) 4 times, (3tr, ch2, 3tr) in corner, ch1.* Repeat from * around, finishing with 3tr in the remaining sps and ss to join.
Round 7 :
ch3 and turn. 2tr in first sp, ch1, (3tr in next sp, ch1) twice, (3tr, ch2, 3tr) in corner, ch1. *(3tr in next sp, ch1) 5 times, (3tr, ch2, 3tr) in corner, ch1.* Repeat around, finishing with 3tr in last 2 sps and ss to join.
Round 8 :
ch3 and turn. 2tr in first sp, ch1, (3tr in next sp, ch1) twice, (3tr, ch2, 3tr) in corner, ch1. *(3tr in next sp, ch1) 6 times, (3tr, ch2, 3tr) in corner, ch1.* Repeat around, finishing with 3tr in last 3 sps and ss to join.
Round 9 :
ch3 and turn. 2tr in first sp, ch1, (3tr in next sp, ch1) 3 times, (3tr, ch2, 3tr) in corner, ch1. *(3tr in next sp, ch1) 7 times, (3tr, ch2, 3tr) in corner, ch1.* Repeat around, finishing with 3tr in last 3 sps and ss to join. Fasten off.
— 5. Finishing the Body :
Info :
Place the front and back panels together with the wrong sides touching. Match the stitches carefully along the left, bottom, and right sides.
Info :
Using a tapestry needle and black yarn, whip stitch the three sides together. Leave the top edge open.
Round 1 :
Join Yarn A to any stitch along the open top edge. ch3, then work 1tr into every stitch all the way around. You should have 74tr in total. ss to join and fasten off.
— 6. Straps :
Row 1 :
On the front top edge, find the 12th stitch from the left side and join your yarn. ch3, then work 1tr into each of the next 4 stitches. (5 sts total)
Row 2-30 :
ch3 and turn. Work 1tr into each of the next 4 stitches. Repeat this until your strap is 30 rows long.
Info :
Fasten off, leaving a very long tail. Count 12 stitches in from the right side of the front panel and sew the end of the strap securely to the top edge.
Info :
Repeat the exact same process on the back panel to create the second strap.
I really hope you enjoy stitching up this retro-inspired tote! It's such a satisfying project because those colorful squares just fly off the hook once you get into the rhythm. Once you've mastered the join-as-you-go technique, you'll find yourself wanting to use it for every blanket and bag you make! Don't forget to take a photo of your finished tote out in the wild—it looks absolutely amazing in the sunshine. Happy crafting, and I can't wait to see the beautiful color combinations you choose for your unique version! 🧶✨