🧶 Beautiful ✨ Detailed 💝 Adorable

Colorful Infinity Cube Fidget Toy Amigurumi Pattern

Colorful Infinity Cube Fidget Toy Amigurumi Pattern
4.1★Rating
10-12 HoursTime Needed
3.6KMade This
✂️

Intermediate Level

Ideal for those with basic crocheting experience, featuring slightly more advanced stitches and techniques to expand your skills.

⏱️

Slow & Steady

A 10-12 hour project—great for savoring the process over several sessions.

🐰

Whimsical Buddy

Playful characters full of personality, designed to spark imagination and become cherished playtime favorites.

About This Colorful Infinity Cube Fidget Toy Amigurumi Pattern

Colorful Infinity Cube Fidget Toy Amigurumi Pattern crochet pattern - detailed view

This fidget toy is a lifesaver for anyone who needs a little sensory focus during the day. It makes a thoughtful handmade gift for students or office workers, and it looks like a piece of modern art sitting on a desk.

Why You'll Love This Colorful Infinity Cube Fidget Toy Amigurumi Pattern

I honestly found the process of making the individual squares so meditative—it's the perfect 'couch project' where you can just zone out. The real magic happens during assembly, and there's nothing more satisfying than that first time you flip the finished cube and realize you've made a moving machine out of yarn!

Colorful Infinity Cube Fidget Toy Amigurumi Pattern step 1 Colorful Infinity Cube Fidget Toy Amigurumi Pattern step 2 Colorful Infinity Cube Fidget Toy Amigurumi Pattern step 3 Colorful Infinity Cube Fidget Toy Amigurumi Pattern step 4

Switch Things Up

There is something so incredibly satisfying about the 'click-clack' of a finished infinity cube, even when it's made of soft yarn. When I first saw this design, I was worried the assembly would be a headache, but it’s actually quite logical once you have all your pieces laid out. My biggest tip for you is to stay organized! I like to keep my squares in little stacks by color so I don't accidentally grab the wrong one while joining.

If you want to change the vibe, try a monochrome version with different shades of grey and one 'pop' color, or go full rainbow like the pattern suggests. I found that using a slightly smaller hook than the yarn recommends helps keep the stitches tight, which is great for durability since this toy is meant to be handled a lot. When you get to the steaming phase, don't be afraid of the steam! It's the 'magic' step that turns a bunch of stiff squares into a fluid, moving machine. I spent a good twenty minutes just flipping mine once it was done—it’s genuinely addictive!

Common Mistakes & How to Fix Them

✗ Overstuffing the individual cubes will make them too rounded, which prevents the infinity cube from folding smoothly and staying flush.✗ If you don't keep your color orientation consistent across all eight cubes, the finished toy will look disorganized and the patterns won't align when flipped.✗ Sewing the hinges too tightly can restrict the movement; make sure your 'stitch to stitch' seams are secure but allow the cubes to pivot freely.✗ Skipping the steaming step at the end is a common pitfall—the steam is essential for softening the yarn and 'setting' the hinges for that perfect fluid motion.

Colorful Infinity Cube Fidget Toy Amigurumi Pattern

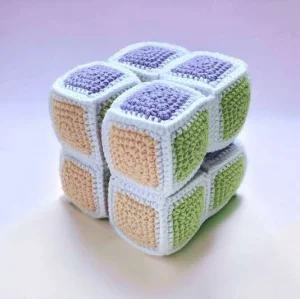
If you're looking for a project that's as fun to play with as it is to make, you've found it. This infinity cube is the ultimate tactile experience, perfect for keeping hands busy and minds calm. You'll love watching the individual squares come together into a complex, moving puzzle. It’s a fantastic way to use up those pretty scrap colors in your stash while creating something truly unique for yourself or a friend.

Intermediate 10-12 Hours

Materials Needed for Colorful Infinity Cube Fidget Toy Amigurumi Pattern

— Main Fabric

  • 01
    YarnArt Jeans in shade 75 (blue), approximately half a skein
  • 02
    YarnArt Jeans in shade 72 (purple), approximately half a skein
  • 03
    YarnArt Jeans in shade 53 (light green), approximately half a skein
  • 04
    YarnArt Jeans in shade 23 (carrot), approximately half a skein
  • 05
    YarnArt Jeans in shade 88 (yellow), approximately half a skein
  • 06
    YarnArt Jeans in shade 73 (peach), approximately half a skein
  • 07
    Alize Cotton Gold in shade 55 (white) for the borders and joining

— Tools Required

  • 01
    2.0mm crochet hook (Size B-1)
  • 02
    Soft holofiber or polyester toy stuffing
  • 03
    Large-eye sewing needle for assembly
  • 04
    Sharp crafting scissors
  • 05
    Steam iron for final shaping

Progress Tracker

0% Complete

— 1. The Colorful Square :

Info :

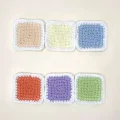
You need to make 8 squares in each of the 6 colors (blue, purple, light green, carrot, yellow, and peach) for a total of 48 squares.

Round 1 :

Work 7 sc into an ar, then join with a sl st and ch 1. (8)

Round 2 :

Work 1 inc3 in the first stitch. Note: the starting ch counts as a stitch here. (1 sc, 1 inc3) repeat 3 times, then join with a sl st into the starting ch and ch 1. (16)

Round 3 :

Work 1 inc3 in the first stitch, (3 sc, 1 inc3) repeat 3 times, then work 2 sc, join with a sl st into the starting ch and ch 1. (24)

Round 4 :

Work 1 inc3 in the first stitch, (5 sc, 1 inc3) repeat 3 times, then work 4 sc, join with a sl st into the starting ch. (32)

Info :

Cut your yarn and fasten off. You will hide these ends when you work the white border in the next step.

— 2. White Border :

Round 5 :

Attach your white yarn to any side of the square. Work sc along the edges, and in each of the four corner stitches, work 1 sc-inc3. (40)

Info :

Finish the round using a needle join for a seamless look and weave in the end on the back of the square. Repeat this for all 48 squares.

— 3. Individual Cube Assembly :

Info :

You will now assemble 8 identical cubes. Each cube uses one square of each color.

Assembly :

Arrange your squares using this layout: Peach on top, Yellow on bottom, Purple on the front, Carrot on the right, Light Green on the left, and Blue on the back.

Joining :

Using white yarn and sc, join the edges of the squares together. When you reach a corner that is already joined, work a sl st through the existing corner sc to create a sharp, defined point.
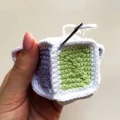
Stuffing :

Before closing the final side of the cube, add a small amount of holofiber. It is vital not to overstuff; the cube should hold its shape but remain slightly soft to avoid bulging.

— 4. Connecting Part 1 :

Placement :

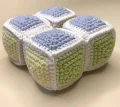
Take 4 of your finished cubes and arrange them in a 2x2 square. Ensure all colors are facing the same direction: Purple on top, Blue on bottom, Peach facing you, and Yellow facing away.

Seaming :

Using a needle and white yarn, sew the cubes together at the side hinges (between Carrot and Light Green sides) as indicated in the assembly photos. Use a 'stitch to stitch' method through the white sc rows.

— 5. Connecting Part 2 :

Placement :

Take the remaining 4 cubes and arrange them in a 2x2 square. This time, Blue should be on top and Purple on the bottom. Peach faces you and Yellow faces away.

Seaming :

Repeat the side hinge sewing process used for Part 1. You should now have two separate blocks of 4 cubes.

— 6. Final Assembly :

Alignment :

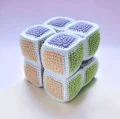
Place Part 1 and Part 2 together so they form one long rectangle (2 cubes wide by 4 cubes long). Ensure the side colors match up perfectly.

The Flip :

Flip the entire assembly 180 degrees so the bottom faces are now on top.

Final Seam :

Sew the remaining connection points across the center horizontal line where the two parts meet, following the specific stroke marks in the pattern photos.

Steaming :

Gently steam all faces of the cube with an iron. Focus steam on the seams to make them flexible. Do not press down hard, as this can flatten the stitches.

Assembly Instructions

  • Connect six different colored squares into a small cube using single crochet joins with white yarn, ensuring the color orientation is identical for all eight cubes.
  • Stuff each of the eight cubes lightly with holofiber before sealing the final edge to maintain a crisp geometric shape without bulging.
  • Arrange four cubes into a 2x2 square (Part 1) and sew the vertical side seams between them using a needle and 'stitch to stitch' technique.
  • Create Part 2 by arranging the other four cubes in a 2x2 square with the top and bottom colors reversed, then sew the side seams as before.
  • Lay Part 1 and Part 2 together to form a 2x4 block, ensuring all side colors are aligned in the same direction.
  • Flip the entire 8-cube structure over and sew the final horizontal center hinges that connect the two 4-cube parts together.
  • Steam the finished toy thoroughly with an iron to soften the seams and ensure the infinity cube moves with a smooth, fluid motion.

Important Notes

  • 💡Consistency is key—ensure every single cube has the exact same color placement (e.g., Peach always opposite Yellow) or the final movement won't look right.
  • 💡When joining squares with sc, use a consistent tension to prevent the white borders from puckering or pulling the squares out of shape.
  • 💡The 'sharp' corner technique using a slip stitch is what gives the cube its professional, clean-edged look, so don't skip it during assembly.
  • 💡If you use a different yarn weight, make sure to adjust your hook size so the fabric is dense enough that the stuffing doesn't peek through.
  • 💡The steaming process is not optional; it transforms a stiff crochet project into a truly functional, moving fidget toy.
  • 💡Use a needle join (invisible join) for the final round of each square to ensure the borders look continuous and neat.

I hope you have as much fun flipping this cube as I did! It’s such a rewarding project because it combines the repetitive, relaxing nature of making small squares with the brain-teasing puzzle of assembly. Whether you're making this for a child to help with motor skills or for yourself as a desk companion, it's sure to be a hit. Don't forget to take your time with the steaming—it really is the secret sauce to making it move perfectly. Happy crafting, and enjoy your new favorite fidget! 🧶✨

You ask,

we answer.

FAQs

Can I use cotton yarn instead of a cotton-acrylic blend?

Absolutely! 100% cotton will make the cube even firmer and more defined, though it might be slightly heavier. Just ensure you steam it well, as pure cotton can be a bit stiffer at the seams.

Does the order of colors really matter for the cubes?

Yes, it's very important! If the colors aren't in the same position on every cube, the 'infinity' effect where colors align as you flip it will be lost. Follow the color map carefully for all 8 cubes.

My cube feels a bit stiff and doesn't flip easily, what did I do wrong?

It likely needs more steam! Use a steam iron to heavily steam the hinged areas. This relaxes the fibers and allows the 'stitch to stitch' seams to act like real hinges.

Is this project suitable for a beginner?

While the squares themselves are quite simple, the assembly requires a lot of precision and patience. If you're a beginner who is comfortable with basic sewing and following layouts, you can definitely do it!

How much stuffing should I actually use?

Use just enough to help the cube hold its shape. If you overstuff it, the faces will bow outward, and the cubes won't sit flush against each other when you try to fold the toy.