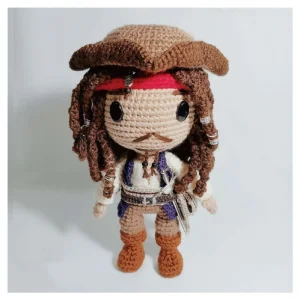
🧶 Beautiful ✨ Detailed 💝 Adorable

Captain Jack Sparrow Amigurumi Pattern

Captain Jack Sparrow Amigurumi Pattern
4.1★Rating
8-10 HoursTime Needed
1.4KMade This
✂️

Advanced Level

Designed for experienced crocheters, these patterns involve intricate designs and complex techniques to challenge and inspire.

⏱️

All-Day Adventure

Requires 8-10 hours, ideal for a full day of immersive crocheting.

🐰

Whimsical Buddy

Playful characters full of personality, designed to spark imagination and become cherished playtime favorites.

About This Captain Jack Sparrow Amigurumi Pattern

Captain Jack Sparrow Amigurumi Pattern crochet pattern - detailed view

This captain makes an incredible gift for movie buffs or a standout piece for your own collection. His detailed accessories and layered look ensure he looks fantastic from every single angle.

Why You'll Love This Captain Jack Sparrow Amigurumi Pattern

I absolutely love how the hair layers come together—it feels like you're actually styling a character for the big screen! The mix of standard yarn and fine embroidery thread gives the finished piece such a sophisticated texture that you just don't get with single-weight projects. Plus, seeing his little smirk emerge as you embroider the face is purely satisfying.

Captain Jack Sparrow Amigurumi Pattern step 1 Captain Jack Sparrow Amigurumi Pattern step 2 Captain Jack Sparrow Amigurumi Pattern step 3 Captain Jack Sparrow Amigurumi Pattern step 4

Switch Things Up

I’ve always been a huge fan of character-driven projects, and honestly, Jack Sparrow is the ultimate challenge for any amigurumi lover. When I first looked at this pattern, I was a bit intimidated by the sheer amount of hair strands, but let me tell you—it is so worth the effort! There’s something incredibly satisfying about watching those messy dreadlocks take shape.

One thing I discovered while making my own version is that the choice of embroidery thread for the vest really makes or breaks the scale. If you use standard yarn, he ends up looking a bit too bulky, like he's wearing a winter coat instead of a pirate's vest! I also recommend taking your time with the facial embroidery. Jack’s smirk is his trademark, so play around with the placement of the mustache pins until it feels just right.

If you want to customize him even more, try adding some tiny metallic charms or different colored beads to his hair. It’s those little personal touches that turn a crochet project into a real piece of art. This isn't a project you want to rush—grab a cup of coffee, put on your favorite pirate movie, and just enjoy the process of bringing this legend to life!

Common Mistakes & How to Fix Them

✗ When joining the legs at Round 17, it is very easy to twist the center chain; keep it perfectly flat to ensure the body doesn't lean to one side.✗ If you use standard DK yarn for the vest instead of the recommended embroidery thread, it will be much too thick and won't fit over the shirt properly.✗ The head needs to be stuffed very firmly around the neck joint to keep it stable, otherwise the mobile head feature will make it feel floppy.✗ In the hair layers, pay close attention to the strand counts; skipping even one strand will leave a noticeable gap in Jack's signature dreadlock volume.

Captain Jack Sparrow Amigurumi Pattern

Set sail for a crafting adventure and bring the legendary Captain Jack Sparrow to your shelf! This pattern is a labor of love, capturing every iconic detail from his weathered tricorn hat to those famous braided dreadlocks. You’ll enjoy the challenge of working with different textures and thread weights to create a character that truly feels alive. It’s the perfect project for any fan of the high seas who wants to add a bit of pirate magic to their collection.

Advanced 8-10 Hours

Materials Needed for Captain Jack Sparrow Amigurumi Pattern

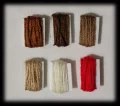
— Main Fabric

  • 01
    Medium weight cotton yarn in dark brown for the hair, boots, and hat details
  • 02
    Medium weight cotton yarn in dark beige for the skin tone
  • 03
    Medium weight cotton yarn in cream for the shirt and highlights
  • 04
    Medium weight cotton yarn in red for the headbands
  • 05
    Medium weight cotton yarn in light brown for the trousers
  • 06
    Dark blue embroidery thread (used double-stranded) for the vest
  • 07
    Small amounts of gray, beige, and wine-colored embroidery thread for the accessories

— Tools Required

  • 01
    2.5mm crochet hook for the main body and hat
  • 02
    1.5mm crochet hook for the vest
  • 03
    1mm crochet hook for the belt and handkerchief
  • 04
    9mm or 10mm oval safety eyes
  • 05
    Synthetic fiberfill for stuffing
  • 06
    Selection of small beads for the hair and beard
  • 07
    Yarn needle and a fine embroidery needle
  • 08
    Stitch markers
  • 09
    Sharp scissors

Progress Tracker

0% Complete

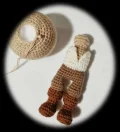
— 1. Legs (Make 2) :

Round 1 :

Using brown yarn, ch 6. Starting in the 2nd ch from the hook, work 4 sc, inc4 in the last ch, then work along the other side of the ch: 3 sc, inc3 (14)

Round 2 :

4 sc, 4 inc, 4 sc, 2 inc (20)

Round 3 :

BLO 20 sc (20)

Round 4 :

20 sc (20)

Round 5 :

3 sc, 2 dec, 1 hdc dec, 2 dec, 7 sc (15)

Round 6 :

1 sc, 5 dec, 4 sc (10)

Round 7 :

10 sc (10)

Round 8 :

10 sc (10)

Round 9 :

10 sc (10)

Round 10 :

10 sc (10)

Round 11 :

10 sc (10)

Colour Change :

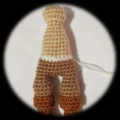
Switch to a lighter shade of brown for the trousers.

Round 12 :

BLO (1 sc, inc) repeat 5 times (15)

Round 13 :

15 sc (15)

Round 14 :

15 sc (15)

Round 15 :

(1 sc, dec) repeat 5 times (10)

Round 16 :

10 sc (10)

Note :

Fasten off the first leg. Repeat for the second leg but do not cut the yarn after Round 16.

— 2. Boot Cuffs :

Info :

Work into the FLO of Round 12 on the legs.

Round 1 :

Join brown yarn with a ch, (1 sc, inc) repeat 5 times (15)

Round 2 :

15 sc (15)

Round 3 :

15 sc (15)

— 3. Body :

Round 17 :

Ch 4 and join to the first leg. Work 10 sc around the first leg, 4 sc across the ch, 10 sc around the second leg, and 4 sc across the other side of the ch (28)

Round 18 :

28 sc (28)

Round 19 :

28 sc (28)

Round 20 :

4 sc, dec, (5 sc, dec) repeat 3 times, 1 sc (24)

Round 21 :

24 sc (24)

Colour Change :

Switch to cream yarn for the shirt.

Round 22 :

BLO 24 sc (24). Do not cut the cream yarn; set it aside for the shirt detail later.

Colour Change :

Switch to skin tone yarn.

Round 23 :

BLO: Work 4 dec, then 1 st in front, 1 st in back, and 1 st on each side (20)

Round 24 :

20 sc (20)

Round 25 :

20 sc (20)

Round 26 :

20 sc (20)

Round 27 :

20 sc (20)

Round 28 :

20 sc (20)

Round 29 :

(2 sc, dec) repeat 5 times (15)

Round 30 :

15 sc (15)

Round 31 :

(1 sc, dec) repeat 5 times (10)

Round 32 :

10 sc (10)

Round 33 :

10 inc (20)

Round 34 :

20 sc (20)

Round 35 :

20 sc (20)

Round 36 :

10 dec (10)

Round 37 :

5 dec, sl st (5)

Info :

Fasten off and secure the end.

— 4. T-Shirt Detail :

Info :

Return to the cream yarn left at Round 22. Work into the FLO of Round 23.

Row 1 :

1 ch, turn, 24 hdc (24)

Info :

Fasten off with an invisible join. Mark the center point of the chest; this will be your new starting point.

Row 2 :

Attach yarn next to your marker: 1 ch, 23 hdc (23)

Row 3 :

1 ch, turn, 23 hdc (23)

Row 4 :

1 ch, turn, dec, 19 hdc, dec (21)

Row 5 :

1 ch, turn, dec, 17 hdc, dec (19)

Info :

Fasten off and weave in the ends.

— 5. Head :

Round 1 :

Using skin tone yarn, 6 sc in MR (6)

Round 2 :

6 inc (12)

Round 3 :

(1 sc, inc) repeat 6 times (18)

Round 4 :

1 sc, inc, (2 sc, inc) repeat 5 times, 1 sc (24)

Round 5 :

(3 sc, inc) repeat 6 times (30)

Round 6 :

2 sc, inc, (4 sc, inc) repeat 5 times, 2 sc (36)

Round 7 :

(5 sc, inc) repeat 6 times (42)

Round 8 :

3 sc, inc, (6 sc, inc) repeat 5 times, 3 sc (48)

Round 9 :

(7 sc, inc) repeat 6 times (54)

Round 10-18 :

54 sc (54)

Note :

Insert safety eyes between Rounds 13 and 14, leaving 12 stitches between them.

Round 19 :

(7 sc, dec) repeat 6 times (48)

Round 20 :

3 sc, dec, (6 sc, dec) repeat 5 times, 3 sc (42)

Round 21 :

(5 sc, dec) repeat 6 times (36)

Round 22 :

2 sc, dec, (4 sc, dec) repeat 5 times, 2 sc (30)

Round 23 :

(3 sc, dec) repeat 6 times (24)

Round 24 :

1 sc, dec, (2 sc, dec) repeat 5 times, 1 sc (18)

Info :

Insert the top of the body into the head now to create the mobile joint.

Round 25 :

(1 sc, dec) repeat 6 times (12)

Info :

Fill the head firmly around the neck and fasten off.

— 6. Arms (Make 2) :

Round 1 :

Using skin tone yarn, 5 sc in MR (5)

Round 2 :

4 sc, inc (6)

Round 3 :

5 sc, (ch 2, sc, then sc at the base of the point to form a thumb), 1 sc (8)

Round 4 :

5 sc, skip the thumb stitches, 1 sc (6)

Round 5 :

6 sc (6)

Colour Change :

Switch to cream yarn.

Round 6 :

6 sc (6)

Round 7 :

BLO 6 inc (12)

Round 8 :

(1 sc, inc) repeat 6 times (18)

Round 9 :

18 sc (18)

Round 10 :

18 sc (18)

Round 11 :

(1 sc, dec) repeat 6 times (12)

Round 12 :

12 sc (12)

Round 13 :

(2 sc, dec) repeat 3 times (9)

Round 14 :

9 sc (9)

Round 15 :

9 sc (9)

Round 16 :

9 sc (9)

— 7. Sleeve Cuffs :

Info :

Work into the 6 FLO of Round 8 on the arms.

Round 1 :

Attach cream yarn, ch 1, work hdc inc in every stitch (12)

— 8. Handkerchief :

Info :

Use a 1mm hook and beige embroidery thread.

Row 1 :

Ch 82, starting in 3rd ch from hook: 80 hdc (80)

Row 2 :

Ch 2, turn, 80 hdc (80)

Row 3 :

Ch 4, turn, starting in 3rd ch from hook: 10 dc, 72 hdc (82)

Row 4 :

Ch 2, turn, 73 hdc, 8 dc, leave the last stitch unworked (81)

Row 5 :

Ch 2, turn, 81 hdc (81)

Note :

Original count for Row 6 suggests 80 stitches; adjust your work to maintain the shape.

Row 6 :

Ch 2, turn, 80 hdc, 8 dc, leave the last stitch unworked (80)

Row 7 :

Ch 2, turn, 80 hdc (80)

Embroidery :

Using wine-colored thread and a 1mm needle, work 2 rows of sl st along the length of the handkerchief.

— 9. Jacket (Vest) :

Info :

Use a 1.5mm hook and double-stranded blue embroidery thread.

Row 1 :

Ch 30, starting in 3rd ch from hook: 28 hdc (28)

Row 2 :

Ch 2, turn, 3 hdc, ch 6, skip 6 st, 10 hdc, ch 6, skip 6 st, 3 hdc (28)

Row 3-13 :

Ch 2, turn, 28 hdc (28)

Contour :

Mark the top center of the vest. Work sc around the entire edge. When you hit the marker, work 2 dec, then continue with sc to the end.

— 10. Belt :

Info :

Use a 1mm hook and brown embroidery thread.

Row 1 :

Ch 46, starting in 3rd ch from hook: 44 hdc (44)

Row 2 :

Ch 1, turn, work along the opposite side: 44 hdc (45)

— 11. Head Band & Rear Band :

Info :

Using red yarn and 2.5mm hook.

Row 1 :

Ch 50, starting in 3rd ch from hook: 48 hdc (48)

Row 2 :

Ch 1, turn, 9 sc, 8 hdc, 14 dc, 8 hdc, 9 sc (48)

Row 3 :

Ch 1, turn, 17 hdc, 14 dc, 17 hdc (48)

Rear Band :

Ch 42, starting in 3rd ch from hook: 8 dc, 7 hdc, 8 sc, 9 hdc, 6 dc, 2 tr (40)

— 12. Hair Base :

Round 1 :

Using brown yarn, 8 sc in MR (8)

Round 2 :

8 inc (16)

Round 3 :

(1 sc, inc) repeat 8 times (24)

Round 4 :

FLO: (2 sc, inc) repeat 8 times, sl st (32)

— 13. Hair - First Layer :

Strands 1-5 :

Ch 28, starting in 3rd ch from hook: 26 hdc. Work 2 strands per stitch as per the pattern diagram.

Strands 6-12 :

Ch 26, starting in 3rd ch from hook: 24 hdc. Work 1 strand per stitch.

Strands 13-16 :

Ch 28, starting in 3rd ch from hook: 26 hdc. Work 2 strands per stitch.

— 14. Hair - Second Layer :

Info :

Work into the 24 BLO remaining from Round 4 of the hair base.

Strands 1-3 :

Ch 32, starting in 3rd ch from hook: 30 hdc. Work 2 strands per stitch.

Strand 4 :

Ch 26, starting in 3rd ch from hook: 24 hdc. Work 2 strands per stitch.

Strands 5-9 :

Ch 22, starting in 3rd ch from hook: 20 hdc. Work 1 strand per stitch.

Strand 10 :

Ch 26, starting in 3rd ch from hook: 24 hdc. Work 2 strands per stitch.

Strands 11-12 :

Ch 32, starting in 3rd ch from hook: 30 hdc. Work 2 strands per stitch.

— 15. Hat :

Round 1 :

Using brown yarn and 2.5mm hook, 8 sc in MR (8)

Round 2 :

8 inc (16)

Round 3 :

(1 sc, inc) repeat 8 times (24)

Round 4 :

1 sc, inc, (2 sc, inc) repeat 7 times, 1 sc (32)

Round 5 :

(3 sc, inc) repeat 8 times (40)

Round 6 :

2 sc, inc, (4 sc, inc) repeat 7 times, 2 sc (48)

Round 7 :

48 sc (48)

Round 8 :

(5 sc, inc) repeat 8 times (56)

Round 9-12 :

56 sc (56)

Round 13 :

FLO: 3 sc, inc, (6 sc, inc) repeat 7 times, 3 sc (64)

Round 14 :

(7 sc, inc) repeat 8 times (72)

Round 15 :

(5 sc, inc) repeat 12 times (84)

Round 16 :

(inc, 6 sc) repeat 12 times (96)

Round 17 :

(inc, 7 sc) repeat 12 times (108)

Round 18 :

(inc, 8 sc) repeat 12 times (120)

Info :

Fold the brim of the hat into a tricorn shape.

Assembly Instructions

  • Secure the hair base to the top of the head using pins, making sure to leave the designated face-framing strands loose before sewing or gluing.
  • Create Jack's signature braid using the longest 32-chain strands from the second layer and secure it with a small bead.
  • Layer the red headband over the hair and tie it at the back, adding a few hidden stitches to keep it from sliding.
  • Map out the facial hair with pins to ensure symmetry, then embroider the mustache and beard using three strands of dark brown thread.
  • Fit the vest over the torso and wrap the waist scarf and belt around the middle, securing the assembly with tiny stitches through all layers.
  • Join the arms to the body at the shoulder line, ensuring the thumbs are oriented forward for a natural look.

Important Notes

  • 💡The final size of your amigurumi depends on your yarn weight and tension; the sample stands roughly 20cm high.
  • 💡Don't skip the mobile head step—it adds a lot of character to the finished doll by allowing him to 'look' around.
  • 💡When working the vest with embroidery thread, keep your tension even to prevent the fabric from curling too much.
  • 💡Use pins for everything! Positioning the hair and facial features is much easier when you can visualize it before sewing.
  • 💡For a more realistic dreadlock look, wrap extra thread around some of the hair strands to give them a matted texture.

I'm so excited for you to finish your very own Captain Jack! This project is truly special because of all the tiny details that come together to create such a recognizable character. From the layered hair to the custom-fit vest, every step adds a bit more personality. I hope you enjoyed the process as much as I did—there’s nothing quite like seeing a legend take shape under your hook. Don't forget to share your finished captain with the community! Happy crocheting, and may your pirate adventures be many! 🧶🏴‍☠️✨

You ask,

we answer.

FAQs

Can I use round safety eyes instead of oval ones?

Absolutely! 9mm or 10mm round eyes will work just fine, though the oval ones give him that slightly more intense, movie-accurate expression.

The vest seems too small for the body, what should I do?

Double-check that you're using two strands of embroidery thread together and the 1.5mm hook. If it's still tight, you can add an extra row of HDC to the width.

How do I make the head mobile?

The pattern has you insert the finished neck into the head before you finish the final decreases. This creates a ball-and-socket style joint that lets the head rotate.

The hair strands are curling too much, is that normal?

Yes, they naturally curl a bit, which actually helps with the 'dreadlock' look. If they curl too much, you can lightly steam them with an iron to flatten them out.