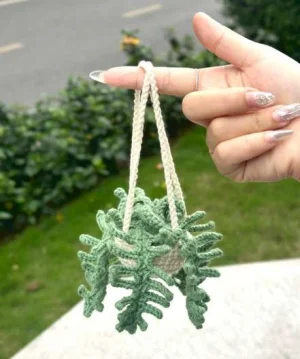
๐Ÿงถ Beautiful โœจ Detailed ๐Ÿ’ Adorable

Fern Plant Amigurumi Car Charm Pattern

Fern Plant Amigurumi Car Charm Pattern
4.6โ˜…Rating
3-5 HoursTime Needed
2.0KMade This
โœ‚๏ธ

Intermediate Level

Ideal for those with basic crocheting experience, featuring slightly more advanced stitches and techniques to expand your skills.

โฑ๏ธ

Quick Craft

Fits nicely into a free afternoon โ€” 2 to 5 hours of focused, enjoyable crocheting.

๐Ÿพ

Pocket Pal

A mini friend to carry anywhere, providing comfort and companionship in a perfectly portable size.

About This Fern Plant Amigurumi Car Charm Pattern

Fern Plant Amigurumi Car Charm Pattern crochet pattern - detailed view

Style your car with a handmade touch or gift this to the plant lover in your life who can't seem to keep a real one alive. Itโ€™s a small, charming project that makes a big impact on your interior decor.

Why You'll Love This Fern Plant Amigurumi Car Charm Pattern

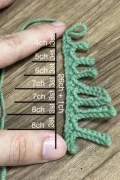
I absolutely love how the leaves are constructed! Using slip stitches to create those serrated edges is so clever and gives the fern its iconic shape. Itโ€™s a great project for using up scraps of green yarn, and seeing it all assembled and hanging is just so satisfying.

Fern Plant Amigurumi Car Charm Pattern step 1 Fern Plant Amigurumi Car Charm Pattern step 2 Fern Plant Amigurumi Car Charm Pattern step 3 Fern Plant Amigurumi Car Charm Pattern step 4

Switch Things Up

Iโ€™ve always been a bit of a 'black thumb' when it comes to real plants, especially in the harsh environment of a car! Thatโ€™s why I fell in love with this fern project. Itโ€™s the perfect way to bring that calming green vibe into your vehicle without the mess of soil or the heartbreak of a wilted leaf.

When I first made the leaves, I was worried theyโ€™d be too fiddly, but once you get into the rhythm of those slip-stitch 'teeth', itโ€™s actually quite meditative. I found that using a slightly variegated green yarn for the fiddleheads gives them a really natural look, like theyโ€™re just starting to unfurl in the spring. If you want a more 'boho' look, you could even add a few tiny wooden beads to the hanging straps before attaching them. Itโ€™s those little personal touches that make a pattern like this truly yours. I canโ€™t wait to see yours swinging from a mirrorโ€”it really does make every traffic jam just a little bit more bearable!

Common Mistakes & How to Fix Them

โœ— Using the wrong hook size for the leaves can make them too floppy; stick to the 2.0mm hook to ensure the fronds keep their shape and don't sag.โœ— If you don't stuff the pot firmly before sewing the green circle on top, the plant might look a bit flat or lose its structure once the heavy leaves are attached.โœ— When making the hanging straps, ensure both chains are the exact same length, otherwise your plant will hang at a lopsided angle which can be distracting while driving.โœ— Forgetting to leave long tails on the leaves will make assembly much harder; keep those tails long for secure sewing into the center of the green soil insert.

Fern Plant Amigurumi Car Charm Pattern

Bring a bit of the outdoors into your daily commute with this adorable hanging fern! It's the perfect little companion for your rearview mirror, adding a splash of green without the need for watering. You'll love how the textured fronds sway as you drive, making every trip feel a bit more like a scenic route through the woods.

Intermediate 3-5 Hours

Materials Needed for Fern Plant Amigurumi Car Charm Pattern

โ€” Main Fabric

  • 01
    Super fine (Weight 1) yarn, approximately 50g per skein.
  • 02
    Tan beige yarn for the pot and hanging straps.
  • 03
    Fern green yarn for the leaves, soil, and fiddleheads.

โ€” Tools Required

  • 01
    3.0mm crochet hook for the pot and soil.
  • 02
    2.0mm crochet hook for the delicate leaves and fiddleheads.
  • 03
    Stitch markers to keep track of your rounds.
  • 04
    Tapestry needle for assembly and weaving in ends.
  • 05
    Sharp scissors.
  • 06
    Polyester fiberfill for stuffing the pot.

Progress Tracker

0% Complete

โ€” 1. Pot (Beige Yarn) :

Info :

Use the 3.0mm hook for this section.

Round 1 :

Start with a MR, ch 1, and work 10 sc into the ring (10)

Round 2 :

ch 1, work a pattern of (1 sc, 1 inc) 5 times around (15)

Round 3 :

ch 1, work a pattern of (2 sc, 1 inc) 5 times around (20)

Round 4 :

ch 1, work a pattern of (3 sc, 1 inc) 5 times around (25)

Round 5 :

ch 1, work a pattern of (4 sc, 1 inc) 5 times around (30)

Round 6 :

ch 1, work a pattern of (5 sc, 1 inc) 5 times around (35)

Round 7 :

ch 1, work 35 sc around (35)

Round 8 :

ch 1, work 35 sc around (35)

Round 9 :

ch 1, work 35 sc around (35)

Round 10 :

ch 1, work 35 sc around (35)

โ€” 2. Soil Circle (Green Yarn) :

Info :

Use the 3.0mm hook for this section.

Round 1 :

Start with a MR, ch 2, and work 10 dc into the ring (10)

Round 2 :

ch 2, work 10 dc inc around (20)

Round 3 :

ch 2, work a pattern of (1 dc, 1 inc) 10 times around (30)

Round 4 :

ch 1, work a pattern of (5 sc, 1 inc) 5 times around (35)

โ€” 3. Hanging Straps (Beige Yarn) :

Info :

Make 2 of these straps.

Step 1 :

ch 60 to 70 depending on your preferred hanging length.

โ€” 4. Fern Leaves (Green Yarn) :

Info :

Use the 2.0mm hook. Make 5 leaves total.

Row 1 :

Create a slip knot and ch 27.

Row 2 :

Start in the 2nd ch from the hook and work 4 sl st.

Row 3 :

1 sc, ch 8, then starting in the 2nd ch from the hook work 7 sl st, followed by 1 sc in the main chain.

Row 4 :

1 sl st, 1 sc, ch 8, then starting in the 2nd ch from the hook work 7 sl st, followed by 1 sc in the main chain.

Row 5 :

1 sl st, 1 sc, ch 8, then starting in the 2nd ch from the hook work 7 sl st, followed by 1 sc in the main chain.

Row 6 :

1 sl st, 1 sc, ch 7, then starting in the 2nd ch from the hook work 6 sl st, followed by 1 sc in the main chain.

Row 7 :

1 sl st, 1 sc, ch 7, then starting in the 2nd ch from the hook work 6 sl st, followed by 1 sc in the main chain.

Row 8 :

1 sl st, 1 sc, ch 6, then starting in the 2nd ch from the hook work 5 sl st, followed by 1 sc in the main chain.

Row 9 :

1 sl st, 1 sc, ch 5, then starting in the 2nd ch from the hook work 4 sl st, followed by 1 sc in the main chain.

Row 10 :

1 sl st, 1 sc, ch 4, then starting in the 2nd ch from the hook work 3 sl st, followed by 1 sc in the main chain.

Row 11 :

Work 2 sl st, ch 1, then 2 sl st (this creates the tip of the leaf).

Row 12 :

Working down the other side: 1 sc, ch 4, then starting in the 2nd ch from the hook work 3 sl st, followed by 1 sc in the main chain.

Row 13 :

1 sl st, 1 sc, ch 5, then starting in the 2nd ch from the hook work 4 sl st, followed by 1 sc in the main chain.

Row 14 :

1 sl st, 1 sc, ch 6, then starting in the 2nd ch from the hook work 5 sl st, followed by 1 sc in the main chain.

Row 15 :

1 sl st, 1 sc, ch 7, then starting in the 2nd ch from the hook work 6 sl st, followed by 1 sc in the main chain.

Row 16 :

1 sl st, 1 sc, ch 7, then starting in the 2nd ch from the hook work 6 sl st, followed by 1 sc in the main chain.

Row 17 :

1 sl st, 1 sc, ch 8, then starting in the 2nd ch from the hook work 7 sl st, followed by 1 sc in the main chain.

Row 18 :

1 sl st, 1 sc, ch 8, then starting in the 2nd ch from the hook work 7 sl st, followed by 1 sc in the main chain.

Row 19 :

Work 4 sl st and leave a long tail for sewing.

โ€” 5. Fiddlehead (Green Yarn) :

Info :

Use the 2.0mm hook.

Row 1 :

Create a slip knot and ch 21.

Row 2 :

Beginning in the 2nd ch from the hook, work 12 sc and then 8 hdc. Keep the tail for sewing.

Assembly Instructions

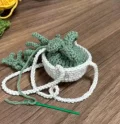
  • Stuff the beige pot firmly with polyester fiberfill, making sure it holds a nice rounded shape and the bottom remains flat enough to sit.
  • Place the green circle on top of the stuffing and sew it carefully to the inner rim of the pot to create the soil base.
  • Position the five fern leaves evenly around the center of the green soil and sew them down securely using the long yarn tails.
  • Tuck the fiddleheads into the center among the leaves, slightly curling the hdc ends to mimic new growth, and sew them in place.
  • Attach the two hanging chains to opposite sides of the pot's top rim so the entire plant can be looped over a rearview mirror.

Important Notes

  • ๐Ÿ’กKeep your tension consistent throughout, especially on the leaves, to ensure the serrated edges look sharp and defined.
  • ๐Ÿ’กThe pattern uses two different hook sizes; keep them separated so you don't accidentally switch them mid-project.
  • ๐Ÿ’กIf your car's mirror is particularly thick, you may want to increase the length of the hanging chains by an extra 10 stitches.
  • ๐Ÿ’กWeave in all your ends as you go, except for the long tails needed for assembly, to keep the project manageable.

I hope you have a blast making this little fern! It's such a rewarding project because it comes together relatively quickly but looks so intricate once it's finished. There's something so cheerful about seeing those little green leaves bouncing along while you're on the road. Don't be afraid to play around with different shades of green for the leaves to give it even more depth and character. This is one plant you definitely won't forget to water! Happy crafting, and enjoy your new little driving buddy! ๐Ÿงถ๐ŸŒฟโœจ

You ask,

we answer.

FAQs

Can I use worsted weight yarn instead of super fine?

Yes, but your plant will end up significantly larger. You'll need to adjust your hook sizes accordingly, perhaps to 3.5mm for the pot and 2.5mm for the leaves.

How do I make the leaves look more realistic?

Try steam blocking the leaves slightly before sewing them on to make the serrated points really stand out and lay flat.

The pot looks a bit gappy, what should I do?

If your stitches are loose and stuffing is showing, try dropping down a hook size for the pot to ensure a denser fabric.

Why are there two different hook sizes used in the pattern?

The 3.0mm hook gives the pot a bit more bulk and speed, while the 2.0mm hook creates the tight, detailed stitches needed for the delicate fern fronds.