About This Velvet Plush Horse Amigurumi Pattern
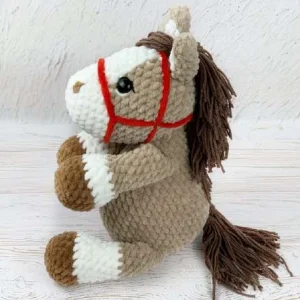
Whether you're making a nursery gift or a new friend for a horse lover, this plushie is designed to be the ultimate snuggle companion that stands out on any shelf.
Ideal for those with basic crocheting experience, featuring slightly more advanced stitches and techniques to expand your skills.
Takes 5-7 hours, making it an enjoyable project to finish over a couple of days.
Playful characters full of personality, designed to spark imagination and become cherished playtime favorites.
Whether you're making a nursery gift or a new friend for a horse lover, this plushie is designed to be the ultimate snuggle companion that stands out on any shelf.
I honestly can't get enough of how the mane looks—using thinner yarn for the hair creates such a realistic contrast against the bulky velvet body. Plus, joining the legs as you go means less sewing later, which is always a win in my book!
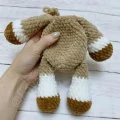
I've always had a soft spot for horses, and making one in this velvet yarn just feels like the ultimate cozy project. When I first made this, I was a bit nervous about the color changes on the face, but they really are what gives the horse its character. If you find the velvet yarn a bit tricky to see, try working under a bright light or feeling for the stitches with your fingers—it gets much easier with practice!
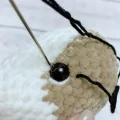
One thing I love to do is customize the mane. I used a dark brown sport weight yarn for mine, but imagine a white horse with a rainbow mane or a black stallion with a silver one! You can really let your creativity run wild here. The needle sculpting for the eyes is also a game changer; it pulls the face together and gives the horse that sweet, soulful expression. Don't rush that part—take your time to get the eyes exactly where you want them before you tie off. It’s those little details that turn a simple crochet project into a treasure you’ll want to keep forever.
You're going to love how soft and squishy this little horse turns out! Using velvet yarn makes it extra cuddly, and the color changes on the face give it so much personality. It's a satisfying project that looks impressive but comes together beautifully once you get the hang of the leg joins. I find that the chunky texture makes the stitches fly by, so you'll have a new stable friend in no time.
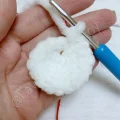
Using white yarn, 6 sc into a MR (6)
6 inc (12)
(1 sc, inc) x 6 (18)
(2 sc, inc) x 6 (24)
24 sc (24)
24 sc (24)
(4 sc, inc) x 4, then work 4 sc (28)
28 sc (28)
Bring in the main color yarn. For the next several rounds, you will alternate between the main color (M) and white (W).
3 sc (M), 6 inc (W), 19 sc (M) (34)
5 sc (M), 9 sc (W), 20 sc (M) (34)
6 sc (M), 7 sc (W), 21 sc (M) (34)
7 sc (M), 5 sc (W), 22 sc (M) (34)
8 sc (M), 3 sc (W), 23 sc (M) (34)
8 sc (M), 3 sc (W), 23 sc (M) (34)
From this point forward, use only the main color yarn. Place safety eyes between Rounds 9 and 10.
(5 sc, dec) x 4, then work 6 sc (30)
30 sc (30)
(4 sc, dec) x 5 (25)
Begin stuffing the head and continue as you go.
(3 sc, dec) x 5 (20)
(2 sc, dec) x 5 (15)
(1 sc, dec) x 5 (10)
2 dec (8)
Cut the yarn. Use a tapestry needle to pick up the front loops of the remaining stitches, pull tight to close the gap, and weave in your tail.
Using main color, 5 sc into a MR (5)
(1 sc, inc) x 2, then 1 sc (7)
7 sc (7)
1 sc (M), inc (W), (1 sc, inc, 2 sc, inc) (M) (10)
inc (M), 3 sc (W), (inc, 5 sc) (M) (12)
2 sc (M), 3 sc (W), 7 sc (M) (12)
2 sc (M), 3 sc (W), 7 sc (M) (12)
Flatten the ear and sl st the bottom edges together. Leave a long tail for sewing.
Using dark hoof color, 6 sc in MR (6)
6 inc (12)
(1 sc, inc) x 6 (18)
BLO 18 sc (18)
18 sc (18)
18 sc (18)
Switch to white yarn. BLO 18 sc (18)
(3 sc, dec) x 3, then 3 sc (15)
15 sc (15)
Stuff the lower half of the leg.
Switch to main color. (3 sc, dec) x 3 (12)
12 sc (12)
Flatten the top and work 6 sc through both layers to close. Fasten off.
Using dark hoof color, 6 sc in MR (6)
6 inc (12)
(1 sc, inc) x 6 (18)
BLO 18 sc (18)
18 sc (18)
18 sc (18)
Switch to white yarn. BLO 18 sc (18)
(3 sc, dec) x 3, then 3 sc (15)
15 sc (15)
Stuff about two-thirds of the leg.
(3 sc, dec) x 3 (12)
12 sc (12)
Switch to main color. 12 sc (12)
Flatten the top and work 6 sc through both layers to close. Fasten off.
Using main color, 6 sc in MR (6)
6 inc (12)
(1 sc, inc) x 6 (18)
(2 sc, inc) x 6 (24)
(3 sc, inc) x 6 (30)
(4 sc, inc) x 6 (36)
(5 sc, inc) x 6 (42)
6 sc, 6 sc through first hind leg and body, 15 sc, 6 sc through second hind leg and body, 9 sc (42)
42 sc (42)
32 sc, (3 sc, dec) x 2 (40)
3 sc, dec, 35 sc (39)
(5 sc, dec) x 5, then 4 sc (34)
34 sc (34)
(4 sc, dec) x 5, then 4 sc (29)
29 sc (29)
(3 sc, dec) x 5, then 4 sc (24)
5 sc, 6 sc through first foreleg and body, 5 sc, 6 sc through second foreleg and body, 2 sc (24)
Stuff the body firmly as you continue.
(2 sc, dec) x 6 (18)
18 sc (18)
7 sc, 8 sl st, 3 sc (18)
7 sc, sl st (8)
Fasten off and leave a long tail for attaching the head.
I really hope you enjoyed making this sweet little horse as much as I did! There's something so magical about seeing that little face come to life with the needle sculpting and the mane. Don't forget to give your new friend a name and maybe a little brush-through of that tail. If you're feeling adventurous, try making a whole stable in different colors! This horse is the perfect size for hugging and makes such a thoughtful, handmade gift for someone special. Happy crafting, and I can't wait to see your finished ponies! 🧶🐴✨
Yes, but your horse will be much smaller and you'll need to drop your hook size to about 2.5mm or 3mm to keep the stuffing from showing.
You can embroider the eyes with black yarn instead, which actually makes the toy safer for very small children!
You can simply add more bundles! The pattern suggests 2 per row, but you can crowd them closer together for a thicker, more luscious look.
The 4mm is for the tight stitches of the body, while the 5mm makes it much easier to pull the many strands of the mane through the plush fabric.
