🧶 Beautiful ✨ Detailed 💝 Adorable

SpaceBall Sensory Toy Amigurumi Pattern

SpaceBall Sensory Toy Amigurumi Pattern
4.2★Rating
5-7 HoursTime Needed
2.0KMade This
✂️

Intermediate Level

Ideal for those with basic crocheting experience, featuring slightly more advanced stitches and techniques to expand your skills.

⏱️

Weekend Treat

Takes 5-7 hours, making it an enjoyable project to finish over a couple of days.

🐰

Whimsical Buddy

Playful characters full of personality, designed to spark imagination and become cherished playtime favorites.

About This SpaceBall Sensory Toy Amigurumi Pattern

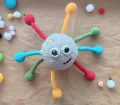
SpaceBall Sensory Toy Amigurumi Pattern crochet pattern - detailed view

A great gift for first birthdays or new parents looking for handmade, safe toys that encourage exploration and curiosity. It looks wonderful in a nursery and provides hours of entertainment.

Why You'll Love This SpaceBall Sensory Toy Amigurumi Pattern

I love how this isn't just a static plushie; it's a "living" toy that moves! Seeing a child's eyes light up when they realize they can pull the arms through is the best reward for a few hours of work. It's also a fantastic stash-buster for all those leftover cotton scraps.

SpaceBall Sensory Toy Amigurumi Pattern step 1 SpaceBall Sensory Toy Amigurumi Pattern step 2 SpaceBall Sensory Toy Amigurumi Pattern step 3 SpaceBall Sensory Toy Amigurumi Pattern step 4

Switch Things Up

I’ve always believed that the best toys are the ones that invite you to touch, pull, and explore. When I first sat down to design this SpaceBall, I wanted to create something that wasn’t just a shelf-sitter, but a real tool for development. There’s something so satisfying about the mechanics of the sliding arms—it’s like a little puzzle for tiny fingers to solve.

Working on the body can be a bit of a juggle since you’re managing the arm pieces as you go, but I promise it’s worth the effort. I found that using a slightly smaller hook than usual really helps keep the fabric dense, which is key for a toy that’s going to get a lot of tugging. My favorite part was picking out the bright, high-contrast colors for the arms. It’s a fantastic way to clear out those odd balls of yarn we all have tucked away! I hope this project brings a little bit of cosmic joy to your crochet hook and a lot of smiles to the little one who ends up playing with it. It’s truly a labor of love.

Common Mistakes & How to Fix Them

✗ If you accidentally stuff the central part of the arms, they will become too bulky to slide through the body openings properly.✗ Failing to use stitch markers during the body rounds can lead to misaligned arm holes, making the toy look lopsided or uneven.✗ Make sure your decreases are tight; otherwise, the fiberfill might start to poke through the stitches when the arms are being pulled.✗ When embroidering the facial features, ensure you knot the yarn securely inside the head so the details don't come loose during rough play.

SpaceBall Sensory Toy Amigurumi Pattern

If you're looking for a project that's as fun to play with as it is to make, you've found it! This SpaceBall is a hit with little ones because of its unique sliding arms. It's a wonderful way to use up those colorful scraps in your stash while creating something truly interactive. You'll love seeing how the simple mechanics of crochet can create a toy that keeps tiny hands busy for hours.

Intermediate 5-7 Hours

Materials Needed for SpaceBall Sensory Toy Amigurumi Pattern

— Main Fabric

  • 01
    Cotton and acrylic blend yarn, such as YarnArt Jeans (50g/160m).
  • 02
    Main body: Grey (shade 80).
  • 03
    Arms: Red (26), Green (69), Yellow (35), and Blue (33).
  • 04
    Details: Small amounts of Black (53) and White (03).

— Tools Required

  • 01
    2mm crochet hook for a nice tight fabric.
  • 02
    Polyester fiberfill for stuffing the ball and arm ends.
  • 03
    Large-eye tapestry needle for assembly and embroidery.
  • 04
    Sharp scissors.
  • 05
    Stitch markers to keep track of your rounds.
  • 06
    A wooden stick or chopstick to help position the stuffing.

Progress Tracker

0% Complete

— 1. Arms (Make 4 in different colors) :

Info :

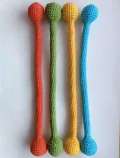
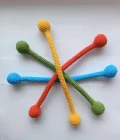
Make four arms in total using red, green, yellow, and blue yarn. Only the bulbous ends are stuffed; the long middle section must remain hollow.

Round 1 :

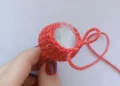
Start with 6 SC into a MR (6)

Round 2 :

Work 6 INC around (12)

Round 3 :

Repeat (1 SC, INC) 6 times (18)

Round 4 :

Repeat (2 SC, INC) 6 times (24)

Round 5-8 :

Work 24 SC in each round for 4 rounds (24)

Round 9 :

Repeat (DEC, 2 SC) 6 times (18)

Info :

Fill the bulbous end firmly with stuffing.

Round 10 :

Repeat (DEC, 1 SC) 6 times (12)

Round 11 :

Repeat (DEC, 2 SC) 3 times (9)

Round 12-71 :

Crochet 9 SC in every round for the next 60 rounds (9)

Info :

Do not stuff this long tube section; it needs to stay flat to slide through the body.

Round 72 :

Repeat (INC, 2 SC) 3 times (12)

Round 73 :

Repeat (1 SC, INC) 6 times (18)

Round 74 :

Repeat (2 SC, INC) 6 times (24)

Round 75-78 :

Work 24 SC in each round for 4 rounds (24)

Round 79 :

Repeat (DEC, 2 SC) 6 times (18)

Info :

Fill this second bulbous end firmly with stuffing.

Round 80 :

Repeat (DEC, 1 SC) 6 times (12)

Round 81 :

Work 6 DEC, then fasten off (6)

— 2. Main Body :

Info :

Use grey yarn. You will be incorporating the arms into the body as you go, so keep them nearby.

Round 1 :

Start with 6 SC into a MR (6)

Round 2 :

Work 6 INC around (12)

Round 3 :

Repeat (1 SC, INC) 6 times (18)

Round 4 :

Repeat (2 SC, INC) 6 times (24)

Round 5 :

Repeat (3 SC, INC) 6 times (30)

Round 6 :

Repeat (4 SC, INC) 6 times (36)

Round 7 :

Repeat (5 SC, INC) 6 times (42)

Round 8 :

CH 3 and skip 3 stitches, insert the yellow arm, 3 SC, INC, (6 SC, INC) twice, CH 3 and skip 3 stitches, insert the red arm, 3 SC, INC, (6 SC, INC) twice (48)

Round 9 :

Repeat (7 SC, INC) 6 times, ensuring you work 1 SC into each of the chains from the previous round (54)

Round 10 :

Repeat (8 SC, INC) 6 times (60)

Round 11 :

Repeat (9 SC, INC) 6 times (66)

Round 12 :

Repeat (10 SC, INC) 6 times (72)

Round 13 :

Repeat (11 SC, INC) 6 times (78)

Round 14 :

Repeat (12 SC, INC) 6 times (84)

Round 15-18 :

Work 84 SC in each round for 4 rounds (84)

Round 19 :

6 SC, CH 3 and skip 3 stitches, insert the green arm, 39 SC, CH 3 and skip 3 stitches, insert the blue arm, 33 SC (84)

Round 20-24 :

Work 84 SC in each round for 5 rounds (84)

Round 25 :

3 SC, CH 3 and skip 3 stitches, insert the other end of the blue arm, 39 SC, CH 3 and skip 3 stitches, insert the other end of the green arm, 36 SC (84)

Round 26-29 :

Work 84 SC in each round for 4 rounds (84)

Round 30 :

Repeat (DEC, 12 SC) 6 times (78)

Round 31 :

Repeat (DEC, 11 SC) 6 times (72)

Info :

Begin stuffing the body around the arms.

Round 32 :

Repeat (DEC, 10 SC) 6 times (66)

Round 33 :

Repeat (DEC, 9 SC) 6 times (60)

Round 34 :

Repeat (DEC, 8 SC) 6 times (54)

Round 35 :

Repeat (DEC, 7 SC) 6 times (48)

Round 36 :

DEC, 1 SC, CH 3 and skip 3 stitches, insert the other end of the red arm, 2 SC, DEC, (6 SC, DEC) twice, 1 SC, CH 3 and skip 3 stitches, insert the other end of the yellow arm, 2 SC, (DEC, 6 SC) twice (42)

Round 37 :

Repeat (DEC, 5 SC) 6 times, working 1 SC into each chain stitch (36)

Round 38 :

Repeat (DEC, 4 SC) 6 times (30)

Info :

Finish stuffing the ball firmly, ensuring it has a nice round shape.

Round 39 :

Repeat (DEC, 3 SC) 6 times (24)

Round 40 :

Repeat (DEC, 2 SC) 6 times (18)

Round 41 :

Repeat (DEC, 1 SC) 6 times (12)

Round 42 :

Work 6 DEC, then fasten off and weave in the tail (6)

— 3. Eyes (Make 2) :

Round 1 :

Using black yarn, work 6 SC into a MR (6)

Round 2 :

Work 6 INC around (12)

Round 3 :

Repeat (1 SC, INC) 6 times, then SL ST and fasten off (18)

— 4. Eye Edging & Details :

Info :

After securing the eyes to the body, you will crochet a border directly onto the face.

Round 1 :

Insert your hook into the body around the eye and work 15 SC in a circle (15)

Round 2 :

Work another round of 15 SC, then SL ST to finish (15)

— 5. Finishing the Arm Openings :

Info :

To give the toy a professional look and keep stuffing inside, work a border around each of the 8 arm holes.

Round 1 :

Attach grey yarn to the corner of a hole and work 3 SC along the side, 2 SC in the corner, 3 SC along the other side, and 2 SC in the final corner (10)

Round 2 :

Work 10 SC around the opening, then SL ST to finish (10)

Assembly Instructions

  • Insert the hollow sections of the arms into the designated chain-space holes as you crochet the body to create the sliding mechanism.
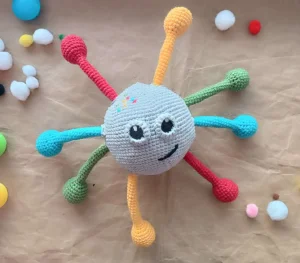
  • Attach the black eye circles between Rounds 25 and 29, ensuring they are spaced about 4 stitches apart for a balanced face.
  • Secure the eyes using white yarn to create highlights and small semicircles along the bottom edge for a friendly expression.
  • Crochet two rounds of single crochet directly onto the body around each eye to create a raised, finished border.
  • Finish each of the 8 arm exits by working two rounds of single crochet around the openings to prevent stuffing from escaping.
  • Embroider a simple black mouth below the left eye, spanning about two stitches between Rounds 30 and 32.
  • Add decorative cross-stitches in various colors across the top and back of the ball to give it a fun, cosmic appearance.

Important Notes

  • 💡Maintain a very firm tension throughout the project to prevent the stuffing from being visible through the stitches.
  • 💡The 60-round section of each arm must remain completely hollow to allow for the sliding feature to work correctly.
  • 💡Use a chopstick or similar tool to push any stray stuffing back into the body before finishing the borders around the arm holes.
  • 💡Always count your stitches carefully after rounds that involve chain spaces to ensure the body remains perfectly spherical.
  • 💡Fasten off and weave in all ends very securely, as this toy is designed for active play and pulling.

I hope you have as much fun making this little SpaceBall as I did! It’s such a rewarding project because it’s both a toy and a learning tool. Don’t be afraid to experiment with your own color combinations—the brighter, the better! Once you finish, you'll have a durable, handmade companion that's ready for years of play. It's the kind of project that reminds you why we love to craft in the first place—making something useful, beautiful, and totally unique for the people we love most. Happy stitching! 🧶✨
You ask,

we answer.

FAQs

Is this toy safe for infants under one year old?

While the pattern is designed for toddlers, always ensure every piece is sewn on extremely securely and check for wear and tear regularly.

Can I use acrylic yarn instead of a cotton blend?

You can, but cotton blends like the one recommended provide better stitch definition and are generally more durable for toys that get handled often.

Why are the arms difficult to pull through the body?

This usually happens if the body is overstuffed or if the single crochet borders around the arm holes are worked too tightly. Try loosening them slightly.

How do I keep the stuffing from coming out of the arm holes?

The pattern includes a specific two-round border for each hole. Crocheting these rounds helps seal the edges and keeps the fiberfill where it belongs.