🧶 Beautiful ✨ Detailed 💝 Adorable

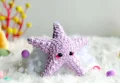
Plush Purple Starfish Amigurumi Pattern

Plush Purple Starfish Amigurumi Pattern
4.0★Rating
3-4 HoursTime Needed
3.9KMade This
✂️

Intermediate Level

Ideal for those with basic crocheting experience, featuring slightly more advanced stitches and techniques to expand your skills.

⏱️

Quick Craft

Fits nicely into a free afternoon — 2 to 5 hours of focused, enjoyable crocheting.

🐰

Whimsical Buddy

Playful characters full of personality, designed to spark imagination and become cherished playtime favorites.

About This Plush Purple Starfish Amigurumi Pattern

Plush Purple Starfish Amigurumi Pattern crochet pattern - detailed view

Whether you're decorating a nursery or looking for a cute keychain companion, this starfish fits right in. It's a fantastic way to use up those scraps of super bulky yarn you have tucked away.

Why You'll Love This Plush Purple Starfish Amigurumi Pattern

I really enjoyed how this construction works—joining the belly and back to grow the arms directly from the body is so satisfying. It feels like magic seeing the shape appear without having to sew five separate limbs on at the end. Plus, using a smaller hook with chunky yarn gives it that perfect, tight stitch that hides the stuffing beautifully.

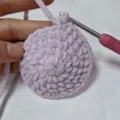
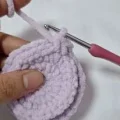
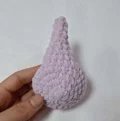
Plush Purple Starfish Amigurumi Pattern step 1 Plush Purple Starfish Amigurumi Pattern step 2 Plush Purple Starfish Amigurumi Pattern step 3 Plush Purple Starfish Amigurumi Pattern step 4

Switch Things Up

I remember the first time I tried a pattern where you grew the limbs directly from two flat pieces—it felt like a total game changer! No more sewing on five separate legs and hoping they're all spaced evenly. For this little purple guy, I really wanted that classic beachy vibe, but I've also seen people make these in bright neons or even sparkly yarn for a 'star' look.

One thing I love to do is add a little bit of weighted beads or poly-pellets at the very bottom of the belly before I finish the last arm. It gives the starfish a nice 'sit' and makes it feel a bit more substantial in your hand. If you're feeling extra creative, try changing the embroidery colors for the spots—a soft mint or a bright yellow would look stunning against the purple fabric. This is one of those patterns that's so quick, you'll find yourself making a whole colony of them before the weekend is over!

Common Mistakes & How to Fix Them

✗ If you don't keep your tension consistent when joining the belly and back, the base of the arms might look lopsided or have small gaps.✗ Miscounting the stitches on the flat circles will throw off the arm placement later, so double-check you have exactly 30 stitches on both pieces before starting the limbs.✗ Placing the safety eyes too high or too low can change the starfish's expression entirely; make sure they sit right between rounds 3 and 4 of the back piece.✗ It's easy to overstuff the very tips of the arms, which can make them look pointy rather than rounded—add your fiberfill gradually as you taper down.

Plush Purple Starfish Amigurumi Pattern

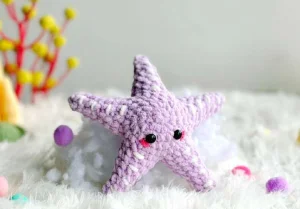
I've always had a soft spot for ocean-inspired makes, and this little starfish is just the sweetest addition to any plushie collection. Using super bulky yarn makes it incredibly squishy and fast to whip up, which is perfect when you need a quick gift. You'll love how the texture feels in your hands as you work through the rounds. It's a wonderful project for relaxing on the sofa with a cup of tea.

Intermediate 3-4 Hours

Materials Needed for Plush Purple Starfish Amigurumi Pattern

— Main Fabric

  • 01
    Super bulky weight yarn (Category 6) in a soft purple shade
  • 02
    Scraps of pink and orange embroidery thread or thinner yarn for the facial details and spots

— Tools Required

  • 01
    3.5mm (E) crochet hook
  • 02
    Stitch markers to keep track of your rounds
  • 03
    Large-eye sewing needle for assembly and embroidery
  • 04
    Sharp scissors
  • 05
    8mm plastic safety eyes
  • 06
    Hot glue gun for securing details
  • 07
    High-quality polyester fiberfill stuffing

Progress Tracker

0% Complete

— 1. Starfish Belly :

Round 1 :

Start with a MR and work 5 sc into it. (5)

Round 2 :

Work 2 sc into every st around. (10)

Round 3 :

Continue by making 2 sc in each of the next 10 st. (20)

Round 4 :

Repeat the sequence of 1 sc followed by an inc 10 times. (30)

Info :

Fasten off and cut your yarn.

— 2. Starfish Back :

Round 1 :

Create a MR and place 6 sc inside. (6)

Round 2 :

Work an inc in every st around the circle. (12)

Round 3 :

Work a pattern of 1 sc then an inc, repeating 6 times. (18)

Round 4 :

Work 2 sc followed by an inc, repeating the set 6 times. (24)

Round 5 :

Complete the circle by working 3 sc and then an inc, repeating 6 times. (30)

— 3. First Arm :

Info :

You will now join the back and belly pieces together to form the first limb.

Round 6 :

Work 6 sc through the stitches of the back, then continue with 6 sc through the stitches of the belly to connect them. (12)

Round 7 :

Simply work 1 sc into every st around. (12)

Round 8 :

Work 2 sc and then a dec, repeating this 3 times around the arm. (9)

Round 9 :

Crochet 1 sc in each of the 9 st. (9)

Round 10 :

Crochet 2 sc, then a dec, followed by 3 sc and one final dec. (7)

Round 11 :

Place 1 sc in every st around. (7)

Round 12 :

Start with a dec, then 1 sc, another dec, and finish with 2 sc. (5)

Round 13 :

Work 1 sc in each of the remaining 5 st. (5)

Info :

Add fiberfill as you go, then fasten off and cut the yarn.

— 4. Second Arm :

Round 6 :

Join the yarn to the next available st on the back and work 6 sc, then 6 sc on the next belly stitches. (12)

Round 7 :

Work 1 sc into every st around. (12)

Round 8 :

Repeat (2 sc, dec) 3 times. (9)

Round 9 :

Work 1 sc in each of the 9 st. (9)

Round 10 :

Work 2 sc, dec, 3 sc, dec. (7)

Round 11 :

Work 1 sc in every st around. (7)

Round 12 :

Work dec, 1 sc, dec, 2 sc. (5)

Round 13 :

Work 1 sc in each of the 5 st. (5)

Info :

Stuff the arm, fasten off, and cut the yarn.

— 5. Third Arm :

Round 6 :

Work 6 sc on the back and 6 sc on the belly to join. (12)

Round 7 :

Work 1 sc into every st around. (12)

Round 8 :

Repeat (2 sc, dec) 3 times. (9)

Round 9 :

Work 1 sc in each of the 9 st. (9)

Round 10 :

Work 2 sc, dec, 3 sc, dec. (7)

Round 11 :

Work 1 sc in every st around. (7)

Round 12 :

Work dec, 1 sc, dec, 2 sc. (5)

Round 13 :

Work 1 sc in each of the 5 st. (5)

Info :

Add stuffing, fasten off, and cut the yarn.

— 6. Fourth Arm :

Round 6 :

Work 6 sc on the back and 6 sc on the belly to join. (12)

Round 7 :

Work 1 sc into every st around. (12)

Round 8 :

Repeat (2 sc, dec) 3 times. (9)

Round 9 :

Work 1 sc in each of the 9 st. (9)

Round 10 :

Work 2 sc, dec, 3 sc, dec. (7)

Round 11 :

Work 1 sc in every st around. (7)

Round 12 :

Work dec, 1 sc, dec, 2 sc. (5)

Round 13 :

Work 1 sc in each of the 5 st. (5)

Info :

Stuff the arm, fasten off, and cut the yarn.

— 7. Fifth Arm :

Round 6 :

Work 6 sc on the back and 6 sc on the belly to join. (12)

Round 7 :

Work 1 sc into every st around. (12)

Round 8 :

Repeat (2 sc, dec) 3 times. (9)

Round 9 :

Work 1 sc in each of the 9 st. (9)

Round 10 :

Work 2 sc, dec, 3 sc, dec. (7)

Round 11 :

Work 1 sc in every st around. (7)

Round 12 :

Work dec, 1 sc, dec, 2 sc. (5)

Round 13 :

Work 1 sc in each of the 5 st. (5)

Info :

Final stuffing of the body and arm before fastening off and weaving in all ends.

Assembly Instructions

  • Position the 8mm safety eyes between rounds 3 and 4 of the back piece, leaving a space of 4 stitches between them.
  • Once the eyes are secure, use your pink thread to embroider a tiny, cheerful mouth centered just below the eyes.
  • Take your orange yarn or thread and add small decorative 'spikes' or spots across the top of the starfish's back and arms.
  • Ensure all five arms are stuffed firmly but evenly before closing the final gaps and weaving in all your ends for a clean finish.

Important Notes

  • 💡When joining the belly and back, make sure the 'right' sides of the fabric are facing outward for a professional look.
  • 💡Using a 3.5mm hook with bulky yarn creates a very stiff fabric, which is great for keeping the starfish's shape but can be tough on the hands—take breaks!
  • 💡If your magic ring leaves a hole, pull the tail tight and use your needle to sew it closed from the inside before you get too far.
  • 💡Count your stitches carefully on Round 6 of the arms to ensure you're using exactly 6 stitches from each circle piece.

I hope you enjoyed making this little ocean dweller as much as I did! There's something so rewarding about seeing those five little arms take shape one by one. This starfish is the perfect size to sit on a shelf or brighten up a workspace. Don't forget to share your finished photos with the community—I'd love to see what colors you chose for yours! Happy crocheting, and may your stitches always be even and your yarn never tangle. 🧶 ✨ 🌊
You ask,

we answer.

FAQs

Can I use a different yarn weight like worsted or blanket yarn?

Absolutely! Just remember to adjust your hook size accordingly. Blanket yarn will make a jumbo starfish, while worsted weight will result in a much smaller, delicate version.

The arm joining part seems tricky, any tips?

It helps to use stitch markers to mark out the 6-stitch sections on both the belly and back circles before you start crocheting them together.

My starfish arms look a bit flat, what happened?

This usually happens if they aren't stuffed enough. Try using the back of your crochet hook to push fiberfill right down into the tips of the arms as you work.

Do I have to use safety eyes?

Not at all. If you're making this for a very young child, I highly recommend embroidering the eyes with black yarn instead to avoid any choking hazards.