🧶 Beautiful ✨ Detailed 💝 Adorable

Le Père Noël Amigurumi Pattern

Le Père Noël Amigurumi Pattern
4.3★Rating
5-7 HoursTime Needed
1.8KMade This
✂️

Intermediate Level

Ideal for those with basic crocheting experience, featuring slightly more advanced stitches and techniques to expand your skills.

⏱️

Weekend Treat

Takes 5-7 hours, making it an enjoyable project to finish over a couple of days.

🎄

Holiday Cheer

Festive fun for the season, bringing handmade magic to celebrations and creating new family traditions.

About This Le Père Noël Amigurumi Pattern

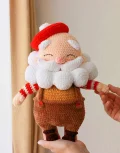
Le Père Noël Amigurumi Pattern crochet pattern - detailed view

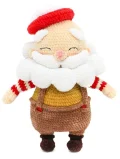
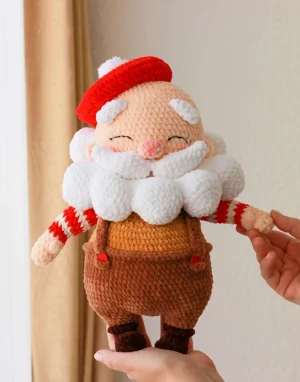
This Santa is the ultimate holiday gift for anyone who appreciates handmade craftsmanship. He looks absolutely darling perched on a mantle or as a centerpiece for your Christmas table display.

Why You'll Love This Le Père Noël Amigurumi Pattern

I honestly think the best part of this pattern is the beard construction. Joining those little spheres together to create that fluffy, cloud-like look is so satisfying! It gives the finished toy such a high-end, professional feel that you will be so proud to show off.

Le Père Noël Amigurumi Pattern step 1 Le Père Noël Amigurumi Pattern step 2 Le Père Noël Amigurumi Pattern step 3 Le Père Noël Amigurumi Pattern step 4

Switch Things Up

There is something so incredibly nostalgic about making a Santa Claus, but I wanted this version to feel a bit more whimsical and unique. That is why I fell in love with the 'bubble' beard and the beret—it gives him such a distinct personality that stands out from traditional holiday decor. I remember the first time I tried joining multiple spheres for a beard; it felt like a little puzzle, but seeing it all come together is so satisfying.

One tip I have for you: when you are working on the striped arms, try to keep your color changes on the inside of the arm where they will be less visible. If you find your spiral is shifting the stripes too much, don't be afraid to add a shift stitch to keep everything lined up. It makes a world of difference in the final look! I also highly recommend using a bit of pink pastel or even actual blush for his nose and cheeks. It transforms him from a simple toy into a character with a story. I hope you enjoy every stitch of this festive project as much as I did. Happy crocheting!

Common Mistakes & How to Fix Them

✗ When joining the legs to the central connector in Round 12, it is very common to leave small gaps at the corners; be sure to use your yarn tail to sew these shut from the inside.✗ The arms must be attached with the thumbs pointing forward during Round 32, or your Santa will look a bit backwards once he is fully assembled.✗ If you don't stuff the individual 'bubbles' of the beard slightly before sewing it to the face, they may lose their rounded shape over time and look flat.✗ The color changes on the striped arms can shift diagonally; I recommend adding a shift stitch if the line moves too far toward the front of the arm.

Le Père Noël Amigurumi Pattern

Get ready to bring the magic of a cozy Christmas right into your living room! This Le Père Noël pattern is one of my absolute favorites because it combines classic holiday charm with a unique, whimsical style. You will love crafting his distinctive 'bubble' beard and that stylish red beret that gives him such a wonderful personality. Whether you are making him as a centerpiece for your festive display or as a precious heirloom gift, this project is sure to fill your crafting time with joy.

Intermediate 5-7 Hours

Materials Needed for Le Père Noël Amigurumi Pattern

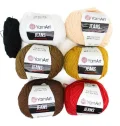
— Main Fabric

  • 01
    Medium weight semi-cotton yarn in deep brown for the sturdy little shoes.
  • 02
    Rich brown yarn for the cozy trousers and matching overall straps.
  • 03
    Crisp white or ivory yarn for the iconic beard, mustache, eyebrows, hair, and sleeve stripes.
  • 04
    Warm mustard yellow yarn for the main body of the shirt.
  • 05
    Soft cream yarn for the head, nose, and ears to give him a gentle look.
  • 06
    Bright red yarn for the festive beret and the contrasting sleeve stripes.

— Tools Required

  • 01
    2.2 mm crochet hook (or size needed to achieve a tight fabric with your chosen yarn).
  • 02
    Small red buttons (approximately 0.6 to 1 cm) for the overall straps.
  • 03
    Thin black embroidery thread for detailing the sleepy eyes and lashes.
  • 04
    Soft pink artistic pastel or blush for adding a rosy glow to the cheeks and nose.
  • 05
    High-quality fiberfill stuffing to keep him soft yet firm.
  • 06
    Stitch markers and long pins for positioning the many pieces before sewing.
  • 07
    Darning needle for assembly and scissors for finishing.

Progress Tracker

0% Complete

— 1. Arms (Make 2) :

Foundation :

Using cream yarn, ch 5.

Round 1 :

Starting in the 2nd ch from hook, work 3 SC, then 3 SC into the final ch. Turn to work along the opposite side of the ch: 2 SC, 1 INC (10)

Round 2 :

(4 SC, INC) repeat 2 times (12)

Round 3-4 :

12 SC (12)

Round 5 :

5 SC, 1 PS, 6 SC (12)

Round 6 :

12 SC (12)

Colour Change :

Switch to red yarn.

Round 7-8 :

12 SC (12)

Colour Change :

Switch to white yarn.

Round 9 :

(INC, 5 SC) repeat 2 times (14)

Round 10 :

14 SC (14)

Colour Change :

Switch to red yarn.

Round 11 :

(INC, 6 SC) repeat 2 times (16)

Round 12 :

16 SC (16)

Colour Change :

Switch to white yarn.

Round 13-14 :

16 SC (16)

Colour Change :

Switch to red yarn.

Round 15-16 :

16 SC (16)

Colour Change :

Switch to white yarn.

Round 17-18 :

16 SC (16)

Info :

Stuff the palm firmly and the rest of the arm lightly. Work extra SC to reach the side edge, fasten off, and leave a tail.

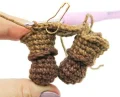
— 2. Legs (Make 2) :

Foundation :

Using deep-brown yarn, ch 7.

Round 1 :

Starting in the 2nd ch from hook, work 5 SC, 3 SC in the last ch. On the other side of the ch: 4 SC, 1 INC (14)

Round 2 :

1 INC, 4 SC, 3 INC, 4 SC, 2 INC (20)

Round 3 :

20 SC (20)

Round 4 :

4 SC, 6 DEC, 4 SC (14)

Round 5 :

3 SC, 4 DEC, 3 SC (10)

Round 6 :

(INC, 4 SC) repeat 2 times (12)

Round 7 :

(3 SC, INC) repeat 3 times (15)

Colour Change :

Switch to brown yarn.

Round 8 :

BLO: 15 SC (15)

Round 9 :

(4 SC, INC) repeat 3 times (18)

Round 10 :

18 SC (18)

Round 11 :

(5 SC, INC) repeat 3 times (21)

Info :

Fasten off and cut the thread. Turn the leg over and attach brown yarn to the FLO of Round 8 to work 15 SC for the boot cuff detail.

— 3. Leg Connector :

Round 1 :

Using brown yarn, 8 SC in MR (8)

Round 2 :

8 INC (16)

Round 3 :

(SC, INC) repeat 8 times (24)

Info :

Do not fasten off. This piece will join the legs together.

— 4. Body & Head :

Round 12 :

Join legs to connector: On left leg work (2 SC, INC)*2, 3 SC, INC, 2 SC, INC, 2 SC. On connector work INC, 4 SC, INC. On right leg work (2 SC, INC)*2, 3 SC, INC, 2 SC, INC, 2 SC. On connector work INC, 4 SC, INC (54)

Round 13 :

5 SC, INC, 4 SC, (2 SC, INC)*8, 6 SC, INC, 5 SC, INC, 6 SC, INC (66)

Round 14 :

15 SC, (3 SC, INC)*6, 27 SC (72)

Round 15-25 :

72 SC (72)

Colour Change :

Switch to mustard yarn.

Round 26 :

BLO: 72 SC (72)

Round 27-28 :

72 SC (72)

Info :

Return to Round 26 and work FLO 72 SC in brown to create the top edge of the trousers.

Round 29 :

20 SC, (3 SC, DEC)*6, 22 SC (66)

Round 30 :

20 SC, (2 SC, DEC)*6, 22 SC (60)

Round 31 :

20 SC, (SC, DEC)*6, 22 SC (54)

Round 32 :

Attaching arms: 10 SC, 8 SC through both arm and body, 18 SC, 8 SC through both arm and body, 10 SC (54)

Round 33 :

10 SC, 8 SC along the outer edge of the arm, 18 SC, 8 SC along the outer edge of the arm, 10 SC (54)

Round 34 :

(7 SC, DEC) repeat 6 times (48)

Round 35 :

48 SC (48)

Round 36 :

(6 SC, DEC) repeat 6 times (42)

Round 37 :

(5 SC, DEC) repeat 6 times (36)

Round 38 :

(4 SC, DEC) repeat 6 times (30)

Round 39 :

(3 SC, DEC) repeat 6 times (24)

Colour Change :

Switch to cream yarn.

Round 40 :

24 SC (24)

Round 41 :

(SC, INC) repeat 12 times (36)

Round 42 :

(2 SC, INC) repeat 12 times (48)

Round 43 :

(3 SC, INC) repeat 12 times (60)

Round 44-55 :

60 SC (60)

Round 56 :

(8 SC, DEC) repeat 6 times (54)

Round 57 :

(7 SC, DEC) repeat 6 times (48)

Round 58 :

(6 SC, DEC) repeat 6 times (42)

Round 59 :

(5 SC, DEC) repeat 6 times (36)

Round 60 :

(4 SC, DEC) repeat 6 times (30)

Round 61 :

(3 SC, DEC) repeat 6 times (24)

Round 62 :

(2 SC, DEC) repeat 6 times (18)

Round 63 :

(SC, DEC) repeat 6 times (12)

Round 64 :

6 DEC (6)

— 5. Straps (Make 2) :

Row 1 :

Using brown yarn, ch 37. Starting in the 3rd ch from hook, work 35 HDC. Fasten off and leave a long tail for sewing.

— 6. Nose :

Round 1 :

Using cream yarn, 6 SC in MR (6)

Round 2 :

6 INC (12)

Round 3 :

12 SC (12)

— 7. Beard :

Info :

First, crochet 5 identical small details. For each: R1: 6 SC in MR. R2: 6 INC (12). R3: (SC, INC)*6 (18). R4: (2 SC, INC)*6 (24). R5: 24 SC. Fasten off 4 details, but keep the thread on the 5th.

Round 6 :

Join details: 12 SC on detail 5, 12 SC on detail 4, 12 SC on detail 3, 12 SC on detail 2, 24 SC on detail 1, 12 SC on detail 2, 12 SC on detail 3, 12 SC on detail 4, 12 SC on detail 5 (120)

Round 7 :

(2 SC, DEC) repeat 30 times (90)

Round 8 :

90 SC (90)

Round 9 :

(SC, DEC) repeat 30 times (60)

Round 10-13 :

60 SC (60)

— 8. Mustache (Make 2) :

Round 1 :

Using white yarn, 6 SC in MR (6)

Round 2 :

6 SC (6)

Round 3 :

3 INC, 3 SC (9)

Round 4 :

9 SC (9)

Round 5 :

(SC, INC) repeat 3 times, 3 SC (12)

Round 6 :

12 SC (12)

Round 7 :

(2 SC, INC) repeat 3 times, 3 SC (15)

Round 8-9 :

15 SC (15)

Round 10 :

(2 SC, DEC) repeat 3 times, 3 SC (12)

Round 11 :

(SC, DEC) repeat 3 times, 3 SC (9)

Round 12 :

3 DEC, 3 SC (6)

— 9. Eyebrows (Make 2) :

Round 1 :

Using white yarn, 6 SC in MR (6)

Round 2-4 :

6 SC (6)

Round 5 :

3 DEC (3)

— 10. Hair :

Info :

Crochet 4 identical small details using the same pattern as the Beard's initial details (R1-5). Fasten off 3 and keep thread on the 4th.

Round 6 :

Join details: 12 SC on detail 4, 12 SC on detail 3, 12 SC on detail 2, 24 SC on detail 1, 12 SC on detail 2, 12 SC on detail 3, 12 SC on detail 4 (96)

Round 7 :

(2 SC, DEC) repeat 24 times (72)

Round 8-9 :

72 SC (72)

— 11. Ears (Make 2) :

Round 1 :

Using cream yarn, 7 SC in MR. Do not join the round; fasten off and leave a tail for sewing.

— 12. Beret :

Round 1 :

Using red yarn, 8 SC in MR (8)

Round 2 :

8 INC (16)

Round 3 :

(SC, INC) repeat 8 times (24)

Round 4 :

(2 SC, INC) repeat 8 times (32)

Round 5 :

(3 SC, INC) repeat 8 times (40)

Round 6 :

(4 SC, INC) repeat 8 times (48)

Round 7 :

(5 SC, INC) repeat 8 times (56)

Round 8 :

(6 SC, INC) repeat 8 times (64)

Round 9 :

64 SC (64)

Round 10 :

(6 SC, DEC) repeat 8 times (56)

Round 11 :

(5 SC, DEC) repeat 8 times (48)

Round 12 :

48 SC (48)

— 13. Pompom :

Round 1 :

Using white yarn, 6 SC in MR (6)

Round 2 :

6 INC (12)

Round 3 :

(SC, INC) repeat 6 times (18)

Round 4 :

18 SC (18)

Round 5 :

(SC, DEC) repeat 6 times (12)

Round 6 :

6 DEC (6)

Assembly Instructions

  • Position the nose between Rounds 46 and 48 of the head, flattening it slightly into an oval shape before sewing.
  • Embroider the sleepy eyes on Round 49, spacing them about 6 stitches apart, and add tiny eyelashes at the outer corners.
  • Sew the beard along a semicircular path starting from the neck transition and curving up toward Rounds 43-45.
  • Attach the mustache pieces directly beneath the nose, securing them with stitches up to the middle of each half.
  • Fix the hair piece to the back of the head, following the neck line and curving up to Round 49.
  • Place the ears on either side of the head, just in front of the hairline between Rounds 47 and 49.
  • Attach the overall straps from the back of the trousers, over the shoulders, to the front, then sew buttons at the front attachment points.

Important Notes

  • 💡If you find the magic ring difficult to close with plush yarn, try starting with a 2-chain foundation and working your first round into the second chain from the hook.
  • 💡Stuffing as you go is vital for the body and head to ensure a smooth shape without lumps, especially around the leg join.
  • 💡Use a very thin black thread for the eyes to keep the expression delicate and 'sleepy' rather than bulky.
  • 💡When sewing the beard and hair, pinning them thoroughly first is the only way to ensure they sit symmetrically on the face.

I hope you enjoy bringing this little Le Père Noël to life! There is nothing quite like the feeling of finishing a holiday project and seeing it nestled on a shelf or tucked under the tree. This Santa is more than just a toy; he is a little bundle of festive spirit made with your own two hands. Take your time with the assembly, especially that wonderful beard, as it is the secret to his charm. I cannot wait to see your finished creations. Happy crafting and may your holidays be filled with handmade warmth! ✨🧶🎅
You ask,

we answer.

FAQs

Can I use plush yarn instead of the cotton yarn mentioned?

Yes! The pattern works beautifully with plush yarn like Himalaya Dolphin Baby. Just switch to a 3.5 mm hook; your Santa will end up much larger, approximately 33 cm tall.

How do I make the arms poseable?

You can insert a piece of wire (wrapped in medical tape or a band-aid for safety) into the arms before you finish stuffing and attaching them to the body.

What is the best way to attach the beard?

I recommend pinning the entire semicircular top edge first. Sew along this line, then add a few hidden stitches behind the 'bubbles' to keep it from flopping forward.

My stitch count is off after joining the legs, what happened?

Check Round 12 carefully. You are working across the leg, then the connector, then the other leg, then the other side of the connector. It's easy to miss the stitches on the connector piece.