🧢 Beautiful ✨ Detailed πŸ’ Adorable

Jumbo Cuddly Minion Amigurumi Pattern

Jumbo Cuddly Minion Amigurumi Pattern
4.7β˜…Rating
5-8 HoursTime Needed
2.9KMade This
βœ‚οΈ

Intermediate Level

Ideal for those with basic crocheting experience, featuring slightly more advanced stitches and techniques to expand your skills.

⏱️

Weekend Treat

Takes 5-7 hours, making it an enjoyable project to finish over a couple of days.

🐰

Whimsical Buddy

Playful characters full of personality, designed to spark imagination and become cherished playtime favorites.

About This Jumbo Cuddly Minion Amigurumi Pattern

Jumbo Cuddly Minion Amigurumi Pattern crochet pattern - detailed view

This project is a fantastic choice for anyone wanting to create a high-impact handmade gift. It looks impressive on a shelf and is tough enough to handle plenty of playtime adventures.

Why You'll Love This Jumbo Cuddly Minion Amigurumi Pattern

I honestly had the best time watching this guy come together! There is something so satisfying about working with bulky yarn; the progress is quick, and the texture is just lovely. I especially love the technique for the gogglesβ€”it gives them such a cool, realistic depth. It's one of those patterns where you can really feel your progress, and the assembly is logically laid out so you won't feel overwhelmed.

Jumbo Cuddly Minion Amigurumi Pattern step 1 Jumbo Cuddly Minion Amigurumi Pattern step 2 Jumbo Cuddly Minion Amigurumi Pattern step 3 Jumbo Cuddly Minion Amigurumi Pattern step 4

Switch Things Up

There is something truly special about making a character that everyone recognizes and loves. When I first sat down to design this Minion, I knew I wanted him to be substantialβ€”the kind of toy that feels like a 'real' gift. Using bulky yarn was the key. It gives the fabric this wonderful, chunky texture that's just so satisfying to hold.

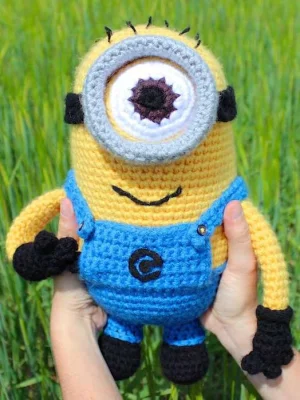
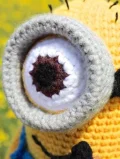
One of my favorite parts of this process is the goggle construction. Instead of just a flat circle, the folding technique creates a thick, industrial-looking rim that really makes the eye pop. If you want to customize your guy, you could easily make two eyes instead of one! Just repeat the eye and goggle steps and sew them side-by-side. I've also found that playing with the mouth embroidery can change his whole vibeβ€”a little side-smirk or a wide open 'O' for a surprised look adds so much personality. Don't be afraid to make him your own. That's the beauty of handmade; no two henchmen will ever be exactly the same, and that's exactly how it should be.

Common Mistakes & How to Fix Them

βœ— When you are picking up stitches for the dungaree panels at Round 36, ensure you center them perfectly with the eye or the overalls will look lopsided.βœ— Avoid stuffing the arms too firmly near the top shoulder area, as this will cause them to stick out sideways rather than resting naturally against the body.βœ— The goggles can easily become twisted when you join the foundation chain to the final round, so keep the strip flat and straight as you work.βœ— If you pull your embroidery stitches too tight when making the mouth, it can cause the yellow fabric to pucker and distort his friendly expression.

Jumbo Cuddly Minion Amigurumi Pattern

If you're looking to bring a bit of movie magic into your craft room, you are going to love making this oversized yellow henchman. He stands a proud 12 inches tall, making him the ultimate huggable companion for kids or a standout piece for your own collection. Using bulky yarn gives him a wonderful weight and a sturdy feel that really brings the character to life. I've designed this to be a fun, engaging project where you'll see his cheeky personality emerge with every stitch, from his iconic goggles to those tiny sprouts of hair.

Intermediate 5-8 Hours

Materials Needed for Jumbo Cuddly Minion Amigurumi Pattern

β€” Main Fabric

  • 01
    Bulky weight yarn in bright yellow for the body
  • 02
    Bulky weight yarn in royal blue for the dungarees
  • 03
    Bulky weight yarn in black for the boots, gloves, and strap
  • 04
    Bulky weight yarn in slate grey for the goggles
  • 05
    Bulky weight yarn in chocolate brown for the iris
  • 06
    Bulky weight yarn in white for the eye

β€” Tools Required

  • 01
    6.0 mm (Size J) crochet hook
  • 02
    Small scrap of black craft felt for the chest logo
  • 03
    Four 12mm small buttons for the dungaree straps
  • 04
    Sharp embroidery needle for facial details
  • 05
    Tapestry needle for sewing pieces together
  • 06
    High-quality polyester fiberfill or stuffing
  • 07
    Locking stitch markers to track rounds and placement

Progress Tracker

0% Complete

β€” 1. Legs (Make 2) :

Round 1 :

Using black yarn, ch 6. Starting in the 2nd ch from the hook, sc 5. Work 5 sc along the other side of the ch. (10)

Round 2 :

2 sc in the first st, sc 2, 2 sc in each of the next 4 sts, sc 2, 2 sc in the final st. (16)

Round 3 :

sc 1, 2 sc in the next st, sc 5, 2 sc in the next st, sc 1, 2 sc in the next st, sc 5, 2 sc in the final st. (20)

Round 4 :

Work this entire round in BLO: sc 20. (20)

Round 5 :

sc 20. (20)

Round 6 :

sc 1, dec 1, sc 5, dec 1, sc 1, dec 1, sc 5, dec 1. (16)

Round 7 :

sc 4, dec 4 times, sc 4. (12)

Round 8-11 :

Switch to blue yarn: sc 12. (12)

Info :

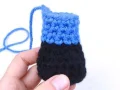
Fasten off and leave a long tail. To finish the cuff, use blue yarn to pick up stitches around Round 7 and sc in every stitch. Stuff the leg firmly.

β€” 2. Eye :

Round 1 :

Using black yarn, ch 2. Work 6 sc into the 2nd ch from the hook. Switch to brown yarn before joining with a sl st to the first sc, ch 1. (6)

Round 2 :

Work 2 sc in every st around. Switch to white yarn before joining with a sl st, ch 1. (12)

Round 3 :

rep *sc 1, 2 sc in next st* 6 times. (18)

Round 4 :

rep *sc 2, 2 sc in next st* 6 times. (24)

Round 5 :

rep *sc 3, 2 sc in next st* 6 times. (30)

Round 6 :

Switch to yellow yarn: sc 30. (30)

Info :

Fasten off and leave a tail for assembly. To finish the eyelid, use yellow yarn to pick up stitches around Round 5 and sc in every stitch around.

β€” 3. Fingers (Make 6) :

Round 1 :

Using black yarn, ch 2. Work 4 sc in the 2nd ch from the hook. (4)

Round 2 :

sc 4. (4)

Info :

Fasten off and leave a tail for sewing.

β€” 4. Hands and Arms (Make 2) :

Round 1 :

Using black yarn, ch 2. Work 4 sc in the 2nd ch from the hook. (4)

Round 2 :

Work 2 sc in every st around. (8)

Round 3 :

rep *sc 1, 2 sc in next st* 4 times. (12)

Round 4 :

sc 12. (12)

Info :

Do not fasten off. Sew 3 fingers onto the hand, placing one on top and the others side-by-side.

Round 5 :

rep *sc 1, dec 1* 4 times. (8)

Round 6 :

Switch to yellow yarn and work in BLO: sc 8. (8)

Round 7-22 :

sc 8. (8)

Info :

Fasten off with a long tail. To finish the glove cuff, join black yarn to the FLO of Round 5.

Glove Round 1 :

Work sc 8 through the front loops. (8)

Glove Round 2 :

rep *sc 1, 2 sc in next st* 4 times. (12)

Glove Round 3 :

sc 12. (12)

Info :

Fasten off and hide the ends.

β€” 5. Body :

Round 1 :

Using yellow yarn, ch 2. Work 6 sc in the 2nd ch from the hook. (6)

Round 2 :

Work 2 sc in every st around. (12)

Round 3 :

rep *sc 1, 2 sc in next st* 6 times. (18)

Round 4 :

rep *sc 2, 2 sc in next st* 6 times. (24)

Round 5 :

rep *sc 3, 2 sc in next st* 6 times. (30)

Round 6 :

rep *sc 4, 2 sc in next st* 6 times. (36)

Round 7 :

rep *sc 5, 2 sc in next st* 6 times. (42)

Round 8 :

rep *sc 6, 2 sc in next st* 6 times. (48)

Round 9 :

rep *sc 7, 2 sc in next st* 6 times. (54)

Info :

Add hair now: tie about 14 strands of black yarn to the inside of the head, pull them through to the top, and trim to your liking.

Round 10-36 :

sc 54. (54)

Info :

Place a marker at Round 36 to help with the dungaree placement later.

Round 37 :

Switch to blue yarn: sc 54. (54)

Info :

Take a break to sew the eye and embroider the mouth onto the face. Flatten the arms and sew them to the sides of the body.

Round 38-41 :

sc 54. (54)

Round 42 :

rep *sc 7, dec 1* 6 times. (48)

Round 43 :

rep *sc 6, dec 1* 6 times. (42)

Round 44 :

rep *sc 5, dec 1* 6 times. (36)

Round 45 :

rep *sc 4, dec 1* 6 times. (30)

Round 46 :

rep *sc 3, dec 1* 6 times. (24)

Round 47 :

rep *sc 2, dec 1* 6 times. (18)

Round 48 :

rep *sc 1, dec 1* 6 times. (12)

Round 49 :

rep *dec 1* 6 times. (6)

Round 50 :

sc the next st and the 4th st together to close. Fasten off and sew legs to the base.

β€” 6. Dungaree Panels :

Front Row 1 :

Go to Round 36 on the body. Mark 13 sts in the center front. Join blue yarn and sc 13 across. (13)

Front Row 2-8 :

ch 1, turn, sc 13. (13)

Back Row 1 :

On Round 36, mark 15 sts centered on the back. Join blue yarn and sc 15 across. (15)

Back Row 2-9 :

ch 1, turn, sc 15. (15)

Edging :

Do not fasten off after the back panel. sc all the way around the edges of the dungaree, picking up stitches along Round 36 to connect the front and back sections.

β€” 7. Dungaree Straps (Make 2) :

Row 1 :

Using blue yarn, ch 3. Starting in the 2nd ch from the hook, sc 2. (2)

Row 2-22 :

ch 1, turn, sc 2. (2)

Info :

Fasten off and sew the straps to the dungaree using a button at each end.

β€” 8. Goggles :

Round 1 :

Using grey yarn, ch 36. Join to the first ch with a sc to form a ring, then sc in each remaining ch around. (36)

Round 2-6 :

sc 36. (36)

Round 7 :

Fold the piece so the foundation chain meets Round 6. sc through both layers together all the way around. (36)

β€” 9. Goggles Strap :

Row 1 :

Using black yarn, ch 4. Starting in the 2nd ch from the hook, sc 3. (3)

Row 2-40 :

ch 1, turn, sc 3. (3)

Info :

Fasten off with a long tail and sew the strap ends to the sides of the grey goggle.

Assembly Instructions

  • Sew the three fingers onto each hand, ensuring one is positioned on top to act as a thumb.
  • Attach the completed eye assembly to the face at Round 37, adding a bit of stuffing behind it for volume.
  • Flatten the top of the arms and sew them securely to the sides of the yellow body.
  • Stitch the legs to the bottom of the body, making sure they are spaced evenly so the toy can stand.
  • Connect the dungaree straps to the front and back panels, securing them with the small buttons.
  • Attach the goggle strap to the sides of the grey goggles and slide them onto the head over the eye.
  • Cut the logo from black felt and sew it onto the center of the dungaree front panel.

Important Notes

  • πŸ’‘Always use a stitch marker at the start of your rounds to avoid losing your place in the large body section.
  • πŸ’‘When working the 'picking up stitches' technique, ensure your tension is consistent to avoid creating large gaps.
  • πŸ’‘Stuff the body very firmly as you go, particularly near the base, to help the Minion maintain his upright shape.
  • πŸ’‘Leave long yarn tails when fastening off each piece; it makes the final assembly much cleaner and more secure.
  • πŸ’‘Check the alignment of the eye and mouth frequently before final sewing to ensure he has a centered, friendly face.

I hope you enjoy every moment of bringing this jumbo Minion to life! There is nothing quite like the feeling of finishing a large amigurumi project and seeing that iconic character staring back at you. Whether he's destined to be a gift for a little one or a fun new addition to your own home, he's sure to bring a smile to everyone who sees him. Don't forget to share your finished photos with the community β€” I absolutely love seeing your unique takes on my patterns. Happy crocheting, and may your stitches always be even! 🧢 ✨

You ask,

we answer.

FAQs

Can I use standard worsted weight yarn instead of bulky yarn?

You certainly can, but keep in mind that your finished Minion will be much smaller, probably around 7 or 8 inches tall. You should also use a smaller hook, like a 4.0mm, to keep the stitches tight.

How do I make the hair stand up straight?

The trick is to use short, stiff pieces of yarn. By securing them through the top of the head and trimming them to about an inch or two, the bulky yarn's natural structure will keep them upright.

Is the dungaree removable for washing?

In this specific design, the dungaree panels are crocheted directly into the stitches of the body at Round 36, so they are a permanent, non-removable part of the toy.

What is the best way to attach the felt logo?

I recommend using a simple whip stitch with black sewing thread around the edges. This keeps it flat against the yarn and prevents the corners from peeling up over time.