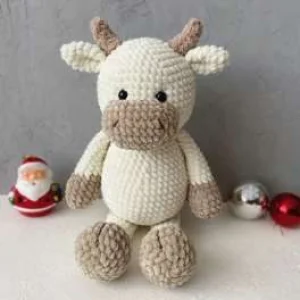
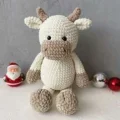
๐Ÿงถ Beautiful โœจ Detailed ๐Ÿ’ Adorable

Adorable Plush Bull Amigurumi Pattern

Adorable Plush Bull Amigurumi Pattern
3.9โ˜…Rating
5-7 HoursTime Needed
2.5KMade This
โœ‚๏ธ

Intermediate Level

Ideal for those with basic crocheting experience, featuring slightly more advanced stitches and techniques to expand your skills.

โฑ๏ธ

Weekend Treat

Takes 5-7 hours, making it an enjoyable project to finish over a couple of days.

๐Ÿฅ

Charming Critter

Delightful animal designs with sweet details that capture the essence of your favorite woodland and farmyard friends.

About This Adorable Plush Bull Amigurumi Pattern

Adorable Plush Bull Amigurumi Pattern crochet pattern - detailed view

Whether you are looking for a unique baby shower gift or a festive farmhouse decoration, this bull fits the bill. His oversized head and floppy limbs make him incredibly poseable and extra lovable for anyone who needs a new plush friend.

Why You'll Love This Adorable Plush Bull Amigurumi Pattern

I honestly can't get over how satisfying it is to work with double strands of soft yarnโ€”it works up surprisingly fast and the stitches look so plump and neat. I also love the little details like the embroidered hooves and the brush-like tail tip; they really elevate the finished look without adding a lot of complex work. Itโ€™s the kind of project that keeps you engaged but still feels meditative.

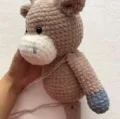
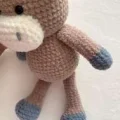
Adorable Plush Bull Amigurumi Pattern step 1 Adorable Plush Bull Amigurumi Pattern step 2 Adorable Plush Bull Amigurumi Pattern step 3 Adorable Plush Bull Amigurumi Pattern step 4

Switch Things Up

Working on this bull reminded me of why I fell in love with amigurumi in the first place. Thereโ€™s a certain magic in taking a few balls of yarn and turning them into a character with a soul. When I first made this, I was worried the double-strand technique would be bulky, but it actually creates this incredibly luxurious, boutique-style finish that you just can't get with a single thread.

One little tip from my craft room to yours: when you're attaching the muzzle, use pins to hold it in place first. It sounds simple, but with this fuzzy yarn, itโ€™s easy for things to shift half an inch to the left, and suddenly your bull looks a little confused! I also love experimenting with the 'accessories' mentioned at the end of the PDF. I once made a little red scarf for one of these guys, and he looked like the perfect winter companion. Whether you stick to the classic beige or go for a 'strawberry cow' pink, I know you're going to create something beautiful.

Common Mistakes & How to Fix Them

โœ— Forgetting to use two strands of yarn throughout the project will result in a much smaller and floppier bull than intended.โœ— If you don't stuff the head firmly before closing, the safety eyes might sit unevenly or the muzzle might sag over time.โœ— The arms have different finishing stitch counts for the left and right sides; skipping those extra stitches before folding will make the arms point the wrong way.โœ— Be careful not to over-tighten the embroidery on the hooves, as it can pinch the soft yarn and distort the shape of the feet.

Adorable Plush Bull Amigurumi Pattern

There is something so special about a handmade toy that feels like a warm hug, and this plush bull is exactly that. You will love working with the soft, velvety texture as he comes to life in your hands. I designed this pattern to be a relaxing project that results in a sturdy, cuddly friend perfect for little ones or as a charming shelf companion. Grab your favorite cozy yarn and let's get started on your new favorite buddy!

Intermediate 5-7 Hours

Materials Needed for Adorable Plush Bull Amigurumi Pattern

โ€” Main Fabric

  • 01
    Alize Softy yarn (or similar soft, fuzzy yarn) in Beige (Color 617) - approximately 3 skeins.
  • 02
    Small amount of Cream yarn (Color 62) for the muzzle and horns.
  • 03
    Small amount of Gray yarn (Color 119) for the hooves and tail tip.

โ€” Tools Required

  • 01
    4.5 mm crochet hook
  • 02
    One pair of 12 mm safety eyes
  • 03
    High-quality toy stuffing (holofiber or poly-fill)
  • 04
    Wide-eye tapestry needle for assembly
  • 05
    Stitch markers or a piece of contrast yarn
  • 06
    Scissors

Progress Tracker

0% Complete

โ€” 1. Head :

Info :

Use Beige yarn held in two strands. Work in continuous spiral rounds.

Round 1 :

Create a mr and place 6 sc inside (6)

Round 2 :

Work 6 inc around the circle (12)

Round 3 :

Repeat (1 sc, 1 inc) 6 times (18)

Round 4 :

Repeat (2 sc, 1 inc) 6 times (24)

Round 5 :

Repeat (3 sc, 1 inc) 6 times (30)

Round 6 :

Repeat (4 sc, 1 inc) 6 times (36)

Round 7 :

Repeat (5 sc, 1 inc) 6 times (42)

Round 8 :

Repeat (6 sc, 1 inc) 6 times (48)

Round 9-16 :

Work 48 sc evenly around (48)

Round 17 :

Repeat (6 sc, 1 dec) 6 times (42)

Round 18 :

Repeat (5 sc, 1 dec) 6 times (36)

Round 19 :

Repeat (4 sc, 1 dec) 6 times (30)

Round 20 :

Repeat (3 sc, 1 dec) 6 times (24)

Info :

Fasten off and leave a long tail for sewing. Place 12mm safety eyes between Rounds 11 and 12, leaving 4 sc between them. Stuff firmly with fiberfill.

โ€” 2. Muzzle :

Info :

Use Cream yarn held in two strands.

Round 1 :

ch 9, starting in the 2nd loop from hook: 7 sc, 3 sc in the last st. Turn to work along the bottom of the chain: 6 sc, 1 inc in the final st (18)

Round 2 :

1 inc, 6 sc, 3 inc, 6 sc, 2 inc (24)

Round 3 :

1 sc, 1 inc, 6 sc, repeat (1 sc, 1 inc) 3 times, 6 sc, repeat (1 sc, 1 inc) 2 times (30)

Round 4-6 :

Work 30 sc around (30)

Info :

Fasten off and leave a long tail for attachment.

โ€” 3. Horns (Make 2) :

Info :

Use Cream yarn held in two strands.

Round 1 :

4 sc into a mr (4)

Round 2 :

Work 4 sc around (4)

Round 3 :

Repeat (1 sc, 1 inc) twice (6)

Round 4 :

Work 6 sc around (6)

Round 5 :

5 sc, 1 inc (7)

Round 6 :

6 sc, 1 inc (8)

Info :

sl st to finish. Fasten off and leave a tail for sewing.

โ€” 4. Ears (Make 2) :

Info :

Use Beige yarn held in two strands.

Round 1 :

4 sc into a mr (4)

Round 2 :

Work 4 inc (8)

Round 3 :

Repeat (3 sc, 1 inc) twice (10)

Round 4 :

Repeat (4 sc, 1 inc) twice (12)

Round 5 :

Repeat (5 sc, 1 inc) twice (14)

Round 6 :

Work 14 sc around (14)

Info :

Flatten the piece and sc 7 through both layers to close. Leave a tail for sewing.

โ€” 5. First Arm :

Info :

Start with Gray yarn held in two strands.

Round 1 :

7 sc into a mr (7)

Round 2 :

Work 7 inc (14)

Round 3-5 :

Work 14 sc around (14)

Round 6 :

2 sc, 1 dec, 10 sc (13)

Round 7 :

2 sc, 1 dec, 9 sc (12)

Colour Change :

Switch to Beige yarn.

Round 8-18 :

Work 12 sc around (12)

Info :

Stuff the bottom half of the arm. Crochet 2 extra sc, then flatten and sc 6 through both layers to close. Leave a tail for sewing.

โ€” 6. Second Arm :

Info :

Start with Gray yarn held in two strands.

Round 1 :

7 sc into a mr (7)

Round 2 :

Work 7 inc (14)

Round 3-5 :

Work 14 sc around (14)

Round 6 :

6 sc, 1 dec, 6 sc (13)

Round 7 :

6 sc, 1 dec, 5 sc (12)

Colour Change :

Switch to Beige yarn.

Round 8-18 :

Work 12 sc around (12)

Info :

Stuff the bottom half. Crochet 1 extra sc, then flatten and sc 6 through both layers to close. Leave a tail for sewing.

โ€” 7. Legs (Make 2) :

Info :

Start with Gray yarn held in two strands.

Round 1 :

6 sc into a mr (6)

Round 2 :

Work 6 inc (12)

Round 3 :

Repeat (1 sc, 1 inc) 6 times (18)

Round 4 :

Repeat (2 sc, 1 inc) 6 times (24)

Round 5-7 :

Work 24 sc around (24)

Round 8 :

4 sc, 6 dec, 6 sc, switch to Beige yarn, 2 sc (18)

Round 9 :

5 sc, 2 dec, 9 sc (16)

Round 10 :

5 sc, 1 dec, 9 sc (15)

Round 11 :

3 sc, 2 dec, 8 sc (13)

Round 12 :

3 sc, 1 dec, 8 sc (12)

Round 13-23 :

Work 12 sc around (12)

Info :

Stuff the leg. For the first leg: 1 extra sc, flatten, and sc 6 through both layers. For the second leg: 2 extra sc, flatten, and sc 6 through both layers. Leave tails for sewing and embroider hoof lines with Gray yarn.

โ€” 8. Tail :

Info :

Use Beige yarn held in two strands.

Row 1 :

ch 11, starting in 2nd loop from hook: 10 sc (10)

Info :

Fasten off leaving a sewing tail. For the tip: Cut several 10cm strands of Gray yarn. Fold them in half and loop them through the end of the tail like a fringe. Trim to neaten.

โ€” 9. Body :

Info :

Use Beige yarn held in two strands.

Round 1 :

6 sc into a mr (6)

Round 2 :

Work 6 inc (12)

Round 3 :

Repeat (1 sc, 1 inc) 6 times (18)

Round 4 :

Repeat (2 sc, 1 inc) 6 times (24)

Round 5 :

Repeat (3 sc, 1 inc) 6 times (30)

Round 6 :

Repeat (4 sc, 1 inc) 6 times (36)

Round 7 :

Repeat (5 sc, 1 inc) 6 times (42)

Round 8 :

Repeat (6 sc, 1 inc) 6 times (48)

Round 9-14 :

Work 48 sc around (48)

Round 15 :

Repeat (6 sc, 1 dec) 6 times (42)

Round 16-17 :

Work 42 sc around (42)

Round 18 :

Repeat (5 sc, 1 dec) 6 times (36)

Round 19-20 :

Work 36 sc around (36)

Round 21 :

Repeat (4 sc, 1 dec) 6 times (30)

Round 22 :

Work 30 sc around (30)

Round 23 :

Repeat (3 sc, 1 dec) 6 times (24)

Info :

Fasten off and stuff the body firmly.

Assembly Instructions

  • Begin by stuffing the muzzle firmly and sewing it to the face, centering it just below the safety eyes.
  • Fold the ears in half and sew them to the sides of the head near Round 6, then attach the horns slightly above and between the ears.
  • Embroider two small horizontal lines on the muzzle using Beige or a darker thread to create the nostrils.
  • Securely sew the head to the body, adding extra stuffing to the neck area as you close the gap to prevent a 'wobbly' head.
  • Position the arms on the sides of the body, approximately 2-3 rounds below the neck, and sew them firmly in place.
  • Attach the legs to the bottom of the body, ensuring they are spaced evenly so the bull can sit or stand balanced.
  • Finally, sew the tail to the back of the body at the center of the lower rounds.

Important Notes

  • ๐Ÿ’กAlways work with two strands of yarn held together to achieve the correct size and plush texture.
  • ๐Ÿ’กUse a stitch marker faithfully, as the fuzzy yarn can make it difficult to see the start of your rounds.
  • ๐Ÿ’กStuff the limbs only about halfway to allow them to move naturally and sit flat against the body.
  • ๐Ÿ’กWhen sewing pieces together, use a double strand of yarn for extra strength and durability during play.
  • ๐Ÿ’กIf the yarn feels too tight on your hook, try to maintain a relaxed tension to keep the fabric soft.

I hope you enjoyed making this sweet bull as much as I did! There is nothing quite like the feeling of finishing a plushie and seeing its little personality shine through. He is such a versatile projectโ€”you can even change up the colors or add a little scarf to give him a unique look for different seasons. Don't forget to give him a big squeeze once he's all finished! Happy crafting, and I can't wait to see your wonderful creations. ๐Ÿงถ โœจ ๐Ÿฎ

You ask,

we answer.

FAQs

Can I use a single strand of chunky yarn instead of two strands of DK?

Yes, you can substitute the double strand of Alize Softy with a single strand of super bulky chenille or velvet yarn. Just make sure your hook size matches the yarn weight so your stitches are tight enough to keep the stuffing inside.

My bull's head is floppy, how can I fix this?

Floppy necks usually happen when there isn't enough stuffing right at the joint. When sewing the head to the body, stop when you have a small opening left, cram in a bit more stuffing into that neck gap, and then finish sewing.

Is this pattern safe for babies?

While safety eyes are generally secure, for children under three, I recommend embroidering the eyes with black yarn instead to eliminate any choking risk. Also, ensure all parts are sewn on very tightly.

How do I make the 'imitation hooves' mentioned in the pattern?

It's a simple embroidery step! Take a long piece of Gray yarn and wrap it vertically around the front of the foot twice, pulling slightly to create a small indentation, then knot it securely inside the leg.