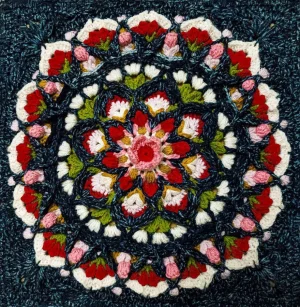
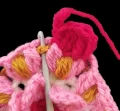
There is something so incredibly satisfying about watching a delicate floral center bloom into a structured, textured square. This pattern is a true celebration of spring, guiding you through layers of intricate post stitches, clusters, and puffs that give the piece a wonderful 3D effect. You will love the way the colors play together as you build this heirloom-quality block. It is the perfect project for when you want to slow down and really enjoy the rhythm of your hook.
Progress Tracker
0% Complete
— 1. The Floral Center :
Info :
Throughout this pattern, replace the first stitch of a round as follows: for sc use ch1, for hdc use ch2, for dc use ch3, and for tr use ch4.
Round 1 :
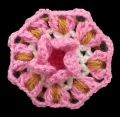
Using Lipstick yarn, create a MR and work 10 sc into the center. Join with a ss to the first st. (10)
Round 2 :
Continue with Lipstick: *sc in next st, ch2, skip 1 st* repeat 5 times. Join with a ss. (5 sc, 5 ch2 spaces)
Round 3 :
Switch to Fondant yarn: In each ch2 space, work a petal consisting of (1 sc, ch3, 3 tr, ch3, 1 sc). Skip to the next space and repeat around. Join with a ss. (15 tr, 10 sc, 10 ch3 spaces)
Round 4 :
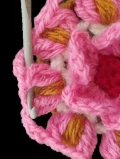
Switch to Cream yarn: Working only in the back loops, work 16 sc and 8 ch1, making sure to lift two loops from the treble stitches of the previous round. Join with a ss. (16 sc, 8 ch1)
Round 5 :
Continue with Cream: In each ch1 space, work (1 hdc, ch1, 1 hdc), then ch1. Repeat 8 times total. Join with a ss to the first hdc. (16 hdc, 16 ch1)
— 2. Expanding the Bloom :
Round 6 :
Using Gold yarn: In each ch1 space from the previous round, work (1 puff4, ch4). Skip to the next space and repeat. Join with a ss into the closing chain of the first puff. (8 puff4, 8 ch4)
Round 7 :
Switch to Fondant yarn: Work into the ch1 spaces from Round 5. Work 1 dc2tog to the right of a puff, ch1, then 1 dc2tog to the left of the same puff, followed by ch3. Repeat around. Join with a ss. (16 dc2tog, 8 ch3, 8 ch1)
Round 8 :
Switch to Lipstick yarn: *Work 1 hdcfp around the dc2tog, ch1. In the next ch1 space, work a cluster of (2 tr, 1 dtrfp around the Round 6 puff, 2 tr) closed together. ch1, 1 hdcfp around the next dc2tog. ch3, bring the Round 6 chains forward and work 1 sc into them, ch3.* Repeat around. Join with a ss. (8 dtrfp, 32 tr, 16 hdcfp, 8 sc, 16 ch3, 16 ch1)
Round 9 :
Using Indigo yarn: Work into the ch1 spaces from Round 5: (2 dc, ch8) in each. Repeat around and join with a ss. (16 dc, 8 ch8)
Round 10 :
Continue with Indigo: *Work 1 dcfp around each dc from Round 9. Work 3 sc into the ch1 space from Round 8, ch1. Work 1 hdcfp around the 5-stitch cluster from Round 8. ch1, 3 sc into the next ch1 space from Round 8.* Repeat around. Join with a ss. (16 dcfp, 8 hdcfp, 48 sc, 16 ch1)
— 3. Intermediate Textures :
Round 11 :
Switch to Gold yarn: *Work between the two dc from Round 9: (1 tr, ch4, 1 tr). ch2, 1 sc into the ch8 space from Round 9, ch2.* Repeat around. Join with a ss. (16 tr, 8 sc, 8 ch4, 16 ch2)
Round 12 :
Switch to Cream yarn: *Between the two dc from Round 10, work (1 puff3, ch2, 1 puff3). ch4.* Repeat around. Join with a ss. (16 puff3, 8 ch3, 8 ch2)
Round 13 :
Switch to Powder Pink yarn: *1 scfp around the first tr of Round 11, 1 hdcfp around the first puff of Round 12. In the ch2 space, work (2 dc, 1 tr, 2 dc). 1 hdcfp around the next puff, 1 scfp around the next tr, ch2. 1 sc in the ch4 space from Round 12, ch2.* Repeat around. Join with a ss. (8 tr, 32 dc, 16 hdcfp, 16 scfp, 8 sc, 16 ch2)
Round 14 :
Switch to Apple yarn: *In the ch2 space from Round 11, work 3 dc, ch1. Skip the sc from Round 11, work 3 dc in the next ch2 space, ch3.* Repeat around. Join with a ss. (48 dc, 8 ch3, 8 ch1)
Round 15 :
Switch to Lipstick yarn: *1 hdcfp around the hdcfp from Round 13. Work 2 hdcfp around the dc stitches from Round 13, ch1. 1 dcfp around the tr from Round 13, ch1. 2 hdcfp around the next dc stitches, 1 hdcfp around the next hdcfp, ch1.* Repeat around. Join with a ss. (8 dcfp, 48 hdcfp, 32 ch1)
— 4. Developing the Frame :
Round 16 :
Using Indigo yarn: *1 dcfp around the hdcfp from Round 10. 1 ss in the ch1 space from Round 14, ch6. Close together: (2 dtr in the dc from Round 14, 1 puff3 in the dcfp from Round 15, 2 dtr in the next dc from Round 14). ch6, 1 ss in the same ch1 space.* Repeat around. Join with a ss. (32 dtr, 8 dcfp, 8 puff3, 8 ss, 16 ch6)
Round 17 :
Switch to Apple yarn: *In the ch1 space from Round 15, work (tr3tog, ch2, tr3tog, ch2, tr3tog, ch2, tr3tog). ch1, 1 sc into the closing chain of the puff from Round 16, ch1.* Repeat around. Join with a ss. (32 tr3tog, 8 sc, 24 ch2)
Round 18 :
Switch to Cream yarn: *In the ch2 spaces from Round 17, work (3 puff3, ch1, skip space, 3 puff3, ch1, skip space, 3 puff3). 1 scfp around the sc from Round 17.* Repeat around. Join with a ss. (72 puff3, 8 scfp, 16 ch1)
Round 19 :
Using Indigo yarn: Work hdcfp around the Round 18 puffs and hdc in the spaces between them. Work trfp around the tr3tog from Round 17. Close the last trfp of one fan and the first trfp of the next fan together. Join with a ss. (16 trfp, 8 trfp2tog, 72 hdcfp, 48 hdc)
Round 20 :
Continue with Indigo: Work 1 hdcbp in every stitch around. Join with a ss. (144 hdcbp)
— 5. Outer Floral Details :
Round 21 :
Using Indigo yarn: Starting to the left of the hdcfp from Round 10, *8 scbp, ch1, skip 1 st.* Repeat 16 times total. Join with a ss. (128 scfp, 16 ch1)
Round 22 :
Switch to Powder Pink yarn: In the ch1 spaces, work (dc3tog, ch2, dc3tog, ch8). Repeat around and join with a ss. (32 dc3tog, 16 ch2, 16 ch8)
Round 23 :
Switch to Gold yarn: Starting in the first scfp from Round 21, *8 dcfp, ch2, skip the next dc3tog.* Repeat around. Pass the dc3tog from Round 22 to the front of the chains. Join with a ss. (128 dcfp, 16 ch2)
Round 24 :
Switch to Fondant yarn: In the ch2 space from Round 22, work (1 pc, ch12). Skip to the next space and repeat. Join with a ss. (16 pc, 16 ch12)
Round 25 :
Using Indigo yarn: *1 scfp around the first dc3tog from Round 22, ch2, 1 scfp around the next dc3tog. In the ch8 space, work 5 dc, ch3. 1 scfp around the dcfp from Round 19, ch3, 5 dc in the next ch8 space.* Repeat around. Join with a ss. (160 dc, 48 scfp, 16 ch2, 32 ch3)
— 6. Squaring the Mandala :
Round 26 :
Switch to Apple yarn: *1 sc in the ch2 space from Round 23, ch3. Work 5 dc in the space between the 4th and 5th dcfp from Round 23, ch3.* Repeat around. Join with a ss. (80 dc, 16 sc, 32 ch3)
Round 27 :
Switch to Lipstick yarn: *1 sc in the sc from Round 26. Between the dc stitches from Round 26, work (dc3tog, ch2) three times, then one more dc3tog.* Repeat around. Join with a ss. (64 dc3tog, 16 sc, 48 ch2)
Round 28 :
Switch to Gold yarn: *1 sc in the ch12 space from Round 24, ch6. 1 puff3 in the center of the pc from Round 24, ch6.* Repeat around. Join with a ss. (16 puff3, 16 sc, 32 ch6)
Round 29 :
Switch to Cream yarn: *1 scfp around the puff3 from Round 28. In the next fan: 1 hdcfp in dc3tog, 4 hdc in ch2 space, 1 hdcfp in next dc3tog. In the next ch2 space: 2 hdc, ch2, 2 hdc. Finish the fan with 1 hdcfp in dc3tog, 4 hdc in ch2, 1 hdcfp in dc3tog.* Repeat around. Join with ss. (64 hdcfp, 192 hdc, 16 scfp, 16 ch2)
Round 30 :
Using Indigo yarn: Starting right of the scfp from Round 25, *work 3 sts together (1 tr in space right of scfp, 1 scfp in puff from Round 28, 1 tr in space left of scfp). ch4, 1 sc in ch6 space from Round 28, ch3, 1 sc in next ch3 space from Round 28, ch4.* Repeat around. Join with a ss. (32 tr, 16 scfp, 32 sc, 32 ch4, 16 ch3)
— 7. Final Edging & Corners :
Round 31 :
Switch to Powder Pink yarn: *1 bl5 in the closing chain of the dc3tog from Round 30. ch7, 1 sc in the ch3 space, ch7.* Repeat around. Join with a ss. (16 bl5, 16 sc, 32 ch7)
Round 32 :
Using Indigo yarn: *1 sc in the closing chain of the bl5, ch1. In the ch4 space: (1 hdc, ch1, 1 hdc, ch1). In the ch3 space: (1 hdc, ch1). Skip the sc, 1 hdc, ch1.* Repeat around. Join with a ss. (96 hdc, 16 sc, 112 ch1)
Round 33 :
Continue with Indigo: *In the ch2 space from Round 29, work 1 hdc through both the ch1 space of Round 29 and Round 32. Work 2 hdc in each ch1 space from the previous round 6 times.* Repeat around. Join with a ss. (208 hdc)
Round 34 (Corner) :
Using Indigo: In the space from Round 31, work (tr3tog, 1 ss into the 4th hdc to the right from Round 33, ch2). In the same space, work 2 tr3tog separated by ch2. ch2, skip a stitch, work 3 tr3tog separated by ch2. 1 ss in the 4th hdc to the right, fasten off. Skip 40 sts and repeat for other corners. (24 tr3tog, 20 ch2, 8 ss total)
Round 35 (Corner) :
Continue Indigo corner: *1 dcfp in first tr3tog, 1 ss in 3rd hdc of Round 33, ch2. 2 hdc in ch2 space. 1 hdcfp in next dc3tog, 2 hdc in ch2 space, 1 hdcfp in next dc3tog. In next ch2: (2 hdc, ch1, 2 hdc). Repeat post stitches and hdc back down. 1 dcfp in last tr3tog, 1 ss in 3rd st of Round 33.* Repeat for all corners. (8 dcfp, 16 hdcfp, 48 hdc, 8 ch2, 4 ch1, 8 ss)
Round 36 (Corner) :
Continue Indigo corner: *tr3tog in dcfp, 1 ss in 4th st of Round 33. ch3, 1 dc and 1 hdc in ch2 space, 8 hdc across. In ch1 space: (2 hdc, ch1, 2 hdc). 8 hdc back, (1 hdc, 1 dc) in ch2 space, ch3. tr3tog in dcfp, 1 ss in 4th st of Round 33.* Repeat for all corners. (8 tr3tog, 8 dc, 80 hdc, 8 ch3, 4 ch1, 8 ss)
Round 37 (Corner) :
Continue Indigo corner: *tr3tog in ch3 space, 1 ss in 4th st of Round 33. tr3tog in next ch3 space, 1 ss in 4th st of Round 33.* Repeat for all corners. (8 tr3tog, 8 ss)
Round 38 :
Final Indigo round: *In the ch1 space of Round 36, work (1 hdc, ch2, 1 hdc). Work 11 hdc across. 2 hdc in ch3 space, 2 hdc in tr, 3 dc and 3 hdc across Round 33. 5 hdc, 1 decrease, 3 hdc, 3 dc. Repeat back to corner.* Join with a ss. (24 dc, 180 hdc, 4 ch2)
You've done it! There is nothing quite like the feeling of finishing such a detailed and rewarding project. Your Cherry Blossom square is now ready to take center stage in your home. Whether you decide to turn it into a statement cushion or make several more for a breathtaking blanket, I hope you enjoyed every single stitch. This piece is a testament to your skill and patience as a crafter. Wear your 'daring beginner' or 'intermediate' badge with pride! Happy crafting, and I can't wait to see your beautiful finished work! 🧶✨🌸