🧢 Beautiful ✨ Detailed πŸ’ Adorable

Chilly the Winter Snowman Amigurumi Pattern

Chilly the Winter Snowman Amigurumi Pattern
4.2β˜…Rating
3-5 HoursTime Needed
1.1KMade This
βœ‚οΈ

Intermediate Level

Ideal for those with basic crocheting experience, featuring slightly more advanced stitches and techniques to expand your skills.

⏱️

Quick Craft

Fits nicely into a free afternoon β€” 2 to 5 hours of focused, enjoyable crocheting.

πŸŽ„

Holiday Cheer

Festive fun for the season, bringing handmade magic to celebrations and creating new family traditions.

About This Chilly the Winter Snowman Amigurumi Pattern

Chilly the Winter Snowman Amigurumi Pattern crochet pattern - detailed view

This project is the ultimate holiday giftβ€”thoughtful enough for someone special, but quick enough that you can whip up a whole flurry of them for your winter market stall or family gatherings.

Why You'll Love This Chilly the Winter Snowman Amigurumi Pattern

I honestly love how this pattern skips the annoying step of sewing the head to the body! By working them as one continuous piece, you get a much sturdier toy that doesn't suffer from a 'wobbly neck.' Plus, the slow increases on the hat give it such a charming, hand-sculpted look that stands out from basic beanies.

Chilly the Winter Snowman Amigurumi Pattern step 1 Chilly the Winter Snowman Amigurumi Pattern step 2 Chilly the Winter Snowman Amigurumi Pattern step 3 Chilly the Winter Snowman Amigurumi Pattern step 4

Switch Things Up

I have always found that snowmen are the quintessential winter project. There is something so nostalgic about them, isn't there? When I was making this specific sample, I was sitting by the window watching the first real frost of the year, and it just felt right.

One thing I really want to emphasize is the stuffing. Because the head and body are one piece, you really want to pack that fiberfill into the 'neck' area (around Round 28-30). It acts like a skeleton for the toy. If you leave it soft, the head might droop, especially once you add the weight of that tall red hat.

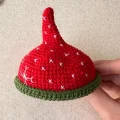
Speaking of the hat, feel free to get creative! I used a forest green for the trim, but a sparkly white or even a fuzzy mohair yarn would look incredible for a 'snow-dusted' effect. If you aren't a fan of embroidery, you could even glue on tiny white sequins to represent the snowflakes. This little guy is your canvas, so don't be afraid to let your personal style shine through. I can't wait to see your versions!

Common Mistakes & How to Fix Them

βœ— When starting the oval base in Round 1, it is easy to skip the very first chain after the turn; make sure you have exactly 30 stitches before moving to Round 2.βœ— If you don't stuff the neck area firmly enough between Rounds 28 and 32, your snowman's head might lean to one side once the hat is attached.βœ— The eye placement is specific to Rounds 43 and 44β€”if you place them too low, he will look a bit grumpy instead of cheerful and bright.βœ— For the hat's snowflake embroidery, avoid pulling your white yarn too tight or you will pucker the red fabric underneath and lose that clean finish.

Chilly the Winter Snowman Amigurumi Pattern

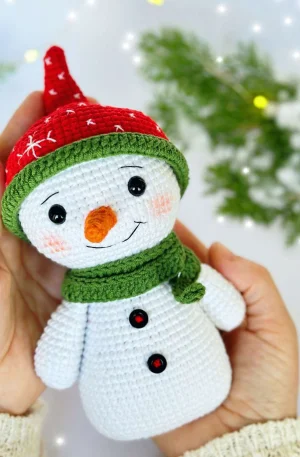
There is nothing quite like the magic of a handmade holiday, and this little snowman is here to bring all the winter wonder to your craft corner. You will love how his personality shines through with that classic carrot nose and cozy accessories. I have designed this to be a relaxing project that results in a sturdy, huggable friend. Whether you are decorating your mantel or making a heartfelt gift for a loved one, this pattern is a joy from the first chain to the final stitch.

Intermediate 3-5 Hours

Materials Needed for Chilly the Winter Snowman Amigurumi Pattern

β€” Main Fabric

  • 01
    White cotton-blend yarn (like YarnArt Jeans) for the main body and head
  • 02
    Bright red yarn for the festive pointed hat
  • 03
    Forest green yarn for the scarf and hat trim
  • 04
    Small amount of orange yarn for the carrot nose
  • 05
    White and black embroidery thread for the facial details

β€” Tools Required

  • 01
    Crochet hook size 1.80mm to 2.00mm
  • 02
    One pair of 8mm black safety eyes
  • 03
    Two small decorative black buttons for the belly
  • 04
    High-quality polyester fiberfill stuffing
  • 05
    Yarn needle for assembly and embroidery
  • 06
    Scissors and stitch markers

Progress Tracker

0% Complete

β€” 1. Main Body and Head :

Info :

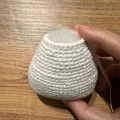
The snowman is worked from the bottom up in white yarn. We start with an oval base.

Round 1 :

ch 15, starting in 2nd ch from hook: 1 inc, 12 sc, 3 sc in the last st. Working along the back of the chain: 13 sc (30)

Round 2 :

2 inc, 12 sc, 3 inc, 12 sc, 1 inc (36)

Round 3 :

(1 sc, 1 inc) x 2, 13 sc, (1 inc, 1 sc) x 3, 12 sc, 1 inc (42)

Round 4 :

(2 sc, 1 inc) x 2, 14 sc, (1 inc, 2 sc) x 3, 12 sc, 1 inc (48)

Round 5 :

1 sc in each st around using blo (48)

Round 6 :

1 sc in each st around (48)

Round 7 :

(7 sc, 1 inc) x 6 (54)

Round 8-14 :

1 sc in each st around (54)

Round 15 :

(7 sc, 1 dec) x 6 (48)

Round 16-17 :

1 sc in each st around (48)

Round 18 :

(6 sc, 1 dec) x 6 (42)

Round 19-20 :

1 sc in each st around (42)

Round 21 :

(5 sc, 1 dec) x 6 (36)

Round 22-23 :

1 sc in each st around (36)

Round 24 :

(4 sc, 1 dec) x 6 (30)

Round 25-26 :

1 sc in each st around (30)

Round 27 :

(3 sc, 1 dec) x 6 (24)

Round 28-29 :

1 sc in each st around (24)

Info :

The following rounds begin the transition into the head.

Round 30 :

(3 sc, 1 inc) x 6 (30)

Round 31 :

(4 sc, 1 inc) x 6 (36)

Round 32 :

(5 sc, 1 inc) x 6 (42)

Round 33 :

(6 sc, 1 inc) x 6 (48)

Round 34 :

(7 sc, 1 inc) x 6 (54)

Round 35 :

(8 sc, 1 inc) x 6 (60)

Round 36-48 :

1 sc in each st around (60)

Info :

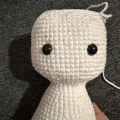
Insert safety eyes between Round 43 and 44, leaving a gap of 9 stitches between them.

Round 49 :

(8 sc, 1 dec) x 6 (54)

Round 50 :

(7 sc, 1 dec) x 6 (48)

Round 51 :

(6 sc, 1 dec) x 6 (42)

Round 52 :

(5 sc, 1 dec) x 6 (36)

Round 53 :

(4 sc, 1 dec) x 6 (30)

Round 54 :

(3 sc, 1 dec) x 6 (24)

Round 55 :

(2 sc, 1 dec) x 6 (18)

Round 56 :

(1 sc, 1 dec) x 6 (12)

Info :

Fasten off and sew the remaining hole closed.

β€” 2. Carrot Nose :

Info :

Use orange yarn.

Round 1 :

4 sc into a magic ring (4)

Round 2 :

(1 sc, 1 inc) x 2 (6)

Round 3 :

1 sc in each st around (6)

Round 4 :

(2 sc, 1 inc) x 2 (8)

Round 5 :

1 sc in each st around (8)

Round 6 :

(3 sc, 1 inc) x 2 (10)

Round 7 :

1 sc in each st around (10)

Info :

Fasten off and leave a tail for sewing.

β€” 3. Arms (Make 2) :

Info :

Use white yarn.

Round 1 :

6 sc into a magic ring (6)

Round 2 :

1 inc in each st around (12)

Round 3 :

(1 sc, 1 inc) x 6 (18)

Round 4 :

1 sc in each st around using blo (18)

Round 5-7 :

1 sc in each st around (18)

Round 8 :

(4 sc, 1 dec) x 3 (15)

Round 9-11 :

1 sc in each st around (15)

Round 12 :

(3 sc, 1 dec) x 3 (12)

Info :

Flatten the top of the arm and sc through both layers to close. Fasten off with a long tail.

β€” 4. Scarf :

Info :

Use green yarn.

Row 1 :

ch 98, start in 3rd ch from hook and work 96 dc across (96)

Info :

Fasten off and weave in ends.

β€” 5. Pointed Hat :

Info :

Start with red yarn.

Round 1 :

6 sc into a magic ring (6)

Round 2 :

5 sc, 1 inc (7)

Round 3 :

6 sc, 1 inc (8)

Round 4 :

7 sc, 1 inc (9)

Round 5 :

8 sc, 1 inc (10)

Round 6 :

9 sc, 1 inc (11)

Round 7 :

10 sc, 1 inc (12)

Round 8 :

11 sc, 1 inc (13)

Round 9 :

12 sc, 1 inc (14)

Round 10 :

13 sc, 1 inc (15)

Round 11 :

14 sc, 1 inc (16)

Round 12 :

15 sc, 1 inc (17)

Round 13 :

16 sc, 1 inc (18)

Round 14 :

(2 sc, 1 inc) x 6 (24)

Round 15 :

(3 sc, 1 inc) x 6 (30)

Round 16 :

(4 sc, 1 inc) x 6 (36)

Round 17 :

(5 sc, 1 inc) x 6 (42)

Round 18 :

(6 sc, 1 inc) x 6 (48)

Round 19 :

(7 sc, 1 inc) x 6 (54)

Round 20 :

(8 sc, 1 inc) x 6 (60)

Round 21 :

(9 sc, 1 inc) x 6 (66)

Round 22-30 :

1 sc in each st around (66)

Colour Change :

Switch to green yarn.

Round 31-32 :

1 sc in each st around (66)

Round 33 :

Working in blo: ch 2, turn and work 66 dc back around the edge (66)

Info :

Fasten off. Embroider small white snowflakes or 'x' shapes onto the red part of the hat.

Assembly Instructions

  • Secure the 8mm safety eyes between Rounds 43 and 44, ensuring there are 9 stitches of space between them for a balanced face.
  • Sew the carrot nose onto the face, centering it just below the eyes. Add a little stuffing inside the nose before closing.
  • Using black embroidery thread, stitch a wide, happy smile centered under the nose and add two small diagonal eyebrows above the eyes.
  • Pin the arms to the sides of the body at approximately Round 27, then sew them securely in place.
  • Attach two small black buttons vertically down the center of the snowman's belly between the arms.
  • Apply a small amount of pink blush or chalk to the cheeks to give him that 'just came in from the cold' look.
  • Wrap the green scarf around the neck and place the hat on the head to complete your winter companion.

Important Notes

  • πŸ’‘Stuff your snowman firmly as you go, especially in the neck area to provide support for the head.
  • πŸ’‘The oval base can be tricky; use a stitch marker in the first stitch of every round to keep your counts accurate.
  • πŸ’‘If you want the hat to stand up straight, you can add a small amount of stuffing to the very tip before placing it.
  • πŸ’‘For the best finish, use an invisible decrease (dec) technique throughout the head and body sections.
  • πŸ’‘When embroidering the mouth, use a single strand of black yarn for a delicate, clean line.

I hope this little snowman brings a big smile to your face! There is something so satisfying about finishing those final embroidery details and seeing him come to life. He is the perfect size for little hands to hold or to sit proudly on a bookshelf throughout the winter season. Don't forget to share your finished photos with our communityβ€”I absolutely love seeing the different colors and personalities you give your creations. Happy hooking, and may your winter be filled with warmth, yarn, and plenty of cozy crochet time! πŸ§Άβœ¨β›„

You ask,

we answer.

FAQs

Can I use a larger hook and thicker yarn for this snowman?

Absolutely! If you use worsted weight yarn and a 3.5mm hook, your snowman will turn out much larger, likely around 20-25 cm. Just remember to size up your safety eyes to 10mm or 12mm so they don't look too small.

What is the best way to embroider the snowflakes on the hat?

I recommend using a sharp embroidery needle and white yarn. Simply make small 'X' shapes with a vertical line through them. Space them randomly for a natural, snowy look, and keep your tension loose so the hat stays stretchy.

How do I make sure the scarf doesn't fall off?

After wrapping the scarf around the neck, you can use a small piece of matching green yarn to tack it in place with a single stitch at the back of the neck. This keeps it perfectly positioned forever!

Is the hat meant to be removable?

That is up to you! The pattern is designed so the hat fits snugly, but if you're giving it to a child, I recommend sewing the hat down around the brim to ensure it doesn't get lost during playtime.