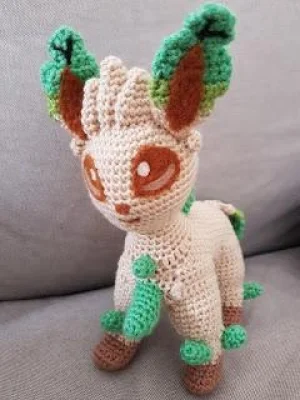
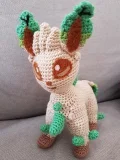
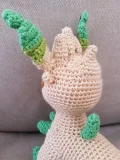
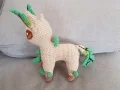
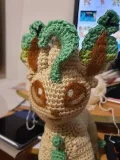
If you are looking to bring a bit of woodland magic into your craft room, this leafy little friend is the perfect project for your next weekend. I have always loved how the different textures and colors come together to create such a botanical feel, and this pattern captures that spirit perfectly. You will get to play with color changes and some fun shaping to make those signature ears and tail really stand out. It is a wonderful way to challenge your skills while creating a truly special handmade companion.
Progress Tracker
0% Complete
— 1. Head :
Round 1 :
ch 2, 6 x 1sc into the 2nd ch from your hook (6)
Round 3 :
6 x (inc, 1 x 1sc) (18)
Round 4 :
6 x (inc, 2 x 1sc) (24)
Round 5 :
6 x (inc, 3 x 1sc) (30)
Round 6 :
6 x (inc, 4 x 1sc) (36)
Round 7 :
6 x (inc, 5 x 1sc) (42)
Round 8 :
6 x (inc, 6 x 1sc) (48)
Round 15 :
8 x 1sc, 3 x inc, 37 x 1sc (51)
Round 17 :
8 x 1sc, 3 x sc2tog, 37 x 1sc (48)
Round 18 :
6 x (sc2tog, 6 x 1sc) (42)
Round 19 :
6 x (sc2tog, 5 x 1sc) (36)
Round 20 :
6 x (sc2tog, 4 x 1sc) (30)
Round 21 :
6 x (sc2tog, 3 x 1sc) (24)
Round 22 :
6 x (sc2tog, 2 x 1sc) (18)
Round 24 :
6 x (inc, 2 x 1sc) (24)
Round 27 :
6 x (inc, 3 x 1sc) (30)
Round 28 :
15 x 1dc, 15 x 1sc (30)
Info :
Fasten off and leave a long tail for sewing. Stuff the head firmly, making sure to push extra filling into the nose area created by the Round 15 increases.
— 2. Body :
Round 1 :
ch 2, 6 x 1sc into the 2nd ch from your hook (6)
Round 3 :
6 x (inc, 1 x 1sc) (18)
Round 4 :
6 x (inc, 2 x 1sc) (24)
Round 5 :
6 x (inc, 3 x 1sc) (30)
Round 6 :
6 x (inc, 4 x 1sc) (36)
Round 7-16 :
36 x 1sc (36)
Round 17 :
3 x (sc2tog, 4 x 1sc), 18 x 1sc (33)
Round 18 :
3 x (sc2tog, 3 x 1sc), 18 x 1sc (30)
Round 19-23 :
30 x 1sc (30)
Info :
Place a stitch marker 6 or 7 stitches into Round 23. This marks the bottom of the stomach area where the decreases were made.
Round 24 :
3 x (inc, 3 x 1sc), 18 x 1sc (33)
Round 25 :
3 x (inc, 4 x 1sc), 18 x 1sc (36)
Round 26-33 :
36 x 1sc (36)
Round 34 :
6 x (sc2tog, 4 x 1sc) (30)
Round 35 :
6 x (sc2tog, 3 x 1sc) (24)
Info :
Begin stuffing firmly. Ensure the stomach area maintains its slight inward curve.
Round 36 :
6 x (sc2tog, 2 x 1sc) (18)
Round 37 :
6 x (sc2tog, 1 x 1sc) (12)
Info :
Sew the opening closed and attach the head to the body.
— 3. Legs (Cream Part) :
Info :
Using cream yarn, make 4 of these pieces.
Round 1 :
ch 2, 6 x 1sc into the 2nd ch from your hook (6)
Round 3 :
6 x (inc, 1 x 1sc) (18)
Round 7 :
6 x (inc, 2 x 1sc) (24)
Round 8-10 :
24 x 1sc (24)
Row 1 :
12 x 1sc, ch 1, turn (12)
Row 2 :
11 x 1sc, ch 1, turn (11)
Row 3 :
10 x 1sc, ch 1, turn (10)
Row 4 :
9 x 1sc, ch 1, turn (9)
Row 5 :
8 x 1sc, ch 1, turn (8)
Info :
Stuff front legs lightly and back legs firmly. Sew to the body with the rows facing the outside.
— 4. Paws (Brown Part) :
Info :
Using brown yarn, make 4 of these pieces.
Round 1 :
ch 2, 6 x 1sc into the 2nd ch from your hook (6)
Round 3 :
3 x inc, 3 x 1sc, 3 x inc, 3 x 1sc (18)
Round 5 :
6 x sc2tog, 6 x 1sc (12)
Colour Change :
Switch to cream yarn.
Round 10 :
6 x (inc, 1 x 1sc) (18)
Info :
1 x 1sc into the next stitch to finish the join. Stuff lightly and sew onto the cream leg sections so the front part faces forward.
— 5. Ears :
Info :
Make 4 pieces total. Start with the dark green yarn. When switching colors, leave long tails for assembly.
Row 1 :
ch 2, 2 x 1sc into the 2nd ch from hook, ch 1, turn (2)
Row 2 :
2 x inc, ch 1, turn (4)
Row 3 :
4 x 1sc, ch 1, turn (4)
Row 4 :
1 x 1sc, 2 x inc, ch 2 (7)
Row 5 :
From 2nd ch from hook: 1 x 1sc, then 3 x 1sc across the row, ch 3, turn (7)
Row 6 :
From 2nd ch from hook: 2 x 1sc, then 4 x 1sc across the row, ch 1, turn (6)
Row 7 :
1 x 1sc, 2 x (inc, 1 x 1sc), 1 x 1sc, ch 1, turn (8)
Row 8-9 :
8 x 1sc, ch 1, turn (8)
Colour Change :
Switch to light green yarn.
Row 10 :
8 x 1sc, ch 1, turn (8)
Row 11 :
7 x 1sc, ch 2, turn (9)
Row 12 :
From 2nd ch from hook: 1 x 1sc, then 7 x 1sc across the row, ch 1, turn (8)
Colour Change :
Switch to cream yarn.
Row 13 :
sc2tog, 4 x 1sc, sc2tog, ch 1, turn (6)
Row 14 :
6 x 1sc, ch 1, turn (6)
Row 15 :
sc2tog, 2 x 1sc, sc2tog, ch 1, turn (4)
Row 16 :
4 x 1sc, ch 1, turn (4)
Row 17 :
2 x sc2tog, ch 1, turn (2)
Info :
Layer two pieces together and sew around the edges to make one ear. Repeat for the second ear. Add felt lines and brown inner ear details before sewing to the head.
— 6. Head Spikes :
Large Spike :
Make 2. Round 1: ch 2, 6 x 1sc in 2nd ch (6). Round 2: 6 x 1sc (6). Round 3: 3 x (inc, 1 x 1sc) (9). Round 4: 9 x 1sc (9). Round 5: 3 x (inc, 2 x 1sc) (12). Round 6: 6 x (inc, 1 x 1sc) (18). Rounds 7-8: 18 x 1sc (18).
Medium Spike :
Make 2. Round 1: ch 2, 6 x 1sc in 2nd ch (6). Round 2: 6 x 1sc (6). Round 3: 3 x (inc, 1 x 1sc) (9). Round 4: 3 x (inc, 2 x 1sc) (12). Round 5: 6 x (inc, 1 x 1sc) (18). Rounds 6-7: 18 x 1sc (18).
Small Spike :
Make 2. Round 1: ch 2, 6 x 1sc in 2nd ch (6). Round 2: 6 x 1sc (6).
Info :
Flatten one large spike and sew to back of head. Lightly stuff the other large spike and sew to top center. Attach medium spikes to either side and small spikes next to the ears.
— 7. Tail :
Info :
Make 2 pieces starting with dark green. Color change logic follows the ear instructions.
Row 1 :
ch 2, 2 x 1sc in 2nd ch, ch 1, turn (2)
Row 2 :
inc, 1 x 1sc, ch 1, turn (3)
Row 3 :
2 x 1sc, inc, ch 1, turn (4)
Row 4 :
2 x 1sc, 2 x inc, ch 1, turn (6)
Row 5 :
2 x inc, 2 x 1sc, sc2tog, ch 1, turn (7)
Row 6 :
7 x 1sc, ch 1, turn (7)
Row 7 :
inc, 6 x 1sc, ch 1, turn (8)
Row 8 :
sc2tog, 5 x 1sc, inc, ch 1, turn (8)
Row 9-12 :
8 x 1sc, ch 1, turn (8)
Row 13 :
sc2tog, 5 x 1sc, inc, ch 1, turn (8)
Row 14 :
inc, 5 x 1sc, sc2tog, ch 1, turn (8)
Row 15 :
sc2tog, 5 x 1sc, inc, ch 1, turn (8)
Row 16 :
6 x 1sc, ch 3 (9)
Row 17 :
From 2nd ch: 2 x 1sc, then 6 x 1sc across main piece, ch 1, turn (8)
Row 18-19 :
8 x 1sc, ch 1, turn (8)
Row 20 :
sc2tog, 4 x 1sc, ch 3 (8)
Row 21 :
From 2nd ch: 2 x 1sc, then 5 x 1sc across main piece, ch 1, turn (7)
Row 22 :
7 x 1sc, ch 1, turn (7). Change to light green.
Row 23 :
5 x 1sc, ch 3 (8)
Row 24 :
From 2nd ch: 2 x 1sc, then 5 x 1sc across main piece, ch 1, turn (7)
Row 25-26 :
7 x 1sc, ch 1, turn (7). Change to cream.
Row 27 :
7 x 1sc, ch 1, turn (7)
Row 28 :
sc2tog, 5 x 1sc, ch 1, turn (6)
Row 29 :
sc2tog, 2 x 1sc, sc2tog, ch 1, turn (4)
Row 30-31 :
4 x 1sc, ch 1, turn (4)
Row 32 :
sc2tog, 2 x 1sc, ch 1, turn (3)
Row 33 :
1 x 1sc, sc2tog (2)
Info :
Sew the two tail pieces together and attach to the body.
— 8. Sprouts & Leaf :
Large Chest Sprout :
Round 1: ch 2, 6 x 1sc in 2nd ch (6). Round 2: 6 x 1sc (6). Round 3: 3 x (inc, 1 x 1sc) (9). Rounds 4-8: 4 x 1hdc, 5 x 1sc (9).
Small Chest Sprout :
Round 1: ch 2, 6 x 1sc in 2nd ch (6). Rounds 2-3: 6 x 1sc (6).
Back Sprout :
Round 1: ch 2, 6 x 1sc in 2nd ch (6). Round 2: 6 x 1sc (6). Rounds 3-5: 3 x 1hdc, 3 x 1sc (6).
Leg Sprouts :
Make 6. Round 1: ch 2, 6 x 1sc in 2nd ch (6). Round 2: 6 x 1sc (6). Rounds 3-4: 3 x 1hdc, 3 x 1sc (6).
Forehead Leaf :
Make 2. ch 20. From 2nd ch: 8 x 1sc, 2 x dc-inc, 2 x (tc-inc, 1 x tc), 2 x dc-inc, 4 x 1sc. Sew pieces together and attach to head.
I hope you have as much fun making this little woodland guardian as I did! There is something so peaceful about working with these earthy tones and botanical shapes. Once you are finished, your new friend will be ready to guard your bookshelf or join your collection of handmade treasures. Don't forget to take a moment to admire that tail—it is definitely the star of the show and adds so much character to the piece! Happy hooking, and I can't wait to see your finished creations. 🧶 ✨