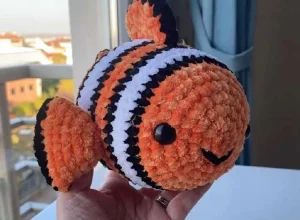
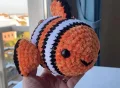
๐Ÿงถ Beautiful โœจ Detailed ๐Ÿ’ Adorable

Adorable Nemo Clown Fish Amigurumi Pattern

Adorable Nemo Clown Fish Amigurumi Pattern
4.2โ˜…Rating
3-5 HoursTime Needed
1.1KMade This
โœ‚๏ธ

Intermediate Level

Ideal for those with basic crocheting experience, featuring slightly more advanced stitches and techniques to expand your skills.

โฑ๏ธ

Quick Craft

Fits nicely into a free afternoon โ€” 2 to 5 hours of focused, enjoyable crocheting.

๐Ÿฐ

Whimsical Buddy

Playful characters full of personality, designed to spark imagination and become cherished playtime favorites.

About This Adorable Nemo Clown Fish Amigurumi Pattern

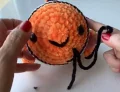
Adorable Nemo Clown Fish Amigurumi Pattern crochet pattern - detailed view

Whether you're decorating a sea-themed bedroom or looking for a handmade gift that kids will cherish, this clown fish is a guaranteed hit. He stands out on any shelf with his bright, bold colors and soft texture.

Why You'll Love This Adorable Nemo Clown Fish Amigurumi Pattern

I honestly couldn't stop smiling while making this one! The way the stripes come together is so satisfying, and using the crossed stitch gives the fabric such a neat, professional look. Itโ€™s one of those projects where you see the personality emerge with every round, and the velvet yarn is just a dream to work with.

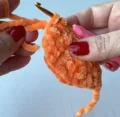
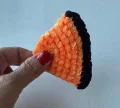
Adorable Nemo Clown Fish Amigurumi Pattern step 1 Adorable Nemo Clown Fish Amigurumi Pattern step 2 Adorable Nemo Clown Fish Amigurumi Pattern step 3 Adorable Nemo Clown Fish Amigurumi Pattern step 4

Switch Things Up

There is something so nostalgic about clown fish, isn't there? Every time I see these bright orange and white stripes, I'm immediately transported to coral reefs and childhood movies. When I sat down to design this pattern, I knew I wanted to use velvet yarn. There's just no beating that plush, high-end feel it gives to amigurumi. It makes the finished toy feel less like a project and more like something you'd find in a boutique toy shop.

One thing I learned while making my first version of this little guy: don't be afraid to really stuff him! Because the velvet fabric is so soft, it can handle quite a bit of filling without looking stretched. I also played around with the smile placement quite a bit. A tiny bit higher or lower can totally change his personality, so I always recommend pinning the mouth line first to see what expression you like best. Itโ€™s those little personal touches that make handmade items so special. I canโ€™t wait to see your versions swimming around!

Common Mistakes & How to Fix Them

โœ— When switching colors for the stripes, if you don't pull the new yarn through the last loops of the previous stitch, your color transitions will look jagged rather than clean lines.โœ— The safety eyes need to go in before you close up the body; if you forget them until Round 26, you'll have a hard time securing the backings through the narrow opening.โœ— Since we're using velvet yarn, don't pull your magic ring too hard or the yarn might snapโ€”slow and steady is the way to go to close that initial hole safely.โœ— If you don't use the 'crossed stitch' (yarn under) as suggested, your fish might turn out slightly larger and the stitches won't have that distinct 'X' shape shown in the photos.

Adorable Nemo Clown Fish Amigurumi Pattern

You're going to love bringing this cheerful little clown fish to life! Using soft velvet yarn makes him so squishy and huggable, perfect for a nursery or as a gift for any underwater adventurer. I've designed this to be a straightforward project that really pops thanks to those classic orange, white, and black stripes that everyone recognizes instantly.

Intermediate 3-5 Hours

Materials Needed for Adorable Nemo Clown Fish Amigurumi Pattern

โ€” Main Fabric

  • 01
    I used Himalaya Velvet Yarn for this project to get that ultra-soft finish.
  • 02
    You'll need Orange (shade 90016) as your primary color.
  • 03
    A bit of crisp White (shade 90001) for the middle stripes.
  • 04
    Deep Black (shade 90011) for the accent stripes and fin edgings.

โ€” Tools Required

  • 01
    A 4mm crochet hook to keep your stitches nice and tight.
  • 02
    One pair of 16mm safety eyes for a cute, wide-eyed look.
  • 03
    A small amount of black embroidery thread to stitch the smile.
  • 04
    A tapestry needle for sewing the fins and tail into place.
  • 05
    High-quality polyester fiberfill for a firm but squishy stuffing.
  • 06
    Sharp scissors and a stitch marker to keep track of your spiral rounds.

Progress Tracker

0% Complete

โ€” 1. Body :

Info :

Start with your orange yarn and work in a continuous spiral.

Round 1 :

6 sc into a magic ring (6)

Round 2 :

Work 1 inc in every stitch around (12)

Round 3 :

(1 sc, inc) repeat 6 times (18)

Round 4 :

1 sc, inc, (2 sc, inc) repeat 5 times, then 1 sc (24)

Round 5 :

(3 sc, inc) repeat 6 times (30)

Round 6 :

2 sc, inc, (4 sc, inc) repeat 5 times, then 2 sc (36)

Round 7 :

1 sc, inc, (3 sc, inc) repeat 8 times, then 2 sc (45)

Round 8 :

Switch to (B) and work 45 sc around (45)

Round 9 :

Switch to (W) and work 45 sc around (45)

Round 10 :

Continue with (W) for 45 sc around (45)

Round 11 :

Switch to (B) and work 45 sc around (45)

Round 12 :

Switch to (O) and work 45 sc around (45)

Round 13 :

Continue with (O) for 45 sc around (45)

Round 14 :

Switch to (B) and work 45 sc around (45)

Round 15 :

Switch to (W) and work 45 sc around (45)

Round 16 :

Continue with (W) for 45 sc around (45)

Round 17 :

Continue with (W) for 45 sc around (45)

Round 18 :

Switch to (B) and work 45 sc around (45)

Round 19 :

Switch to (O) and work 45 sc around (45)

Round 20 :

Continue with (O) for 45 sc around (45)

Round 21 :

With (O), work 1 sc, dec, (3 sc, dec) repeat 8 times, then 2 sc (36)

Round 22 :

Switch to (B) and work 2 sc, dec, (4 sc, dec) repeat 5 times, then 2 sc (30)

Round 23 :

Switch to (W) and work (3 sc, dec) repeat 6 times (24)

Round 24 :

Switch to (B) and work (2 sc, dec) repeat 6 times (18)

Round 25 :

Switch to (O) and work (1 sc, dec) repeat 6 times (12)

Round 26 :

Continue with (O) and dec 6 times (6)

Info :

Finish with 1 slst into the next stitch, ch 1, and fasten off. Stuff the body firmly and weave in your ends.

โ€” 2. Side Fin (Make 2) :

Round 1 :

With (O), work 6 sc into a magic ring (6)

Round 2 :

Work 1 inc in every stitch around (12)

Round 3 :

(3 sc, inc) repeat 3 times (15)

Round 4 :

(4 sc, inc) repeat 3 times (18)

Round 5 :

(5 sc, inc) repeat 3 times (21)

Round 6 :

(6 sc, inc) repeat 3 times (24)

Info :

Cut the orange yarn leaving a long tail for assembly later.

Edging :

Using (B), flatten the piece and work 12 sc through both layers to close the edge. Finish with a slst, ch 1, and hide the tail.

โ€” 3. Upper Fin (Make 2 Pieces) :

Info :

Use (O) yarn. These pieces are worked in rows.

Row 1 :

ch 4, start in 2nd ch from hook, 3 HDC, turn and ch 1 (3)

Row 2 :

2 HDC, inc HDC, turn and ch 1 (4)

Row 3 :

4 HDC, turn and ch 1 (4)

Row 4 :

4 HDC, turn and ch 1 (4)

Row 5 :

dec HDC, 2 HDC, turn and ch 1 (3)

Row 6 :

1 HDC, dec HDC (2)

Info :

Fasten off and leave a tail. Make a second identical piece.

Joining :

Stack the two pieces. Crochet 9 sc using (O) along the straight bottom edge, then join the rest of the edge with 11 sc using (B).

โ€” 4. Tail :

Round 1 :

With (O), work 6 sc into a magic ring (6)

Round 2 :

Work 1 inc in every stitch around (12)

Round 3 :

(3 sc, inc) repeat 3 times (15)

Round 4 :

(4 sc, inc) repeat 3 times (18)

Round 5 :

(5 sc, inc) repeat 3 times (21)

Round 6 :

(6 sc, inc) repeat 3 times (24)

Round 7 :

(7 sc, inc) repeat 3 times (27)

Round 8 :

(8 sc, inc) repeat 3 times (30)

Info :

Cut the orange yarn leaving a long tail for sewing.

Edging :

Using (B), flatten the tail and work 15 sc through both layers to seal the edge.

Assembly Instructions

  • Insert the 16mm safety eyes between Round 5 and Round 6 of the body before you finish stuffing it.
  • Sew the tail piece directly onto the back of the body, positioning it over the final two rounds.
  • Pin the side fins to each side of the body between Round 12 and Round 15 to ensure they are level.
  • Attach the upper fin along the top center, spanning the distance from Round 11 to Round 20.
  • Use black embroidery thread to stitch a friendly curved smile centered below the eyes.

Important Notes

  • ๐Ÿ’กWork in a continuous spiral without joining rounds to keep the stripes looking seamless.
  • ๐Ÿ’กI highly recommend using a stitch marker to track the start of each round, especially with the dark black yarn.
  • ๐Ÿ’กUse the 'yarn under' technique (crossed stitch) to create a denser fabric that keeps the stuffing from peeking through.
  • ๐Ÿ’กWhen stuffing, focus on creating a smooth, rounded shape for the body before you start the final decreases.
  • ๐Ÿ’กKeep your tension consistent throughout all pieces so the fins look proportional to the body.

I hope you enjoy making your new little ocean friend! Thereโ€™s something so rewarding about seeing those bright stripes come together. Whether heโ€™s destined for a nursery shelf or a snuggle, heโ€™s sure to bring a bit of tropical joy to your home. Don't forget to share your finished fishy with the communityโ€”I'd love to see how yours turns out! Happy hooking and enjoy every single stitch of the process. ๐Ÿงถ ๐Ÿงต โœจ

You ask,

we answer.

FAQs

Can I use standard acrylic yarn instead of velvet?

Absolutely! Just keep in mind that using worsted weight acrylic will result in a smaller fish, and you might want to drop your hook size to a 3.5mm to keep the stitches tight enough to hide the stuffing.

How do I make the color changes look cleaner?

The trick is to introduce the new color on the final pull-through of the last stitch of the previous round. This makes the transition sharp and professional instead of having a 'step' in the colors.

My fish looks a bit lopsided, how can I fix it?

This usually happens during the stuffing phase. Try pulling out some stuffing and re-inserting it in smaller clumps, shaping the body with your hands like dough as you go to even it out.

What is a crossed stitch and is it necessary?

It's when you yarn under instead of yarn over. It creates a tighter 'X' shape. Itโ€™s not strictly necessary, but it helps prevent the velvet yarn from stretching too much and keeps the stuffing hidden.