🧶 Beautiful ✨ Detailed 💝 Adorable

Chubby Cat Loaf Amigurumi Pattern

Chubby Cat Loaf Amigurumi Pattern
4.9★Rating
3-5 HoursTime Needed
2.0KMade This
✂️

Intermediate Level

Ideal for those with basic crocheting experience, featuring slightly more advanced stitches and techniques to expand your skills.

⏱️

Quick Craft

Fits nicely into a free afternoon — 2 to 5 hours of focused, enjoyable crocheting.

🧸

Cute Companion

An adorable friend to cherish, handcrafted with love to bring comfort and joy for years to come.

About This Chubby Cat Loaf Amigurumi Pattern

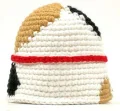
Chubby Cat Loaf Amigurumi Pattern crochet pattern - detailed view

This pattern is a fantastic choice for anyone looking to practice color changes and surface stitching. The finished kitties make heartwarming gifts for pet parents or a charming addition to any nursery shelf.

Why You'll Love This Chubby Cat Loaf Amigurumi Pattern

I honestly can't get enough of the 'reversible' option in this pattern—it's like getting two toys in one! The way the muzzle is constructed from two joined circles gives them such a realistic little face, and adding that tiny golden bell or a little peach fish is just the icing on the cake.

Chubby Cat Loaf Amigurumi Pattern step 1 Chubby Cat Loaf Amigurumi Pattern step 2 Chubby Cat Loaf Amigurumi Pattern step 3 Chubby Cat Loaf Amigurumi Pattern step 4

Switch Things Up

I've always been a total sucker for amigurumi that captures that perfect 'loaf' shape cats do, and this pattern hits the nail right on the head. What I really love about this specific project is how much room there is to play with personality. Whether you're making a tribute to your own childhood pet or a gift for a fellow cat lover, these little guys come together so quickly that you'll want to make a whole clowder of them!

One little tip from my own hook: when you're doing the color changes for the Calico or the Tabby, don't stress too much about being perfectly precise. Cats are wonderfully unique, and a little bit of 'organic' placement only makes them look more realistic. Also, if you decide to go the reversible route, keep your tension just a bit looser than usual. It makes flipping them inside out so much smoother and prevents the stitches from pulling too hard. I usually keep a small basket of these on my craft fair table, and they are always the first things people want to squeeze. Happy hooking, everyone!

Common Mistakes & How to Fix Them

✗ If you're making the reversible version, working your stitches too tightly will make it nearly impossible to flip the cat inside out without straining the yarn.✗ When working the surface slip stitches for the collar, it's easy to accidentally pull too tight, which can cause the body to cinch inward and lose its loaf shape.✗ The muzzle is made of two separate circles; if you don't align them perfectly before joining, the nose and mouth embroidery will end up looking crooked.✗ Forgetting to place the cardboard or plastic base inside before sewing the bottom closed will result in a wobbly cat that won't stand up straight on its own.

Chubby Cat Loaf Amigurumi Pattern

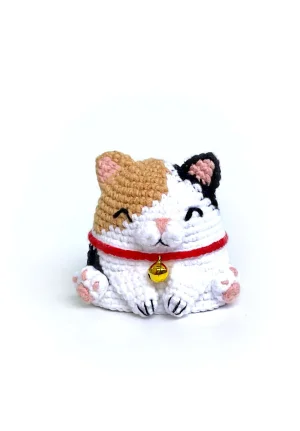
There is something so special about a handmade kitty, especially one that fits right in the palm of your hand. This pattern is a total treat because it gives you the blueprints for five distinct breeds—Calico, Grey, Siamese, Tabby, and Tuxedo! You'll love how these little loaves come together with their tiny paws and sweet accessories. Whether you're making a mini version of your own pet or a whole clowder for a gift, these cats are designed to bring a smile to anyone's face.

Intermediate 3-5 Hours

Materials Needed for Chubby Cat Loaf Amigurumi Pattern

— Main Fabric

  • 01
    4-ply cotton blend yarn in white, tan, black, red, and peach for the Calico version
  • 02
    4-ply cotton blend yarn in grey, black, white, peach, and pink for the Grey version
  • 03
    4-ply cotton blend yarn in light beige, black, brown, dark brown, orange, and peach for the Siamese version
  • 04
    4-ply cotton blend yarn in tan, dark brown, white, orange, and peach for the Tabby version
  • 05
    4-ply cotton blend yarn in black, white, peach, red, and yellow for the Tuxedo version
  • 06
    Polyester fiberfill for stuffing the body

— Tools Required

  • 01
    2.0 mm crochet hook or size needed to achieve a tight fabric
  • 02
    Tapestry needle for assembly and sewing
  • 03
    Embroidery needle for fine facial details
  • 04
    Stitch markers to keep track of the continuous spiral rounds
  • 05
    Small golden bell (7 mm diameter) for the collar
  • 06
    Sharp scissors for trimming yarn tails
  • 07
    Circular piece of cardboard or rigid plastic for the flat base

Progress Tracker

0% Complete

— 1. Calico Head & Body :

Info :

Note: If making a single cat, use a standard tail. For a reversible cat, leave a 50cm starting tail. Use tan, white, and black yarn as indicated.

Round 1 :

Using tan: 6 x 1sc into a mr (6)

Round 2 :

Using tan: 3 x inc. Using white: 2 x inc. Using tan: 1 x inc (12)

Round 3 :

Using tan: [1sc, inc] 3 times. Using white: 1sc, inc. Using tan: 1sc, inc, 1sc, inc (18)

Round 4 :

Using tan: [1sc, inc, 1sc] 2 times, 1sc, inc. Using black: 2sc, inc. Using tan: 2sc, inc, 2sc, inc, 2sc, inc, 1sc (24)

Round 5 :

Using tan: [3sc, inc] 2 times, 3sc, inc. Using white: 1sc. Using tan: 2sc, inc, 3sc, inc, 3sc, inc (30)

Round 6 :

Using tan: [2sc, inc, 2sc] 2 times, 2sc, inc. Using white: 4sc, inc. Using tan: 4sc, inc, 1sc. Using white: 3sc, inc, 2sc (36)

Round 7 :

Using white: 1sc. Using tan: 4sc, inc, 5sc, inc, 3sc. Using white: 2sc, inc, 3sc, 2sc, inc, 5sc, inc, 5sc, inc (42)

Round 8 :

Using tan: 2sc, 14sc. Using white: 8sc. Using black: 8sc. Using white: 10sc (42)

Round 9 :

Using white: 3sc, inc. Using tan: 6sc, inc, 4sc. Using white: 2sc, inc, 6sc, inc, 6sc, inc, 6sc, inc, 3sc (48)

Round 10 :

Using white: 4sc. Using tan: 12sc. Using white: 14sc. Using black: 4sc. Using white: 14sc (48)

Round 11 :

Using white: 5sc. Using tan: 10sc. Using white: 33sc (48)

Round 12 :

Using white: 6sc. Using tan: 7sc. Using white: 35sc (48)

Round 13 :

Using white: 8sc. Using tan: 4sc. Using white: 36sc (48)

Round 14 :

Using white: [7sc, inc] 6 times (54)

Round 15 :

Using white: BLO 54 x 1sc (54)

Round 16 :

Using white: 8sc. Using black: 8sc. Using white: 38sc (54)

Round 17 :

Using white: 7sc. Using black: 10sc. Using white: 31sc, 6sc (54)

Round 18 :

Using white: 6sc. Using black: 12sc. Using white: 28sc, 8sc (54)

Round 19 :

Using tan: 2sc, 3sc. Using white: 12sc, 18sc, 5sc, 4sc. Using tan: 10sc (54)

Round 20 :

Using tan: 4sc, inc. Using white: 8sc, inc, 1sc. Using tan: 7sc, inc, 8sc, inc, 2sc. Using white: 6sc, inc, 3sc, 5sc, inc, 4sc (60)

Round 21 :

Using white: 4sc. Using tan: 13sc. Using white: 20sc, 8sc, 5sc. Using tan: 10sc (60)

Round 22 :

Using white: 5sc. Using tan: 11sc. Using white: 22sc. Using black: 6sc. Using white: 7sc. Using tan: 9sc (60)

Info :

Fasten off and finish with an invisible join.

— 2. Calico Ears :

Info :

Create one ear in black and one in tan/peach. Use the peach color for the inner ear details.

Round 1 :

Using black: 6 x 1sc into a mr (6)

Round 2 :

Using black: 1sc. Using peach: inc. Using black: 1sc. Using peach: inc. Using black: 1sc. Using peach: inc (9)

Round 3 :

Using black: 2sc, inc. Using peach: 1sc. Using black: 1sc, inc. Using peach: 2sc, inc (12)

Round 4 :

Using black: 3sc, inc, 1sc. Using peach: 2sc, inc, 3sc (13). Skip the very last stitch.

Info :

Fasten off, leave a sewing tail, and finish invisibly. Repeat for the second ear using tan and peach.

— 3. Muzzle (All Breeds) :

Info :

Use white yarn. You will make two small circles and join them.

Circle 1 :

Work 6 x 1sc into a mr. Tighten and sl st to the first st. Fasten off.

Circle 2 :

Work 6 x 1sc into a mr. Tighten and sl st to the first st. Do not fasten off.

Joining :

Connect to the first circle with 1sc. Work 5 more sc around the first circle, then work 6sc around the second circle. Fasten off and finish invisibly.

— 4. Front Legs (All Breeds) :

Round 1 :

Using white: 8 x 1sc into a mr (8)

Round 2-3 :

8 x 1sc (8)

Round 4 :

3sc, inc, 4sc (9)

Round 5 :

4sc, inc, 4sc (10)

Closing :

Flatten the piece and work 5sc through both layers to close. Fasten off and leave a tail.

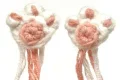
— 5. Paws (All Breeds) :

Round 1 :

Using peach: 6 x 1sc into a mr. Join with sl st and switch to white yarn (6)

Round 2 :

BLO: Loosely work 6 x sl st. Join to first st and ch1 (6)

Round 3 :

3 x inc, loosely work 3 x sl st. Join to first st (9)

Round 4 :

[1 x bobble st, 1 x sl st] 3 times (6). Leave remaining stitches unworked.

Info :

Fasten off with a tail. Embroider paw pads on each bobble using the peach yarn tail.

— 6. Calico Tail :

Round 1 :

Using black: 5 x 1sc into a mr (5)

Round 2-3 :

5 x 1sc (5)

Round 4 :

2 x sl st, 3sc (5)

Round 5 :

5 x 1sc (5)

Round 6 :

Using tan: 2 x sl st, 3sc (5)

Round 7 :

5 x 1sc (5)

Round 8 :

2 x sl st, 3sc (5)

Round 9-10 :

Using black: 5 x 1sc (5)

Round 11-12 :

Using tan: 5 x 1sc (5)

Round 13 :

1 x sl st, 3sc, 1 x sl st (5)

Round 14 :

5 x 1sc (5)

Round 15 :

1 x sl st, 3sc, 1 x sl st (5)

— 7. Base (All Breeds) :

Round 1 :

Work 6 x 1sc into a mr (6)

Round 2 :

6 x inc (12)

Round 3 :

[1sc, inc] 6 times (18)

Round 4 :

[1sc, inc, 1sc] 6 times (24)

Round 5 :

[3sc, inc] 6 times (30)

Round 6 :

[2sc, inc, 2sc] 6 times (36)

Round 7 :

[5sc, inc] 6 times (42)

Round 8 :

[3sc, inc, 3sc] 6 times (48)

Round 9 :

[7sc, inc] 6 times (54)

Round 10 :

[4sc, inc, 4sc] 6 times (60)

Info :

Fasten off and leave a long tail for sewing to the body.

Assembly Instructions

  • Position the muzzle on the face between Rounds 11 and 13, centered across 5 stitches. Sew it flat without adding any stuffing.
  • Attach the ears to the top of the head, placing them between Rounds 4 and 8.
  • Sew the front legs to the body between Rounds 17 and 22. Angle them slightly outward for a natural look.
  • Place the paws directly next to the front legs, securing them to the body between Rounds 18 and 22.
  • Attach the tail to the center back of the body at Round 21.
  • Embroider the eyes at Round 10, keeping them 1 stitch away from the muzzle and 3 stitches wide. Add nose and mouth details to the muzzle.
  • Insert your cardboard base, stuff the body firmly, and sew the flat base piece to the back loops of the last round of the body.

Important Notes

  • 💡For the cleanest finish, use invisible decreases (dec) throughout the project to avoid gaps in the fabric.
  • 💡When changing colors, pull the new color through on the final loop of the previous stitch to keep the transition sharp.
  • 💡The surface slip stitches for the collar should be worked between Rounds 14 and 15 while holding the body upside down.
  • 💡If you are making the reversible version, do not use tapestry technique for color changes as it makes the fabric too stiff to flip.
  • 💡Always use a stitch marker; since this is worked in a spiral, it is very easy to lose your place in the rounds.

I hope you have as much fun making these little cat loaves as I did! There is something so satisfying about finishing that final row and seeing their little faces come to life. Don't forget that you can mix and match the colors to create your own unique kitty combinations. If you enjoyed this pattern, I'd love to see your finished clowder of cats! Keep your hook moving and your yarn untangled. Happy crafting! 🧶✨🐈
You ask,

we answer.

FAQs

How do I make the cat reversible?

To make it reversible, you need to crochet two complete cat bodies. Instead of sewing a flat base on each, you will join the two bodies together at the bottom edge, allowing one to tuck inside the other.

What yarn weight is best for this pattern?

This pattern was designed using 4-ply cotton blend yarn. If you use a heavier weight like worsted, your cat will be significantly larger and you may need to adjust your safety eye or embroidery size.

Do I need to stuff the muzzle?

No, the muzzle is designed to be sewn flat against the face. The construction of the two joined circles naturally provides enough shape without extra stuffing.

My cat won't stand up straight, what happened?

This usually happens if the base is too rounded. Make sure you've inserted a rigid piece of cardboard or plastic inside the bottom before sewing the base piece on to keep it perfectly flat.