🧶 Beautiful ✨ Detailed 💝 Adorable

Chubby Cat Pillow Amigurumi Pattern

Chubby Cat Pillow Amigurumi Pattern
4.3★Rating
5-7 HoursTime Needed
1.2KMade This
✂️

Intermediate Level

Ideal for those with basic crocheting experience, featuring slightly more advanced stitches and techniques to expand your skills.

⏱️

Weekend Treat

Takes 5-7 hours, making it an enjoyable project to finish over a couple of days.

🐰

Whimsical Buddy

Playful characters full of personality, designed to spark imagination and become cherished playtime favorites.

About This Chubby Cat Pillow Amigurumi Pattern

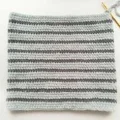
Chubby Cat Pillow Amigurumi Pattern crochet pattern - detailed view

This project is a total hit for nursery decor or as a comforting companion for long car rides. It is the kind of handmade gift that actually gets used every single day for naps and snuggles.

Why You'll Love This Chubby Cat Pillow Amigurumi Pattern

I am obsessed with how the stripes work up—it is so satisfying to see the pattern grow round by round. Plus, using the bulky plush yarn means you get a massive, squishy result without spending weeks on a single project!

Chubby Cat Pillow Amigurumi Pattern step 1 Chubby Cat Pillow Amigurumi Pattern step 2 Chubby Cat Pillow Amigurumi Pattern step 3 Chubby Cat Pillow Amigurumi Pattern step 4

Switch Things Up

I’ve always been a fan of functional amigurumi, and this cat pillow is the perfect example of why. There is something so rewarding about making a toy that isn’t just for display but actually gets used for naps! When I first started working with this plush yarn, I was a bit intimidated by how hidden the stitches can get, but you quickly develop a feel for it.

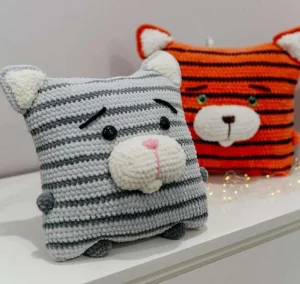
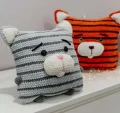
One thing I love to do with this pattern is play around with the colors. While the gray stripes are classic, I’ve seen versions in bright oranges or even soft pastels that look absolutely darling. If you want to make it even more special, you could try using a variegated yarn for the stripes to get a cool, mottled effect.

Don’t rush the assembly phase! Taking the time to pin the snout and eyes properly makes a world of difference. I usually spend a good twenty minutes just moving the pins around until the cat looks back at me with just the right amount of personality. It is those little details that turn a pile of crochet into a character with a soul. I hope you enjoy every single stitch of this big guy!

Common Mistakes & How to Fix Them

✗ When sewing the top and bottom closed, make sure your stripes align perfectly across the seam or the cat will look a bit lopsided from the side.✗ If you do not stuff the corners of the pillow firmly enough, the ears will not have a solid base and might flop over instead of standing tall.✗ The snout shaping uses hdc and dc in Round 6; if you miss these taller stitches, the nose will not have those cute, rounded 'cheek' shapes.✗ Be careful with the eye placement—if they are not exactly 11 stitches apart, the cat's expression changes from sleepy to slightly confused.

Chubby Cat Pillow Amigurumi Pattern

This squishy kitty is basically a giant hug in yarn form! I designed this pattern to be super snuggly, using plush yarn that makes every stitch feel like a soft cloud. You will love how quickly it comes together as a statement piece for your couch or a sweet gift for a little one. It is the perfect blend of a cuddly toy and a functional pillow.

Intermediate 5-7 Hours

Materials Needed for Chubby Cat Pillow Amigurumi Pattern

— Main Fabric

  • 01
    Two skeins of super bulky plush yarn in light gray (approx. 240 meters total)
  • 02
    One skein of super bulky plush yarn in a darker gray for the stripes
  • 03
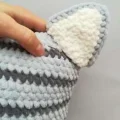
    One skein of white plush yarn for the snout and inner ears
  • 04
    Small amount of pink plush or cotton yarn for the nose detail
  • 05
    Scrap amount of black yarn for the embroidered eyebrows
  • 06
    Small amount of dark brown plush yarn for the paws

— Tools Required

  • 01
    3.5mm crochet hook (or size needed to get a tight fabric)
  • 02
    High-quality polyester fiberfill for a squishy finish
  • 03
    Two 22mm black safety eyes or large black buttons
  • 04
    Large-eye yarn needle for assembly and embroidery
  • 05
    Stitch markers to track the start of your rounds
  • 06
    Sharp scissors

Progress Tracker

0% Complete

— 1. Main Body (Pillow) :

Round 1 :

Using light gray yarn, start by making 90 ch and joining to the first loop with a sl st to create a large circle.

Round 2-3 :

Work 90 sc around the circle in light gray (90).

Round 4 :

Switch to the darker gray yarn and work 90 sc around (90).

Round 5-7 :

Change back to light gray and work 90 sc for each of the next three rounds (90).

Round 8 :

Switch to dark gray and work 90 sc (90).

Round 9-11 :

Using light gray, work 90 sc for each of these three rounds (90).

Round 12 :

Switch to dark gray and work 90 sc (90).

Round 13-15 :

Using light gray, work 90 sc for each of these three rounds (90).

Round 16 :

Switch to dark gray and work 90 sc (90).

Round 17-19 :

Using light gray, work 90 sc for each of these three rounds (90).

Round 20 :

Switch to dark gray and work 90 sc (90).

Round 21-23 :

Using light gray, work 90 sc for each of these three rounds (90).

Round 24 :

Switch to dark gray and work 90 sc (90).

Round 25-27 :

Using light gray, work 90 sc for each of these three rounds (90).

Round 28 :

Switch to dark gray and work 90 sc (90).

Round 29-31 :

Using light gray, work 90 sc for each of these three rounds (90).

Round 32 :

Switch to dark gray and work 90 sc (90).

Round 33-35 :

Using light gray, work 90 sc for each of these three rounds (90).

Round 36 :

Switch to dark gray and work 90 sc (90).

Round 37-39 :

Using light gray, work 90 sc for each of these three rounds (90).

Info :

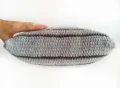
Leave a very long tail for assembly. Sew the top edge of the pillow closed. Stuff the body firmly and evenly, ensuring the corners are well-filled. Sew the bottom edge closed and hide all yarn tails inside.

— 2. Inner Ear (Make 2) :

Row 1 :

Using white yarn, make 11 ch.

Row 2 :

Starting in the 2nd ch from the hook, work 10 sc, then 1 ch and turn (10).

Row 3 :

Work 1 dec, 6 sc, 1 dec, then 1 ch and turn (8).

Row 4 :

Work 1 dec, 4 sc, 1 dec, then 1 ch and turn (6).

Row 5 :

Work 1 dec, 2 sc, 1 dec, then 1 ch and turn (4).

Row 6 :

Work 2 dec, then 1 ch and turn (2).

Row 7 :

Work 1 dec (1).

Border :

Crochet around the triangle: work 7 sc down the side, 1 inc in the bottom corner, 8 sc across the base, 1 inc in the other corner, then 8 sc back up the side and finish with a sl st. Cut yarn.

— 3. Outer Ear (Make 2) :

Row 1-7 :

Repeat the instructions for Rows 1 through 7 of the Inner Ear using light gray yarn.

Border :

Repeat the border instructions from the Inner Ear using light gray yarn, but do not cut the yarn yet.

Assembly :

Place one white piece and one light gray piece together. Using light gray yarn, crochet them together starting from the bottom corner: 10 sc, 1 inc in the top corner, 1 inc, then 10 sc down the other side. Leave a tail for sewing.

— 4. Snout :

Round 1 :

Using white yarn, make 14 ch.

Round 2 :

Starting in the 2nd loop from the hook, work 12 sc, then 3 sc into the last loop. Continue along the other side of the ch with 12 sc (27).

Round 3 :

Work 3 sc into the first loop, 12 sc, followed by 3 inc, then 12 sc (33).

Round 4 :

Work 3 inc, 13 sc, 1 inc, 1 sc, 1 inc, 1 sc, 1 inc, then 12 sc (39).

Round 5 :

Work 1 sc, 1 inc, 1 sc, 1 inc, 1 sc, 1 inc, 13 sc, 1 inc, 2 sc, 1 inc, 2 sc, 1 inc, then 13 sc (45).

Round 6 :

Work 8 sc, 1 hdc, 5 x 1 dc, 1 hdc, 1 sc, 1 hdc, 5 x 1 dc, 1 hdc, then 22 sc (45).

Round 7 :

Work 10 sc, 1 inc, 10 sc, 1 inc, then 23 sc (45).

Info :

Fasten off, leaving a long tail for sewing.

— 5. Lip :

Round 1 :

Using white yarn, work 6 sc into a MR (6).

Round 2 :

Work 6 inc around (12).

Info :

Fold the circle in half and sew the edges together using 6 sc. Leave a tail for sewing.

— 6. Legs (Make 2) :

Round 1 :

Using dark brown yarn, work 6 sc into a MR (6).

Round 2 :

Work 6 inc around (12).

Round 3 :

Work (1 sc, 1 inc) repeated 6 times (18).

Round 4 :

Work 18 sc around (18).

Info :

Fasten off and leave a tail for sewing.

— 7. Arms (Make 2) :

Round 1 :

Using dark brown yarn, work 6 sc into a MR (6).

Round 2 :

Work 6 inc around (12).

Round 3 :

Work 12 sc around (12).

Info :

Fasten off and leave a tail for sewing.

Assembly Instructions

  • After finishing the main body, sew the top edge closed using a mattress stitch for a clean finish.
  • Stuff the body very firmly, paying extra attention to the corners, then sew the bottom edge shut.
  • Pin the white snout between rounds 12 and 22 of the body, then sew it in place while adding a bit of stuffing behind it.
  • Attach the ears to the top corners of the pillow, ensuring the pillow's corner sits snugly inside the ear's opening.
  • Position the arms on the sides between rounds 11 and 15, then sew the legs to the bottom edge.
  • Secure the 22mm eyes between rounds 24 and 25, leaving a gap of 11 stitches between them for the perfect face.
  • Use pink yarn to stitch a vertical line on the snout and black yarn for the slanted eyebrows to finish the expression.

Important Notes

  • 💡Plush yarn can be slippery, so use a stitch marker at the start of every round to avoid losing your place.
  • 💡When sewing the pieces together, use a strong cotton thread if you find the plush yarn breaks too easily when pulled tight.
  • 💡To get the cleanest stripes, finish the last stitch of a color with the new color for a seamless transition.
  • 💡Don't be afraid to over-stuff the snout slightly; it needs to be firm to hold its shape against the flat face of the pillow.

I honestly can't wait for you to feel how soft this kitty is once it is finished! It is one of those projects that brings a smile to your face every time you see it sitting on your bed. Don't worry if your embroidery isn't perfect—it just gives your cat a unique little personality. Happy crocheting, and I hope your new feline friend brings you lots of cozy snuggles! 🧶✨
You ask,

we answer.

FAQs

Can I use regular worsted weight yarn instead of plush yarn?

You definitely can, but your pillow will turn out much smaller and less 'squishy.' You would likely need to double the yarn or adjust the stitch counts to get a full-sized pillow.

What is the best way to clean this pillow once it is finished?

Since it is made with plush yarn and fiberfill, I recommend spot cleaning with a damp cloth or hand washing gently and air drying to keep the fluffiness intact.

Is the color changing difficult for a beginner?

Not at all! You just pull the new color through the last two loops of the previous stitch. Just keep an eye on your tension so the stripes stay even across the body.

My snout looks different than the picture, what did I do wrong?

Check Round 6 of the snout section. That round uses hdc and dc stitches to create height for the cheeks—if you used sc by mistake, it will look flat instead of rounded.