About This Sloth Stacking Toy Amigurumi Pattern
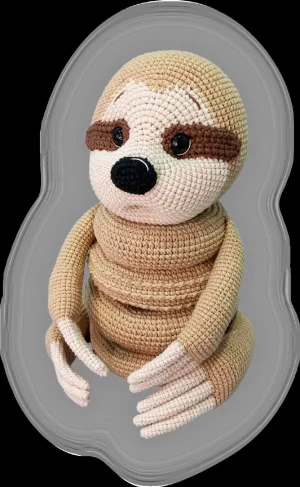
This project is the ultimate baby shower gift—it's a toy that grows with the child, moving from a cuddly friend to a developmental stacking puzzle that looks great on any shelf.
Ideal for those with basic crocheting experience, featuring slightly more advanced stitches and techniques to expand your skills.
Requires 8-10 hours, ideal for a full day of immersive crocheting.
Playful characters full of personality, designed to spark imagination and become cherished playtime favorites.
This project is the ultimate baby shower gift—it's a toy that grows with the child, moving from a cuddly friend to a developmental stacking puzzle that looks great on any shelf.
I honestly fell in love with the way the rings create that chunky, lovable sloth body. There's something so satisfying about seeing the little guy come together piece by piece, and the crab stitch edging on the rings gives it such a professional, tactile finish. It's a project that keeps you engaged with different shapes and techniques.
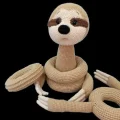
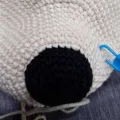
I’ve always had a soft spot for sloths, but making one into a stacking toy? That was a total lightbulb moment for me. There’s a rhythmic quality to working on the rings that I find so meditative. You can just put on a podcast and let your hands do the work. One thing I discovered while making my first one: the color choice really sets the mood. While the classic beige is timeless, I’ve seen some makers try a soft mint or a muted blue for the rings, and it looks stunning in a modern nursery.
When you get to the claws, don't be intimidated by the 1.5mm hook. It’s small, yes, but it gives those claws the perfect 'toenail' look that makes the sloth so realistic. My biggest tip for the assembly is to pin everything—and I mean everything—before you pick up your sewing needle. Because the body is made of rings, the alignment of the head and arms is what really gives him that 'sloth-like' posture. If you’re making this for a very young baby, definitely skip the plastic eyes and embroider some sleepy closed lids instead. It adds to the charm and keeps it super safe for little hands!
This sweet little sloth isn't just a plushie; he's a clever stacking toy that's as fun to play with as he is to make. I love how his long, lazy arms and legs give him so much personality. Whether you're making this for a nursery or a curious toddler, the sensory rings and soft textures make it a project you'll be proud to finish. It’s a wonderful way to combine a classic amigurumi look with an interactive, developmental element that kids will adore.
Using beige yarn, work 6 sc into a MR (6)
Work 6 inc around (12)
Work 12 sc (12)
Repeat (1 sc, inc) 6 times (18)
Work 18 sc (18)
Repeat (2 sc, inc) 6 times (24)
Work 24 sc (24)
Repeat (3 sc, inc) 6 times (30)
Work 30 sc (30)
Repeat (4 sc, inc) 6 times (36)
Work 36 sc (36)
Repeat (5 sc, inc) 6 times (42)
Work 42 sc (42)
Repeat (6 sc, inc) 6 times (48)
Work 48 sc (48)
Repeat (7 sc, inc) 6 times (54)
Work 54 sc (54)
Repeat (8 sc, inc) 6 times (60)
Working in FLO, repeat (9 sc, inc) 6 times (66)
5 sc, inc, (10 sc, inc) 5 times, 5 sc (72)
Repeat (11 sc, inc) 6 times (78)
6 sc, inc, (12 sc, inc) 5 times, 6 sc (84)
Repeat (13 sc, inc) 6 times (90)
7 sc, inc, (14 sc, inc) 5 times, 7 sc (96)
Repeat (15 sc, inc) 6 times (102)
8 sc, inc, (16 sc, inc) 5 times, 8 sc (108)
Repeat (17 sc, inc) 6 times (114)
Work 114 sc (114)
Repeat (17 sc, dec) 6 times (108)
8 sc, dec, (16 sc, dec) 5 times, 8 sc (102)
Repeat (15 sc, dec) 6 times (96)
7 sc, dec, (14 sc, dec) 5 times, 7 sc (90)
Repeat (13 sc, dec) 6 times (84)
6 sc, dec, (12 sc, dec) 5 times, 6 sc (78)
Repeat (11 sc, dec) 6 times (72)
5 sc, dec, (10 sc, dec) 5 times, 5 sc (66)
Repeat (9 sc, dec) 6 times (60)
Join R71 to the BLO of R47 using 60 sc. Stuff the base as you go (60)
Repeat (8 sc, dec) 6 times (54)
Repeat (7 sc, dec) 6 times (48)
Repeat (6 sc, dec) 6 times (42)
Repeat (5 sc, dec) 6 times (36)
Repeat (4 sc, dec) 6 times (30)
Repeat (3 sc, dec) 6 times (24)
Repeat (2 sc, dec) 6 times (18)
Repeat (1 sc, dec) 6 times (12)
Work 6 dec (6). Fasten off and weave in the end.
Using ivory yarn and a 1.5 mm hook, create three claws for each leg. One will be slightly longer.
Work 6 sc in a MR (6)
Work 6 sc (6)
Work 1 inc, then 5 sc (7)
Work 7 sc (7)
Work 1 sc, 1 inc, 5 sc (8)
Work 8 sc (8)
Work 2 sc, 1 inc, 5 sc (9)
Work 9 sc (9). Fasten off.
Make two. Work 6 sc in a MR (6)
Work 6 sc (6)
Work 1 inc, 5 sc (7)
Work 7 sc (7)
Work 1 sc, 1 inc, 5 sc (8)
Work 8 sc (8)
Work 2 sc, 1 inc, 5 sc (9)
Work 9 sc (9). Fasten off the first one. Keep the second one attached to change colors.
Switch to beige yarn and a 3 mm hook. Join the three claws together.
Work 9 sc around the first short claw, 5 sc on the long claw, 9 sc on the second short claw, and 4 sc on the long claw (27)
9 sc, inc, 3 sc, inc, 10 sc, inc, 2 sc (30)
Work 30 sc (30)
9 sc, dec, (3 sc, dec) 2 times, 4 sc, inc, (1 sc, inc) 2 times (30)
23 sc, then 7 sl st in BLO (30)
Work 30 sc (30)
Repeat (3 sc, dec) 6 times (24)
Work 24 sc (24)
Repeat (2 sc, dec) 6 times (18)
Stuff 3/4 of the leg. Work 5 sc, turn and fold flat. Close with 9 sc through both layers.
Using beige, 6 sc in MR (6)
6 inc (12)
12 sc (12)
Repeat (1 sc, inc) 6 times (18)
18 sc (18)
Repeat (2 sc, inc) 6 times (24)
24 sc (24)
Repeat (3 sc, inc) 6 times (30)
Work 30 sc (30)
In BLO, repeat (3 sc, dec) 6 times (24)
Repeat (2 sc, dec) 6 times (18). Stuff now.
Repeat (1 sc, dec) 6 times (12)
Work 6 dec (6). Fasten off, leaving a tail for assembly.
With beige, ch 60 and join with a sl st to form a ring (60)
Repeat (9 sc, inc) 6 times (66)
5 sc, inc, (10 sc, inc) 5 times, 5 sc (72)
Repeat (11 sc, inc) 6 times (78)
6 sc, inc, (12 sc, inc) 5 times, 6 sc (84)
Repeat (13 sc, inc) 6 times (90)
7 sc, inc, (14 sc, inc) 5 times, 7 sc (96)
Repeat (15 sc, inc) 6 times (102)
Work 102 sc (102)
Work 102 sc in BLO (102)
Work 102 sc (102)
Repeat (15 sc, dec) 6 times (96)
7 sc, dec, (14 sc, dec) 5 times, 7 sc (90)
Repeat (13 sc, dec) 6 times (84)
6 sc, dec, (12 sc, dec) 5 times, 6 sc (78)
Repeat (11 sc, dec) 6 times (72)
5 sc, dec, (10 sc, dec) 5 times, 5 sc (66)
Repeat (9 sc, dec) 6 times (60). Sew R22 to R1, stuffing as you go.
Using gray yarn (or beige), ch 48 and join with a sl st (48)
Repeat (7 sc, inc) 6 times (54)
4 sc, inc, (8 sc, inc) 5 times, 4 sc (60)
Repeat (9 sc, inc) 6 times (66)
5 sc, inc, (10 sc, inc) 5 times, 5 sc (72)
Repeat (11 sc, inc) 6 times (78)
6 sc, inc, (12 sc, inc) 5 times, 6 sc (84)
Repeat (13 sc, inc) 6 times (90)
Work 90 sc (90)
Work 90 sc in BLO (90)
Work 90 sc (90)
Work 90 sc in BLO (90)
Work 90 sc (90)
Work 90 sc in BLO (90)
Work 90 sc (90)
Repeat (13 sc, dec) 6 times (84)
6 sc, dec, (12 sc, dec) 5 times, 6 sc (78)
Repeat (11 sc, dec) 6 times (72)
5 sc, dec, (10 sc, dec) 5 times, 5 sc (66)
Repeat (9 sc, dec) 6 times (60)
4 sc, dec, (8 sc, dec) 5 times, 4 sc (54)
Repeat (7 sc, dec) 6 times (48). Sew R22 to R1, stuffing as you go.
To finish the edges, work a round of sl st or rev in the FLO of Rounds 10, 12, and 14.
Using ivory and 1.5 mm hook, make three claws. One long, two short.
6 sc in MR (6)
6 sc (6)
1 inc, 5 sc (7)
7 sc (7)
1 sc, inc, 5 sc (8)
8 sc (8). Fasten off.
Make two. 6 sc in MR (6)
6 sc (6)
1 inc, 5 sc (7)
7 sc (7)
1 sc, inc, 5 sc (8)
8 sc (8). Fasten off the first, keep the second attached for color change.
Switch to beige and 3 mm hook.
8 sc on first short claw, 4 sc on long claw, 8 sc on second short claw, 4 sc on long claw (24)
Work 24 sc (24)
5 sc, dec, (3 sc, dec) 2 times, 4 sc, 3 inc (24)
18 sc, then 6 sl st in BLO (24)
Work 24 sc (24)
Repeat (2 sc, dec) 6 times (18)
Work 18 sc (18)
Stuff 3/4 full. 6 sc, turn and fold flat. Close with 9 sc through both layers.
With beige, ch 36 and join with sl st (36)
Repeat (5 sc, inc) 6 times (42)
3 sc, inc, (6 sc, inc) 5 times, 3 sc (48)
Repeat (7 sc, inc) 6 times (54)
4 sc, inc, (8 sc, inc) 5 times, 4 sc (60)
Repeat (9 sc, inc) 6 times (66)
5 sc, inc, (10 sc, inc) 5 times, 5 sc (72)
Repeat (11 sc, inc) 6 times (78)
Work 78 sc (78)
Repeat (11 sc, dec) 6 times (72)
5 sc, dec, (10 sc, dec) 5 times, 5 sc (66)
Repeat (9 sc, dec) 6 times (60)
4 sc, dec, (8 sc, dec) 5 times, 4 sc (54)
Repeat (7 sc, dec) 6 times (48)
3 sc, dec, (6 sc, dec) 5 times, 3 sc (42)
Repeat (5 sc, dec) 6 times (36). Sew R22 to R1, stuffing as you go.
Start with black yarn and 1.5 mm hook.
ch 5, turn and work around the chain (5)
1 inc, 2 sc, 2 inc in the first ch, 2 sc, 1 inc in the last ch (12)
Repeat (1 sc, inc) 6 times (18)
Repeat (2 sc, inc) 6 times (24)
Work 24 sc (24)
In BLO, repeat (2 sc, dec) 6 times (18). Stuff the nose.
Repeat (1 sc, dec) 6 times (12). Fasten off and close the hole.
Switch to ivory yarn and 3 mm hook. Work in the FLO of Nose Round 6.
Repeat (3 sc, inc) 6 times (30)
Work 30 sc (30)
Repeat (4 sc, inc) 6 times (36)
Repeat (5 sc, inc) 6 times (42)
Repeat (6 sc, inc) 6 times (48)
Repeat (7 sc, inc) 6 times (54)
Repeat (8 sc, inc) 6 times (60)
6 sc, 6 inc, 48 sc (66)
Work 66 sc (66)
6 sc, (1 sc, inc) 6 times, 48 sc (72)
Work 72 sc (72)
14 sc, change to beige and work 3 sc, back to ivory for 55 sc (72)
6 sc, (2 sc, inc) 2 times, beige 1 sc, inc, 2 sc, inc, ivory (2 sc, inc) 2 times, 48 sc (78)
13 sc, change to beige 11 sc, back to ivory 54 sc (78). Change to beige for the rest of the head.
Repeat (12 sc, inc) 6 times (84)
Repeat (13 sc, inc) 6 times (90)
Repeat (14 sc, inc) 6 times (96)
62 sc, ch 18, skip 18 sc, 16 sc (96)
Work 96 sc (96)
Repeat (14 sc, dec) 6 times (90)
Repeat (13 sc, dec) 6 times (84)
Repeat (12 sc, dec) 6 times (78)
Repeat (11 sc, dec) 6 times (72)
Repeat (10 sc, dec) 6 times (66)
Repeat (9 sc, dec) 6 times (60)
Repeat (8 sc, dec) 6 times (54)
Repeat (7 sc, dec) 6 times (48)
Repeat (6 sc, dec) 6 times (42)
Repeat (5 sc, dec) 6 times (36)
Repeat (4 sc, dec) 6 times (30)
Repeat (3 sc, dec) 6 times (24)
Repeat (2 sc, dec) 6 times (18)
Repeat (1 sc, dec) 6 times (12)
6 dec (6). Fasten off.
Make two using brown yarn.
ch 11, turn and work around (11)
9 sc, 3 sc in the first ch, 8 sc, 1 inc (22)
1 inc, 8 sc, 3 inc, 8 sc, 2 inc (28). Leave a tail for sewing.
After eyes and patches are on, stuff the head and work in the hole between R26-27.
In BLO, work 36 sc (36)
Work 36 sc (36)
Repeat (4 sc, dec) 6 times (30)
Work 30 sc (30)
Repeat (3 sc, dec) 6 times (24)
Work 24 sc (24)
Repeat (2 sc, dec) 6 times (18)
Work 18 sc (18)
Repeat (1 sc, dec) 6 times (12)
6 dec (6). Fasten off.
I can't wait for you to see this little guy finished! There’s something so rewarding about a project that’s both a toy and a piece of decor. Don’t worry if the claw assembly feels a bit fiddly at first—just take your time and use those tweezers for the stuffing. Once he’s all stacked up with his lazy arms draped over the rings, he’s absolutely irresistible. Happy hooking, and I hope this sloth brings a lot of joy to whoever receives him! 🧶✨
Yes, but it will change the size of the toy. If you use a thicker yarn like worsted weight, the sloth will be significantly larger and you'll need to increase your hook size accordingly.
It's optional but highly recommended! It adds a lovely textured ridge that helps the rings sit nicely against each other and provides a great sensory feel for babies.
Instead of using plastic safety eyes, I recommend embroidering the eyes with black yarn. This eliminates any choking hazards for very young children.
This usually happens if the stuffing isn't distributed evenly or if the bottom wasn't flattened enough. Try removing some stuffing, reshaping the base, and refilling it firmly.
Tweezers or the back of a small crochet hook are your best friends here. Use tiny bits of stuffing at a time to avoid lumps.
