About This Majestic Water Creature Amigurumi Pattern
This piece is the ultimate showstopper for your collection. Its complex silhouette and layered textures make it look like a high-end boutique find rather than a DIY project.
Designed for experienced crocheters, these patterns involve intricate designs and complex techniques to challenge and inspire.
A 10-12 hour project—great for savoring the process over several sessions.
Playful characters full of personality, designed to spark imagination and become cherished playtime favorites.
This piece is the ultimate showstopper for your collection. Its complex silhouette and layered textures make it look like a high-end boutique find rather than a DIY project.
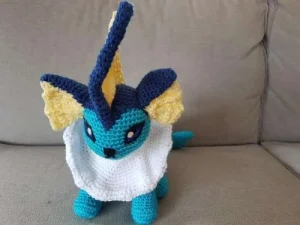
I honestly love how this pattern isn't just a simple tube; the way the slip stitches shape the back legs and the specific increases form the snout feels like magic. It is one of those projects where you can really see your skills growing with every section. Plus, the final assembly of the fins and collar is so rewarding—it’s like the character finally wakes up once you add those finishing touches!

There is something truly meditative about working on a large-scale amigurumi like this. I remember the first time I tackled a pattern with this many separate pieces; I was a bit intimidated by the assembly, but honestly, that’s where the character really comes to life!
One thing I love to do with this specific design is to play with the colors. While the classic blues are iconic, I’ve seen some makers try a 'shiny' version with purples and pinks, and it looks absolutely ethereal. If you find the collar a bit fiddly, just take your time with the white and blue layering—getting those scalloped edges aligned makes a world of difference.
When you get to the back legs, don't worry if they look a bit wonky while you're crocheting the slip-stitch rounds. Those stitches are intentionally creating a 'hinge' effect that allows the leg to sit in that classic crouched position. It’s a clever bit of crochet engineering! I always suggest saving the facial embroidery for the very last step. Once the fins are on, you’ll have a much better idea of where the eyes should sit to give it that perfect, curious expression. Enjoy the process, and don't rush—the best plushies are made with patience!
Happy hooking, friends!
If you have a soft spot for aquatic-inspired companions, you are going to fall in love with this project. This pattern helps you create a stunning, multi-toned creature that looks like it just hopped out of a magical spring. It is a substantial build with plenty of character, featuring an intricate collar and beautiful fin details that really bring your work to life. You will enjoy the challenge of the shaping and the satisfaction of seeing all those separate pieces come together into one impressive plush.
ch2, work 6 sc into the second ch from your hook (6)
Work 1 inc in every stitch around (12)
Repeat [1 inc, 1 sc] 6 times (18)
Repeat [1 inc, 2 sc] 6 times (24)
Repeat [1 inc, 3 sc] 6 times (30)
Repeat [1 inc, 4 sc] 6 times (36)
Repeat [1 inc, 5 sc] 6 times (42)
Repeat [1 inc, 6 sc] 6 times (48)
Work 1 sc in each stitch around (48)
42 sc, 1 inc, 5 sc (49)
42 sc, 2 inc, 5 sc (51)
44 sc, 3 inc, 4 sc (54)
Repeat [1 dec, 7 sc] 6 times (48)
Repeat [1 dec, 6 sc] 6 times (42)
Repeat [1 dec, 5 sc] 6 times (36)
Repeat [1 dec, 4 sc] 6 times (30)
Repeat [1 dec, 3 sc] 6 times (24)
Stuff the head firmly, ensuring the protruding nose shape is defined.
Repeat [1 dec, 2 sc] 6 times (18)
Repeat [1 dec, 1 sc] 6 times (12)
Work 6 dec (6)
Fasten off, sew the opening shut, and leave a long length for attaching to the neck.
ch2, work 6 sc into the second ch from your hook (6)
Work 1 inc in every stitch around (12)
Repeat [1 inc, 1 sc] 6 times (18)
Repeat [1 inc, 2 sc] 6 times (24)
Repeat [1 inc, 3 sc] 6 times (30)
Repeat [1 inc, 4 sc] 6 times (36)
Repeat [1 inc, 5 sc] 6 times (42)
Repeat [1 inc, 6 sc] 6 times (48)
Work 1 sc in each stitch around (48)
7 sc, ch1 and turn (7)
1 dec, 5 sc, ch1 and turn (6)
1 dec, 4 sc (5)
1 dec, 3 sc (4)
1 dec, 2 sc (3)
1 dec, 1 sc (2)
1 dec (1)
Sew this dark blue piece onto the back of the head so the pointed end faces the nose.
ch18 and join with a sl st to the first ch to form a ring. Work 1 sc in each ch around (18)
Work 1 sc in each stitch around (18)
Repeat [1 inc, 2 sc] 6 times (24)
Work 1 sc in each stitch around (24)
Fasten off and leave a long tail for sewing.
Starting at the tail: ch2, 6 sc in second ch from hook (6)
Work 1 inc in every stitch around (12)
Work 1 sc in each stitch around (12)
Repeat [1 inc, 3 sc] 3 times (15)
Work 1 sc in each stitch around (15)
Repeat [1 inc, 4 sc] 3 times (18)
Work 1 sc in each stitch around (18)
Repeat [1 inc, 5 sc] 3 times (21)
Work 1 sc in each stitch around (21)
Repeat [1 inc, 6 sc] 3 times (24)
Work 1 sc in each stitch around (24)
Repeat [1 inc, 3 sc] 6 times (30)
Work 1 sc in each stitch around (30)
Repeat [1 inc, 4 sc] 6 times (36)
12 hdc, then 24 sc (36)
Work 1 sc in each stitch around (36)
Repeat [1 inc, 5 sc] 6 times (42)
Work 1 sc in each stitch around (42)
Repeat [1 inc, 6 sc] 6 times (48)
Work 1 sc in each stitch around (48)
Repeat [1 dec, 6 sc] 6 times (42)
Repeat [1 dec, 5 sc] 6 times (36)
Repeat [1 dec, 4 sc] 6 times (30)
Repeat [1 dec, 3 sc] 6 times (24)
Repeat [1 dec, 2 sc] 6 times (18)
Repeat [1 dec, 1 sc] 6 times (12)
Work 6 dec (6)
Fasten off and sew closed. Attach the neck piece to the body.
ch27 and join with a sl st to the first ch. Work 1 sc in each ch around (27)
Work 1 sc in each stitch around (27)
Repeat [1 inc, 8 sc] 3 times (30)
Repeat [1 inc, 9 sc] 3 times (33)
Repeat [1 inc, 10 sc] 3 times (36)
Repeat [1 inc, 5 sc] 6 times (42)
Repeat [1 inc, 6 sc] 6 times (48)
Repeat [1 inc, 7 sc] 6 times (54)
Repeat [1 inc, 8 sc] 6 times (60)
Repeat [1 inc, 9 sc] 6 times (66)
Repeat [1 inc, 10 sc] 6 times (72)
Repeat [1 inc, 11 sc] 6 times (78)
Repeat [1 inc, 12 sc] 6 times (84)
Repeat [1 inc, 13 sc] 6 times (90)
Repeat [1 sc, 1 hdc, 2 dc, 1 hdc, 1 sc] 15 times (90)
Repeat [2 sc, 1 dc, ch1, 1 dc, 2 sc] 15 times (105)
ch2, 6 sc in second ch from hook (6)
Work 1 inc in every stitch around (12)
Repeat [3 inc, 3 sc] 2 times (18)
Repeat [1 inc, 1 sc] 3 times, 3 sc, then repeat [1 inc, 1 sc] 3 times, 3 sc (24)
Work in blo: 1 sc in each stitch around (24)
Work in both loops: 1 sc in each stitch around (24)
Repeat [1 dec, 1 sc] 3 times, 15 sc (21)
Repeat [1 dec, 1 sc] 3 times, 12 sc (18)
Work 1 sc in each stitch around (18)
Repeat instructions for Front Legs Rounds 1-8 (18)
Work 1 sc in each stitch around (18)
7 sl st, 9 sc, 2 sl st (18)
9 sl st, 9 sc (18)
Repeat [1 inc, 2 sc] 6 times (24)
Repeat [1 inc, 3 sc] 6 times (30)
Work 1 sc in each stitch around (30)
Repeat [1 dec, 3 sc] 6 times (24)
Repeat [1 dec, 2 sc] 6 times (18)
ch57, starting in 2nd ch from hook work 56 sc (56)
ch1 and turn. Repeat [skip 1, 5 hdc in next st, skip 1, 1 sl st] until the end of the row.
ch2, 6 sc in second ch from hook (6)
Work 1 sc in each stitch around (6)
2 inc, 4 sc (8)
Work 1 sc in each stitch around (8)
Repeat [1 inc, 1 sc] 2 times, 4 sc (10)
Repeat [1 inc, 2 sc] 2 times, 4 sc (12)
Repeat [1 inc, 3 sc] 2 times, 4 sc (14)
Repeat [1 inc, 4 sc] 2 times, 4 sc (16)
Repeat [1 inc, 5 sc] 2 times, 4 sc (18)
Work 1 sc in each stitch around (18)
Repeat [1 dec, 1 sc] 6 times (12)
Work 6 dec (6)
ch2, 6 sc in second ch from hook (6)
Work 1 sc in each stitch around (6)
Repeat [1 inc, 1 sc] 3 times (9)
Work 1 sc in each stitch around (9)
Repeat [1 inc, 2 sc] 3 times (12)
Work 1 sc in each stitch around (12)
Repeat [1 inc, 3 sc] 3 times (15)
Work 1 sc in each stitch around (15)
ch4, starting in 2nd ch from hook work 3 sc (3)
ch1 and turn, work 3 inc (6)
ch1 and turn, 6 sc (6)
ch1 and turn, repeat [1 inc, 1 sc] 3 times (9)
ch1 and turn, 9 sc (9)
ch2 and turn, 1 dc, 2 sc, 1 tc, ch1, 2 sc, 1 tc, ch1, then work [1 inc and 1 tc] in the final stitch.
ch14, starting in 2nd ch from hook work 13 sc (13)
ch1 and turn, 11 sc, 1 dec (12)
ch1 and turn, 10 sc, 1 dec (11)
ch1 and turn, 11 sc (11)
ch1 and turn, 9 sc, 1 dec (10)
ch1 and turn, 10 sc (10)
ch1 and turn, 1 dec, 8 sc (9)
ch1 and turn, 9 sc (9)
ch1 and turn, 8 sc, 1 inc (10)
ch1 and turn, 10 sc (10)
ch1 and turn, 1 dec, 6 sc, 1 dec (8)
ch1 and turn, 8 sc (8)
Row 14 is omitted in the original pattern; continue directly to Row 15.
ch1 and turn, 1 dec, 6 sc (7)
ch1 and turn, 1 dec, 3 sc, 1 dec (5)
ch1 and turn, 5 sc (5)
ch1 and turn, 1 dec, 1 sc, 1 dec (3)
ch1 and turn, 3 sc (3)
ch1 and turn, sc3tog (1)
ch2, 6 sc in second ch from hook (6)
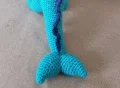
Continue working 6 sc in the round until the tube is long enough to fit along the front edge of the yellow fin.
I hope you enjoy every stitch of this magical water creature! It is truly a labor of love, but once you see that majestic collar and those elegant fins all assembled, you'll know it was worth every hour spent. This project is a fantastic way to practice shaping and multi-part assembly. Don't forget to share your finished photos with the community — there's nothing I love more than seeing your unique color choices and the personality you give your handmade friends. Happy crafting, and may your tension always be perfect! 🧶 ✨ 🌊
Absolutely! Just keep in mind that using a bulky plush yarn will make the finished plush significantly larger (likely over 2 feet long) and you will need to increase your hook size accordingly.
Yes! The high number of increases in the final rounds is designed to create that ruffed, wavy effect. If it feels too stiff, try using a slightly larger hook for just the collar portion.
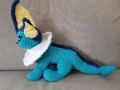
Stuff the legs very firmly, especially at the base. The placement of the back legs is key — if they are too far back, the weight of the head might make it tip forward.
I find it easiest to pin the tube along the straight edge of the yellow fin first, then use the tail from the fin tip to whipstitch them together before attaching the whole unit to the head.
