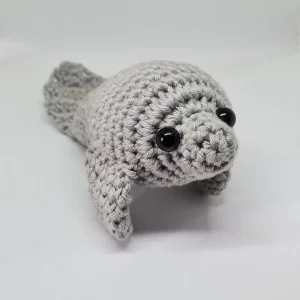
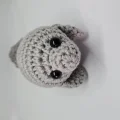
🧢 Beautiful ✨ Detailed πŸ’ Adorable

Chubby Manatee Amigurumi Pattern

Chubby Manatee Amigurumi Pattern
4.5β˜…Rating
2-3 HoursTime Needed
2.4KMade This
βœ‚οΈ

Intermediate Level

Ideal for those with basic crocheting experience, featuring slightly more advanced stitches and techniques to expand your skills.

⏱️

Quick Craft

Fits nicely into a free afternoon β€” 2 to 5 hours of focused, enjoyable crocheting.

πŸ₯

Charming Critter

Delightful animal designs with sweet details that capture the essence of your favorite woodland and farmyard friends.

About This Chubby Manatee Amigurumi Pattern

Chubby Manatee Amigurumi Pattern crochet pattern - detailed view

This little guy makes the sweetest gift for ocean lovers or a cute addition to a coastal-themed nursery shelf. He's small enough to be a keychain but chunky enough to sit on a desk and keep you company.

Why You'll Love This Chubby Manatee Amigurumi Pattern

I love how the tail is worked directly onto the bodyβ€”it saves so much sewing time, which is always a win in my book! Plus, seeing his chubby little face emerge after just a few rounds of increases is so satisfying.

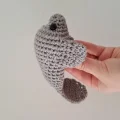
Chubby Manatee Amigurumi Pattern step 1 Chubby Manatee Amigurumi Pattern step 2 Chubby Manatee Amigurumi Pattern step 3 Chubby Manatee Amigurumi Pattern step 4

Switch Things Up

I've always had a soft spot for manateesβ€”they're basically the potatoes of the sea, aren't they? So gentle and slow-moving. When I first sat down to design this little guy, I wanted to capture that perfectly round, chubby silhouette without making the construction too complicated. One of my favorite things about this specific pattern is how the tail transitions from the round body into a flat paddle. It's a great technique to have in your back pocket for other aquatic amigurumi too!

If you're finding that your stitches look a bit loose, don't be afraid to drop down a hook size. I usually suggest a 3mm or even a 2.5mm for DK weight yarn if you're a loose crocheter. It makes the fabric much denser, which is exactly what you want so that the stuffing doesn't start peeking through after a few hugs. I also love playing around with different shades of greyβ€”a heathered yarn gives him a really lovely, natural look, but a bright minty green manatee is just as adorable in its own way. I can't wait to see the little friends you create!

Common Mistakes & How to Fix Them

βœ— If the eyes aren't centered between the increases in Round 4, your manatee might end up looking a bit lopsided, so double-check the placement before snapping the backs on.βœ— Missing that extra stitch at the end of Round 22 will make the tail start at an angle rather than being perfectly aligned with the center of the body.βœ— Stuffing too lightly before you start the flat tail section can leave the neck area looking a bit floppy once the project is finished and handled.βœ— When slip stitching the fins closed, make sure you don't pull your stitches too tight or the flippers will curl instead of lying flat against the body.

Chubby Manatee Amigurumi Pattern

You're going to love how this little sea cow comes together. He's perfectly palm-sized and has that sweet, gentle face that just melts your heart. Whether you're making him for a nursery or just a desk buddy for yourself, this project is such a relaxing way to spend an afternoon with your yarn. He's small, squishy, and brings a little bit of the ocean right to your crochet hook.

Intermediate 2-3 Hours

Materials Needed for Chubby Manatee Amigurumi Pattern

β€” Main Fabric

  • 01
    Grey DK weight cotton yarn (though any fiber will work beautifully)
  • 02
    Small amount of polyester fiberfill for a squishy finish

β€” Tools Required

  • 01
    4mm crochet hook (or a 3mm hook if you want tighter amigurumi stitches)
  • 02
    Two safety eyes (8mm or 9mm sizes work great for DK yarn)
  • 03
    Darning needle for weaving in ends and attaching the fins
  • 04
    Scissors
  • 05
    Stitch markers to keep track of your rounds

Progress Tracker

0% Complete

β€” 1. Body :

Info :

Start by making a foundation. You can use a magic ring or ch 2 and work into the first st. We will be working in a continuous spiral for the main body.

Round 1 :

Work 6 sc into your starting ring or the second ch from your hook (6)

Round 2 :

Repeat a pattern of 1 sc followed by an inc around the circle 3 times (9)

Round 3 :

Work 1 sc into every st around (9)

Round 4 :

Repeat a pattern of 2 sc then an inc 3 times (12)

Round 5 :

Work 3 sc, then perform 6 inc in a row, and finish with 3 sc (18)

Round 6 :

Work 3 sc, then perform 12 inc in a row, and finish with 3 sc (30)

Round 7-9 :

Work 1 sc into every st around (30)

Info :

Now is the time to place your eyes. Position them between Rounds 3 and 4. They should be roughly 3 stitches apart and centered right in the middle of those increases you made earlier.

Round 10 :

Repeat a pattern of 13 sc and 1 dec twice (28)

Round 11 :

Work 6 sc, then a dec, followed by 12 sc, another dec, and finish with 6 sc (26)

Round 12 :

Repeat a pattern of 11 sc and 1 dec twice (24)

Round 13 :

Work 5 sc, then a dec, followed by 10 sc, another dec, and finish with 5 sc (22)

Round 14 :

Repeat a pattern of 9 sc and 1 dec twice (20)

Round 15 :

Work 4 sc, then a dec, followed by 8 sc, another dec, and finish with 4 sc (18)

Round 16-17 :

Work 1 sc into every st around (18)

Round 18 :

Repeat a pattern of 7 sc and 1 dec twice (16)

Round 19 :

Work 1 sc into every st around (16)

Info :

Start stuffing your manatee firmly now and continue as you finish the body.

Round 20 :

Work 3 sc, then a dec, followed by 6 sc, another dec, and finish with 3 sc (14)

Round 21 :

Work 1 sc into every st around (14)

Round 22 :

Repeat a pattern of 5 sc and 1 dec twice (12)

Round 23 :

Work 12 sc around, then add 1 more extra sc to ensure you are positioned at the side edge of the body.

Row 24 :

Make sure the body is stuffed well. Flatten the opening and ss through both layers across to close the gap (6). ch 1 and turn your work.

Row 25 :

Work an inc in the first st, 4 sc across, and an inc in the last st (8). ch 1 and turn.

Row 26 :

Work 1 sc into every st across (8). ch 1 and turn.

Row 27 :

Work an inc in the first st, 6 sc across, and an inc in the last st (10). ch 1 and turn.

Row 28-29 :

Work 1 sc into every st across (10). ch 1 and turn.

Row 30 :

Work 1 sc, then a dec, followed by 4 sc, another dec, and finish with 1 sc (8). ch 1 and turn.

Row 31 :

Work 1 sc, then a dec, followed by 2 sc, another dec, and finish with 1 sc (6). ch 1 and turn.

Row 32 :

Work 1 sc, then perform 2 dec in a row, and finish with 1 sc (4). ch 1 and turn.

Row 33 :

Work 1 sc into every st across (4). fo and hide your yarn tail inside the body.

β€” 2. Fins :

Info :

You will need to make two of these flippers.

Round 1 :

Create a ring and work 6 sc into it (6)

Round 2 :

Work an inc into every st around (12)

Round 3-6 :

Work 1 sc into every st around (12)

Round 7 :

Hold the fin flat and ss through both layers to close the edge (6). fo and leave a long tail for sewing.

Assembly Instructions

  • Place your safety eyes between Rounds 3 and 4, keeping them about 3 stitches apart and centered between the increases.
  • Stuff the head and body firmly as you go, making sure to fill the body before you reach the tail section.
  • To start the tail, flatten the end of the body and work a row of slip stitches through both layers to seal it shut.
  • Sew the two fins to the sides of the body, positioning them slightly below the midline to give him a realistic look.
  • Fasten off all yarn and use a darning needle to weave in the ends so they are completely hidden inside the stuffing.

Important Notes

  • πŸ’‘Choose a hook size slightly smaller than what your yarn recommends to keep the stuffing from peeking through.
  • πŸ’‘You can start with a magic ring if you prefer that over the chain 2 method.
  • πŸ’‘The tail is worked in rows after Round 23, so remember to turn your work after each row.
  • πŸ’‘Feel free to swap the grey for a soft blue or mint green for a more whimsical sea creature.

There is something so satisfying about finishing a project that fits right in the palm of your hand. This manatee is the perfect companion for those quiet moments when you just want to create something cute without a massive time commitment. I love how he looks in different yarn weights, tooβ€”try him in a bulky chenille for a giant, squishy version! I hope he brings a little bit of ocean magic to your day and puts a smile on your face every time you see him. Happy hooking! 🧢✨

You ask,

we answer.

FAQs

Can I use plush yarn for this pattern?

Absolutely! Just remember to use a larger hook (like a 5mm or 5.5mm) and your manatee will turn out much bigger and extra squishy.

How do I make sure the tail is centered?

Pay close attention to that extra stitch at the end of Round 22β€”it's there specifically to shift your starting point to the very edge of the body.

What size safety eyes should I use?

For DK weight yarn, 8mm or 9mm eyes usually look best, but you can go bigger if you want a more 'kawaii' look.

Is this pattern worked in continuous rounds?

The body is worked in a spiral up until the tail section, where you'll switch to working in flat rows and turning your work.