About This Citrus Slice Crochet Coasters Pattern
These make such a thoughtful handmade gift — tuck a set of six into a little basket and you've got something way more personal than anything from a shop.
Perfect for those just starting their crocheting journey, with clear instructions and simple techniques
Fits nicely into a free afternoon — 2 to 5 hours of focused, enjoyable crocheting.
A warm touch for your space that transforms ordinary corners into inviting nooks filled with handmade charm.
These make such a thoughtful handmade gift — tuck a set of six into a little basket and you've got something way more personal than anything from a shop.
I genuinely reach for this pattern whenever I need something that feels productive but low-pressure. There's something almost meditative about working small increases round by round and watching a flat circle grow. And when you get to the embroidery at the end — drawing those little segment lines with back stitch — it feels like signing your name to the piece. I've made these in all three colorways and I keep them on rotation depending on my mood. The lime ones especially get compliments every single time someone comes over.

I made my first set of these on a rainy Sunday with a lukewarm cup of tea going cold next to me — which felt very on-brand for a coaster project, honestly. I'd been looking for something small and satisfying that I could actually finish in one sitting, and this hit the spot completely.
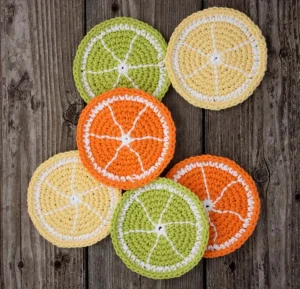
What I didn't expect was how much the color choice would change the whole personality of the finished piece. The lime green ones feel fresh and modern, the yellow ones are genuinely sunshine-y, and the orange ones look like something off a retro kitchen poster. I ended up making two of each and mixing them in a little bowl on my coffee table like a fruit basket.
The construction is so logical — each round builds directly on the last with a clear increase pattern, and by Round 5 you can already see the circle taking shape. That's the kind of pattern feedback that keeps you hooked (no apology for that pun). The color transitions at Rounds 7 and 8 feel a little fiddly the first time, but by your second or third coaster you'll barely notice them.
My favorite part is the embroidery at the end. I know some crocheters skip finishing steps, but please don't skip these segment lines — they transform a simple striped circle into something that genuinely looks like a citrus slice. I use a slightly longer length of yarn for each line so I can work with some ease without the tail pulling through mid-stitch.
If you want to play with color variations, a pink grapefruit version works beautifully — swap the Color B for a dusty rose or coral and keep the white, and you've got something that feels a little more grown-up and unexpected.
These cheerful little coasters are honestly one of those projects that just makes you smile the whole way through. They work up so fast — we're talking a single afternoon — and the result looks like a real citrus slice sitting on your table. You get to pick your citrus mood: lime green, sunny yellow, or bright orange, each one just as satisfying as the last. The color shift from the white center out to the bright rind is so simple to execute but looks so intentional and polished. Make a set of six and your kitchen instantly has a whole new personality.
Using Color A, ch 2.
Work 6 sc into the 2nd ch from your hook. At the end of the round, drop Color A and join Color B with a sl st into the first sc. Total: 6 sc.
With Color B, ch 1. Work 2 sc into every sc around. Join with sl st to first sc. Total: 12 sc.
Ch 1. *Work 1 sc in the next sc, then 2 sc in the following sc. Rep from * around. Join with sl st to first sc. Total: 18 sc.
Ch 1. *Work 2 sc in the next sc, then 1 sc in each of the following 2 sc. Rep from * around. Join with sl st to first sc. Total: 24 sc.
Ch 1. *Work 1 sc in each of the next 3 sc, then 2 sc in the next sc. Rep from * around. Join with sl st to first sc. Total: 30 sc.
Ch 1. *Work 1 sc in each of the next 2 sc, 2 sc in the next sc, then 1 sc in each of the next 2 sc. Rep from * around. Join with sl st to first sc. Total: 36 sc.
Ch 1. *Work 2 sc in the next sc, then 1 sc in each of the following 5 sc. Rep from * around. At end of round, drop Color B and join Color A with sl st to first sc. Total: 42 sc.
With Color A, ch 1. *Work 1 sc in each of the next 3 sc, 2 sc in the next sc, then 1 sc in each of the next 3 sc. Rep from * around. At end of round, join Color B with sl st to first sc. Cut Color A. Total: 48 sc.
With Color B, ch 1. *Work 1 sc in each of the next 7 sc, then 2 sc in the next sc. Rep from * around. Join with sl st to first sc. Fasten off. Total: 54 sc.
Note: One ball each of Color A and Color B is enough to crochet approximately 6 coasters. The finished coaster measures approximately 4½ inches (11.5 cm) in diameter. Gauge is 16 sc and 17 rows to 4 inches (10 cm).
Thread a tapestry needle with Color A yarn.
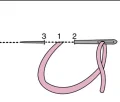
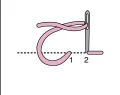
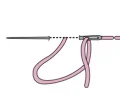
Using back stitch and Color A, embroider segment lines radiating out from the center of the coaster to the outer edge, mimicking the look of a real citrus slice. Space the lines evenly around the coaster — refer to the photo for placement guidance. Weave in all ends securely when finished.
There's something so cheerful about a set of these sitting on a kitchen counter — whether you go lime, lemon, orange, or mix all three, they bring that little pop of color that makes everyday moments feel a bit more intentional. 🍊🍋 They're genuinely fast to make, satisfying to finish, and the kind of thing people notice right away when they come over. Whip up a full set of six and you'll still have yarn left over. Happy hooking! 🧶✨
Absolutely — any worsted weight cotton will work well here. The original uses Lily Sugar'n Cream which is a standard worsted weight, so look for something with a similar yardage and fiber content. Avoid blended yarns with a lot of acrylic if you want the coasters to absorb moisture the way a good coaster should.
One ball each of Color A (white) and Color B (your citrus color) makes approximately 6 coasters. If you want a mixed citrus set with all three colors, pick up one ball of white plus one ball each of hot green, yellow, and hot orange — that gives you plenty to make 6 of each colorway.
Cupping usually means the increases weren't worked at the right frequency, or your tension is too tight. Go back and count your stitch totals at the end of each round against the numbers in the pattern — a missed increase anywhere from Round 2 through Round 6 is the most likely culprit.
The back stitch used here is one of the most basic embroidery stitches — you just work backward along a straight line, and the pattern includes a simple diagram. You can technically skip the lines, but they're what make the coasters actually look like citrus slices, so it's well worth the few minutes to do them.
Yes — cotton yarn is tough and gets softer with washing. These can handle hot mugs and cold glasses, and they're machine washable on a gentle cycle. Just reshape and dry flat after washing to keep them perfectly round.
